I started brewing my own beer more than 10 years ago. Like most homebrewers, I started in my kitchen making extract-based brews. This required the least equipment and still resulted in really tasty beer. Eventually I stepped up to all-grain brewing using a big cooler for my mash tun. For several years I was brewing 5 gallons at a time, but brewing 10 gallons takes the same amount of time and effort (and only requires slightly larger equipment), so a few years ago I stepped it up. After moving up to 10 gallons, I stumbled across StrangeBrew Elsinore and realized what I really needed to do was convert my whole system to be all-electric, and run it with a Raspberry Pi.
There is a ton of great information available for building your own all-electric homebrew system, and most brewers start out at TheElectricBrewery.com. Just putting together the control panel can get pretty complicated, although the simplest approach is outlined well there. Of course you can also take a less expensive approach and still end up with the same result—a boil kettle and hot liquor tank powered by heating elements and managed by a PID controller. I think that's a little too boring though (and it also means you don't get neat graphs of your brew process).
Hardware supplies
Before I talked myself out of the project, I decided to start buying parts. My basic design was a Hot Liquor Tank (HLT) and boil kettle with 5500w heating elements in them, plus a mash tun with a false bottom. I would use a pump to recirculate the mash through a 50' stainless coil in the HLT (a "heat exchanger recirculating mash system", known as HERMS). I would need a second pump to circulate the water in the HLT, and to help with transferring water to the mash tun. All of the electrical components would be controlled with a Raspberry Pi.
Building my electric brew system and automating as much of it as possible meant I was going to need the following:
- HLT with a 5500w electric heating element
- HERMS coil (50' 1/2" stainless steel) in the HLT
- boil kettle with a 5500w electric heating element
- multiple solid-state relays to switch the heaters on and off
- 2 high-temp food-grade pumps
- relays for switching the pumps on and off
- fittings and high-temp silicon tubing
- stainless ball valves
- 1-wire temperature probes
- lots of wire
- electrical box to hold everything
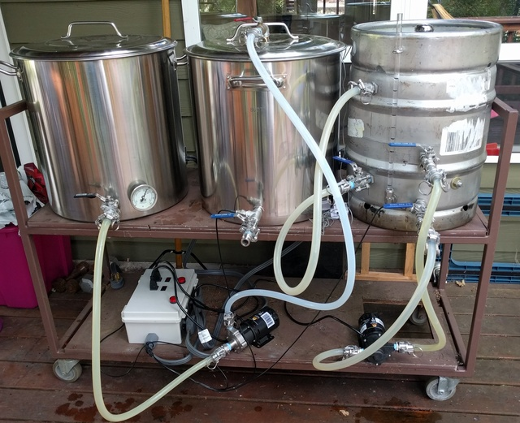
Brew system (photo by Christopher Aedo. CC BY-SA 4.0)
The details of building out the electrical side of the system are really well covered by The Electric Brewery, so I won't repeat their detailed information. You can read through and follow their suggestions while planning to replace the PID controllers with a Raspberry Pi.
One important thing to note is the solid-state relay (SSR) signal voltage. Many tutorials suggest using SSRs that need a 12-volt signal to close the circuit. The Raspberry Pi GPIO pins will only output 3v, however. Be sure to purchase relays that will trigger on 3 volts.
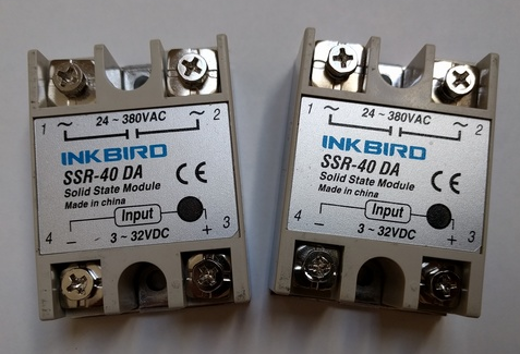
Inkbird SSR (photo by Christopher Aedo. CC BY-SA 4.0)
To run your brew system, your Pi must do two key things: sense temperature from a few different places, and turn relays on and off to control the heating elements. The Raspberry Pi easily is able to handle these tasks.
There are a few different ways to connect temp sensors to a Pi, but I've found the most convenient approach is to use the 1-Wire bus. This allows for multiple sensors to share the same wire (actually three wires), which makes it a convenient way to instrument multiple components in your brew system. If you look for waterproof DS18B20 temperature sensors online, you'll find lots of options available. I used Hilitchi DS18B20 Waterproof Temperature Sensors for my project.
To control the heating elements, the Raspberry Pi includes several General Purpose IO (GPIO) pins that are software addressable. This allows you to send 3.3v to a relay by simply putting a 1 or a 0 in a file. The Raspberry Pi—Driving a Relay using GPIO tutorial was the most helpful for me when I was first learning how all this worked. The GPIO controls multiple solid-state relays, turning on and off the heating elements as directed by the brewing software.
I first started working on the box to hold all the components. Because this would all be on a rolling cart, I wanted it to be relatively portable rather than permanently mounted. If I had a spot (for example, inside a garage, utility room, or basement), I would have used a larger electrical box mounted on the wall. Instead I found a decent-size waterproof project box that I expected I could shoehorn everything into. In the end, it turned out to be a little bit of a tight fit, but it worked out. In the bottom left corner is the Pi with a breakout board for connecting the GPIO to the 1-Wire temperature probes and the solid state relays.
To keep the 240v SSRs cool, I cut holes in the case and stacked copper shims with CPU cooling grease between them and heat sinks mounted on the outside of the box. It worked out well and there haven't been any cooling issues inside the box. On the cover I put two switches for 120v outlets, plus two 240v LEDs to show which heating element was energized. I used dryer plugs and outlets for all connections so disconnecting a kettle from everything is easy. Everything worked right on the first try, too. (Sketching a wiring diagram first definitely pays off.)
The pictures are from the "proof-of-concept" version—the final production system should have two more SSRs so that both legs of the 240v circuit would be switched. The other thing I would like to switch via software is the pumps. Right now they're controlled via physical switches on the front of the box, but they could easily be controlled with relays.
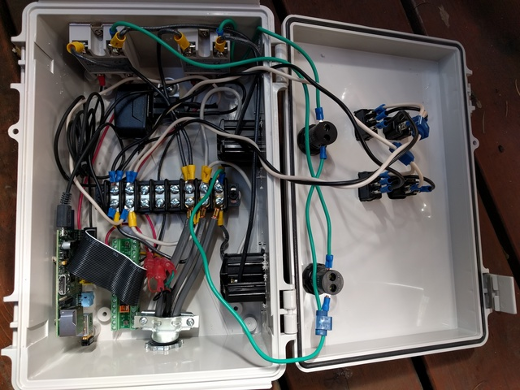
Control box (photo by Christopher Aedo. CC BY-SA 4.0)
The only other thing I needed that was a little tricky to find was a compression fitting for the temperature probes. The probes were mounted in T fittings before the valve on the lowest bulkhead in both the HLT and the mash tun. As long as the liquid is flowing past the temp sensor, it's going to be accurate. I thought about adding a thermowell into the kettles as well, but realized that's not going to be useful for me based on my brewing process. Anyway, I purchased 1/4" compression fittings and they worked out perfectly.
Software
Once the hardware was sorted out, I had time to play with the software. I ran the latest Pi OS. Nothing special is required on the operating-system side.
I started with Strangebrew Elsinore brewing software, which I had discovered when a friend asked whether I had heard of Hosehead, a Raspberry Pi-based brewing controller. I thought Hosehead looked great, but rather than buying a brewing controller, I wanted the challenge of building my own.
Setting up Strangebrew Elsinore was straightforward—the documentation was thorough and I did not encounter any problems. Even though Strangebrew Elsinore was working fine, Java seemed to be taxing my first-generation Pi sometimes, and it crashed on me more than once. I also was sad to see development stall and there did not seem to be a big community of additional contributors (although there were—and still are—plenty of people using it).
CraftBeerPi
Then I stumbled across CraftBeerPI, which is written in Python and supported by a development community of active contributors. The original author (and current maintainer) Manuel Fritsch is great about handling contributions and giving feedback on issues that folks open. Cloning the repo and getting started only took me a few minutes. The README also has a good example of connecting DS1820 temp sensors, along with notes on interfacing hardware to a Pi or a C.H.I.P. computer.
On startup, CraftBeerPi walks users through a configuration process that discovers the temperature probes available and lets you specify which GPIO pins are managing which pieces of equipment.
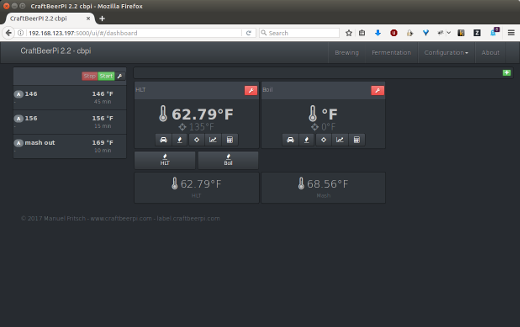
CraftBeerPi (photo by Christopher Aedo. CC BY-SA 4.0)
Running a brew with this system is easy. I can count on it holding temperatures reliably, and I can input steps for a multi-temp step mash. Using CraftBeerPi has made my brew days a little bit boring, but I'm happy to trade off the "excitement" of traditional manually managed propane burners for the efficiency and consistency of this system.
CraftBeerPI's user-friendliness inspired me to set up another controller to run a "fermentation chamber." In my case, that was a second-hand refrigerator I found for US$ 50 plus a $25 heater) on the inside. CraftBeerPI easily can control the cooling and heating elements, and you can set up multiple temperature steps. For instance, this graph shows the fermentation temperatures for a session IPA I made recently. The fermentation chamber held the fermenting wort at 67F for four days, then ramped up one degree every 12 hours until it was at 72F. That temp was held for a two-day diacetyl rest. After that it was set to drop down to 65F for five days, during which time I "dry hopped" the beer. Finally, the beer was cold-crashed down to 38F. CraftBeerPI made adding each step and letting the software manage the fermentation easy.
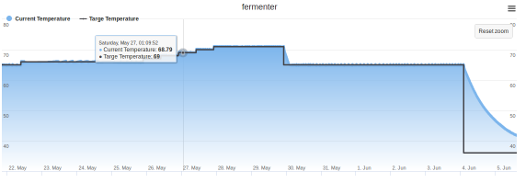
SIPA fermentation profile (photo by Christopher Aedo. CC BY-SA 4.0)
I have also been experimenting with the TILT hydrometer to monitor the gravity of the fermenting beer via a Bluetooth-connected floating sensor. There are integration plans for this to get it working with CraftBeerPI, but for now it logs the gravity to a Google spreadsheet. Once this hydrometer can talk to the fermentation controller, setting automated fermentation profiles that take action directly based on the yeast activity would be easy—rather than banking on primary fermentation completing in four days, you can set the temperature ramp to kick off after the gravity is stable for 24 hours.
As with any project like this, imaging and planning improvements and additional components is easy. Still, I'm happy with where things stand today. I've brewed a lot of beer with this setup and am hitting the expected mash efficiency every time, and the beer has been consistently tasty. My most important customer—me!—is pleased with what I've been putting on tap in my kitchen.
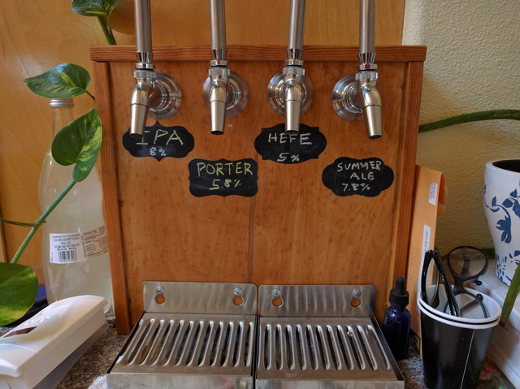
Homebrew on tap (photo by Christopher Aedo. CC BY-SA 4.0)
This article is based on Christopher's OpenWest talk, Brewing Beer with Linux, Python and a RaspberryPi. OpenWest will be held July 12-15, 2017 in Salt Lake City, Utah.


4 Comments