Since the days of papyrus, publishers have struggled with formatting data in ways that engage readers. This is a particular issue in the areas of mathematics, science, and programming, where well-designed charts, illustrations, and equations can be key to helping people understand technical information.
The Jupyter Notebook is addressing this problem by reimagining how we produce instructional texts. Jupyter (which I first learned about at All Things Open in October 2017) is an open source application that enables users to create interactive, shareable notebooks that contain live code, equations, visualizations, and text.
Jupyter evolved from the IPython Project, which features an interactive shell and a browser-based notebook with support for code, text, and mathematical expressions. Jupyter offers support for over 40 programming languages, including Python, R, and Julia, and its code can be exported to HTML, LaTeX, PDF, images, and videos or as IPython notebooks to be shared with other users.
Fun fact: "Jupyter" is an acronym for "Julia, Python, and R."
Some of its uses, according to Project Jupyter's website, include "data cleaning and transformation, numerical simulation, statistical modeling, data visualization, machine learning, and much more." Scientific institutions are using Jupyter Notebooks to explain research results. The code, which can come from actual data, can be tweaked and re-tweaked to visualize different results and scenarios. In this way, Jupyter Notebooks have become living texts and reports.
Installing and starting Jupyter
The Jupyter software is open source, licensed under the modified BSD license, and it can be installed on Linux, MacOS, or Windows. There are a number of ways to install Jupyter; I tried the PIP and the Anaconda installs on Linux and MacOS. A PIP install requires that Python is already installed on your computer; Jupyter recommends Python 3.
Since Python 3 was already installed on my computers, I installed Jupyter by running the following commands in the terminal (on Linux or Mac):
$ python3 -m pip install --upgrade pip
$ python3 -m pip install jupyter
Entering the following command at the terminal prompt started the application right away:
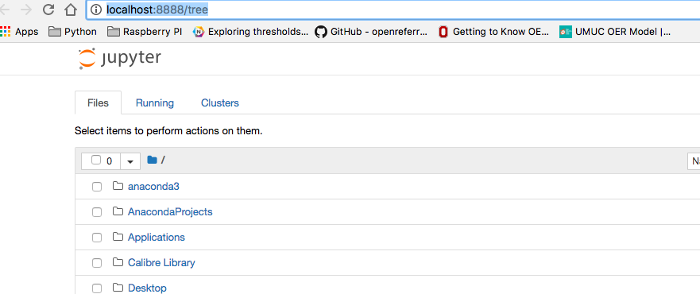
$ jupyter notebookSoon my browser opened and displayed my Jupyter Notebook server at https://localhost:8888. (Supported browsers are Google Chrome, Firefox, and Safari.)

opensource.com
There's a drop-down menu labeled "New" in the upper-right corner. It enabled me to quickly create a new notebook for my own instructions and code. Note that my new notebook defaults to Python 3, which is my current environment.

opensource.com
A new notebook with some default values, which can be changed (including the name of the notebook), opened.

opensource.com
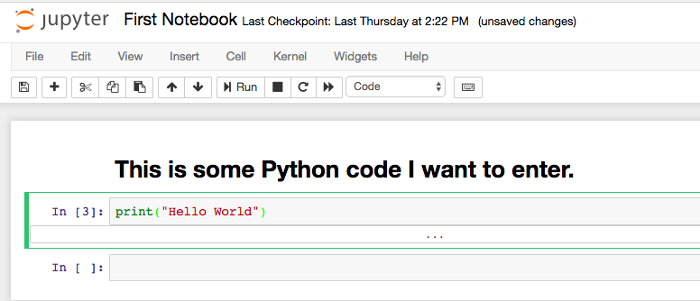
Notebooks have two different modes: Command and Edit. Command mode allows you to add or delete cells. You can enter Command mode by pressing the Escape key, and you can get into Edit mode by pressing the Enter key or by clicking in a cell.
A green highlight around a cell indicates you are in Edit mode, and a blue highlight means you're in Command mode. The following notebook is in Command mode and ready for me to execute the Python code in the cell. Note that I've changed the name of the notebook to First Notebook.

opensource.com
Using Jupyter
A strength of Jupyter Notebooks is that besides being able to enter code, you can also add Markdown with narrative and explanatory text. I wanted to add a heading, so I added a cell above my code and typed a heading in Markdown. When I pressed Ctrl+Enter, my heading converted to HTML.

opensource.com
I can add output from a Bash command or script by appending an ! to a command.

opensource.com
I can also take advantage of IPython's line magic and cell magic commands. You can list the magic commands by appending a % or %% sign to commands inside a code cell. For example, %lsmagic produces all the magic commands that can be used in Jupyter notebooks.

opensource.com
Examples of these magic commands include %pwd, which outputs the present working directory (e.g., /Users/YourName) and %ls, which lists all the files and subdirectories in the current working directory. Another magic command displays charts generated from matplotlib in the notebook. %%html renders anything in that cell as HTML, which is useful for embedding video and links. There are cell magic commands for JavaScript and Bash, also.
If you need more information about using Jupyter Notebooks and its features, the Help section is incredibly complete.
People are using Jupyter Notebooks in many interesting ways; you can find some great examples in this gallery. How are you using Jupyter notebooks? Please share your ideas in the comments below.


1 Comment