Django is the comprehensive web framework by which all other frameworks are measured. One of the most popular names in Python API development, Django has surged in popularity since its start in 2005.
Django is maintained by the Django Software Foundation and has experienced great community support, with over 11,600 members worldwide. On Stack Overflow, Django has around 191,000 tagged questions. Websites like Spotify, YouTube, and Instagram rely on Django for application and data management.
This article demonstrates a simple API to fetch data from a server using the GET method of the HTTP protocol.
Set up a project
First, create a structure for your Django application; you can do this at any location on your system:
$ mkdir myproject
$ cd myproject
Then, create a virtual environment to isolate package dependencies locally within the project directory:
$ python3 -m venv env
$ source env/bin/activate
On Windows, use the command env\Scripts\activate to activate your Python virtual environment.
Install Django and the Django REST framework
Next, install the Python modules for Django and Django REST:
$ pip3 install django
$ pip3 install djangorestframework
Instantiate a new Django project
Now that you have a work environment for your app, you must instantiate a new Django project. Unlike a minimal framework like Flask, Django includes dedicated commands for this process (note the trailing . character in the first command):
$ django-admin startproject tutorial .
$ cd tutorial
$ django-admin startapp quickstart
Django uses a database as its backend, so you should sync your database before beginning development. The database can be managed with the manage.py script that was created when you ran the django-admin command. Because you're currently in the tutorial directory, use the ../ notation to run the script, located one directory up:
$ python3 ../manage.py makemigrations
No changes detected
$ python4 ../manage.py migrate
Operations to perform:
  Apply all migrations: admin, auth, contenttypes, sessions
Running migrations:
  Applying contenttypes.0001_initial... OK
  Applying auth.0001_initial... OK
  Applying admin.0001_initial... OK
  Applying admin.0002_logentry_remove_auto_add... OK
  Applying admin.0003_logentry_add_action_flag_choices... OK
  Applying contenttypes.0002_remove_content_type_name... OK
  Applying auth.0002_alter_permission_name_max_length... OK
  Applying auth.0003_alter_user_email_max_length... OK
  Applying auth.0004_alter_user_username_opts... OK
  Applying auth.0005_alter_user_last_login_null... OK
  Applying auth.0006_require_contenttypes_0002... OK
  Applying auth.0007_alter_validators_add_error_messages... OK
  Applying auth.0008_alter_user_username_max_length... OK
  Applying auth.0009_alter_user_last_name_max_length... OK
  Applying auth.0010_alter_group_name_max_length... OK
  Applying auth.0011_update_proxy_permissions... OK
  Applying sessions.0001_initial... OK
Create users in Django
Create an initial user named admin with the example password of password123:
$ python3 ../manage.py createsuperuser \
  --email admin@example.com \
  --username admin
Create a password when you're prompted.
Implement serializers and views in Django
For Django to be able to pass information over to an HTTP GET request, the information object must be translated into valid response data. Django implements serializers for this.
In your project, define some serializers by creating a new module named quickstart/serializers.py, which you'll use for data representations:
from django.contrib.auth.models import User, Group
from rest_framework import serializers

class UserSerializer(serializers.HyperlinkedModelSerializer):
    class Meta:
        model = User
        fields = ['url', 'username', 'email', 'groups']

class GroupSerializer(serializers.HyperlinkedModelSerializer):
    class Meta:
        model = Group
        fields = ['url', 'name']
A view in Django is a function that takes a web request and returns a web response. The response can be HTML, or an HTTP redirect, or an HTTP error, a JSON or XML document, an image or TAR file, or anything else you can get over the internet. To create a view, open quickstart/views.py and enter the following code. This file already exists and has some boilerplate text in it, so keep that and append this text to the file:
from django.contrib.auth.models import User, Group
from rest_framework import viewsets
from tutorial.quickstart.serializers import UserSerializer, GroupSerializer

class UserViewSet(viewsets.ModelViewSet):
    """
    API endpoint  allows users to be viewed or edited.
    """
    queryset = User.objects.all().order_by('-date_joined')
    serializer_class = UserSerializer

class GroupViewSet(viewsets.ModelViewSet):
    """
    API endpoint  allows groups to be viewed or edited.
    """
    queryset = Group.objects.all()
    serializer_class = GroupSerializer
Generate URLs with Django
Now you can generate URLs so people can access your fledgling API. Open urls.py in a text editor and replace the default sample code with this code:
from django.urls import include, path
from rest_framework import routers
from tutorial.quickstart import views

router = routers.DefaultRouter()
router.register(r'users', views.UserViewSet)
router.register(r'groups', views.GroupViewSet)

# Use automatic URL routing
# Can also include login URLs for the browsable API
urlpatterns = [
    path('', include(router.urls)),
    path('api-auth/', include('rest_framework.urls', namespace='rest_framework'))
]
Adjust your Django project settings
The settings module for this example project is stored in tutorial/settings.py, so open that in a text editor and add rest_framework to the end of the INSTALLED_APPS list:
INSTALLED_APPS = [
    ...
    'rest_framework',
]
Test your Django API
You're now ready to test the API you've built. First, start up the built-in server from the command line:
$ python3 manage.py runserverYou can access your API by navigating to the URL https://localhost:8000/users using curl:
$ curl --get https://localhost:8000/users/?format=json
[{"url":"https://localhost:8000/users/1/?format=json","username":"admin","email":"admin@example.com","groups":[]}]
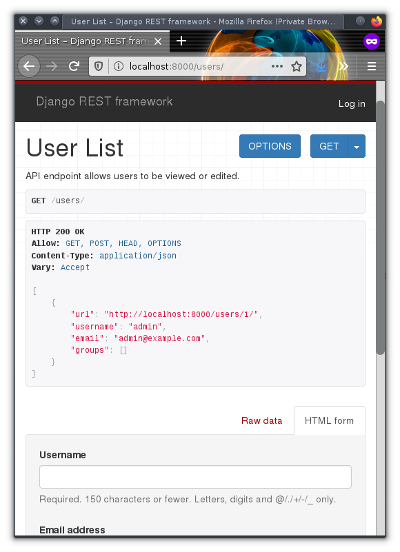
Or use Firefox or the open source web browser of your choice:

For more in-depth knowledge about RESTful APIs using Django and Python, see the excellent Django documentation.
Why should I use Django?
The major benefits of Django:
- The size of the Django community is ever-growing, so you have lots of resources for guidance, even on a complicated project.
- Features like templating, routing, forms, authentication, and management tools are included by default. You don't have to hunt for external tools or worry about third-party tools introducing compatibility issues.
- Simple constructs for users, loops, and conditions allow you to focus on writing code.
- It's a mature and optimized framework that is extremely fast and reliable.
The major drawbacks of Django are:
- Django is complex! From a developer's point of view, Django can be trickier to learn than a simpler framework.
- There's a big ecosystem around Django. This is great once you're comfortable with Django, but it can be overwhelming when you're still learning.
Django is a great option for your application or API. Download it, get familiar with it, and start developing an amazing project!


1 Comment