Being able to validate your network connection speed puts you in control of your computer. Three open source tools that enable you to check your internet and network speeds at the command line are Speedtest, Fast, and iPerf.
Speedtest
Speedtest is an old favorite. It's implemented in Python, packaged in Apt, and also available with pip. You can use it as a command-line tool or within a Python script.
Install it with:
sudo apt install speedtest-clior
sudo pip3 install speedtest-cliThen run it with the command speedtest:
$ speedtest
Retrieving speedtest.net configuration...
Testing from CenturyLink (65.128.194.58)...
Retrieving speedtest.net server list...
Selecting best server based on ping...
Hosted by CenturyLink (Cambridge, UK) [20.49 km]: 31.566 ms
Testing download speed................................................................................
Download: 68.62 Mbit/s
Testing upload speed......................................................................................................
Upload: 10.93 Mbit/s
This gives you your download and upload Internet speeds. It's fast and scriptable, so you can run it regularly and save the output to a file or database for a record of your network speed over time.
Fast
Fast is a service provided by Netflix. Its web interface is located at Fast.com, and it has a command-line interface available through npm:
npm install --global fast-cliBoth the website and command-line utility provide the same basic interface: it's a simple-as-possible speed test:
$ fast

     82 Mbps ↓
The command returns your Internet download speed. To get your upload speed, use the -u flag:
$ fast -u

   ⠧ 80 Mbps ↓ / 8.2 Mbps ↑
iPerf
iPerf is a great way to test your LAN speed (rather than your Internet speed, as the two previous tools do). Debian, Raspbian, and Ubuntu users can install it with apt:
sudo apt install iperfIt's also available for Mac and Windows.
Once it's installed, you need two machines on the same network to use it (both must have iPerf installed). Designate one as the server.
Obtain the IP address of the server machine:
ip addr show | grep inet.*brdYour local IP address (assuming an IPv4 local network) starts with either 192.168 or 10. Take note of the IP address so you can use it on the other machine (the one designated as the client).
Start iperf on the server:
iperf -sThis waits for incoming connections from clients. Designate another machine as a client and run this command, substituting the IP address of your server machine for the sample one here:
iperf -c 192.168.1.2

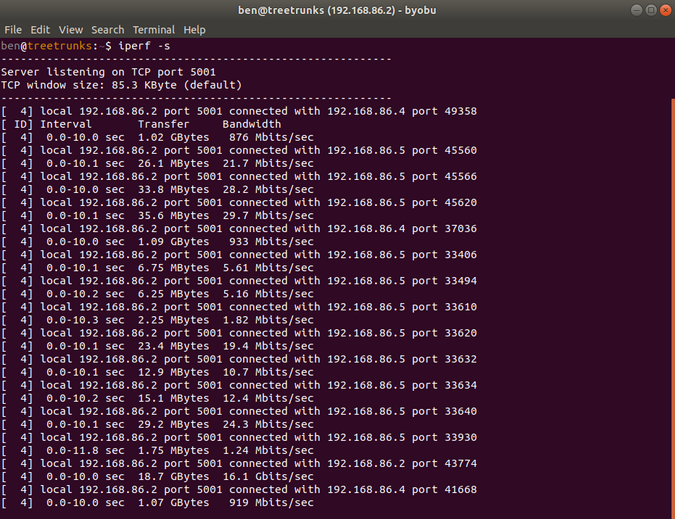
It only takes a few seconds to do a test, and it returns the transfer size and calculated bandwidth. I ran a few tests from my PC and my laptop, using my home server as the server machine. I recently put in Cat6 Ethernet around my house, so I get up to 1Gbps speeds from my wired connections but much lower speeds on WiFi connections.

You may notice where it recorded 16Gbps. That was me using the server to test itself, so it's just testing how fast it can write to its own disk. The server has hard disk drives, which are only 16Gbps, but my desktop PC gets 46Gbps, and my (newer) laptop gets over 60Gbps, as they have solid-state drives.

Wrapping up
Knowing the speed of your network is a rather straightforward task with these tools. If you prefer to script or run these from the command line for the fun of it, any of the above projects will get you there. If you're after specific point-to-point metrics, iPerf is your go-to.
What other tools do you use to measure the network at home? Share in the comments.
This article was originally published on Ben Nuttall's Tooling blog and is used here with permission.


7 Comments