In my last article, I introduced Mycroft and shared some information about the open source voice assistant project. This article will help you get started with details on key terms, installation, and pairing Mycroft with your devices. My intent is to augment the official documentation; while the docs are really good, I found them hard to follow when I first started learning Mycroft, so I'm hoping to bridge some of those gaps for you.
How it works
Before I get to the installation and setup, I want to cover some basics to ensure you have clarity when moving through the documentation. This graphic from the Mycroft team does a great job summarizing the process at a high level.

(© Mycroft AI, Inc.)
Key terminology
The following are some of the terms you will frequently see in the Mycroft ecosystem. Some of this information comes from Mycroft's whitepaper Introduction to the voice stack.
Wake word
A wake word is a trigger that a voice assistant is trained to hear when you're about to issue a command. This may also be known as a "hot word." Common examples of wake words are Hey Siri, OK Google, Alexa, and so on. A voice assistant is continually listening for its wake word.
Mycroft has two options for wake-word listeners:
- Pocket Sphinx is currently only trained with English speech. It uses the CMU Flite dictionary of sounds to understand wake words. That means your wake words should be in English for optimal efficiency. The upside to this method is that it is flexible and easy to use. You can pick any combination of words and sounds you find in the dictionary. The downside, in my experience, is it's either way too easy or very difficult to get the trigger to work properly. You have some options to adjust the threshold or sensitivity, and that helps a bit.
- Precise, on the other hand, is described as a neural network that is trained on audio data. This method is trained solely on sounds. This option is best for non-native English speakers. This can be a bit labor-intensive, as you have to make a lot of recordings of you (and possibly others) saying your chosen wake word. You also should build up a large volume of noise that is common to your environment(s) and does not have the wake sounds (words) in them. This is so that the Precise engine can more accurately determine what is and what is not a wake sound.
Utterance
Once the device is "listening" for commands, the user speaks an utterance. This might be something like "What's the weather forecast?" or "What's the price of Bitcoin today?" The voice assistant makes an audio recording of the utterance.
Speech-to-text (STT) and text-to-speech (TTS)
Once the voice assistant has a recording of the utterance, it runs the utterance through a speech-to-text (STT) processor to turn the audio into words. As you can imagine, this is one of the most crucial parts. If Mycroft does not understand you correctly, it will not select the correct skill, and therefore it will seem "dumb" to the end user.
While it uses Google's services by default for the highest accuracy, Mycroft provides a few privacy options. First, Mycroft proxies the requests to Google so that it is harder for Google to know who the request came from and where they are. Second, there are a lot of options for changing out the backend, with more being added as users submit pull requests against the project.
Ideally, I would prefer to be able to run something like this on my own network, but that seems impractical at this time. Having my data proxied is sufficient for now, although I may investigate other backend services, such as those from IBM.
Finally, the voice assistant responds to the user's voice. This layer is called text-to-speech (TTS) and is essentially the reverse of the STT layer—it turns text into speech. There is a local option available called Mimic. It is both a main option and a fallback in the event Mycroft encounters a problem.
Mimic is very robotic sounding, but I use it on my development machine because it responds faster than the other options. When I am developing a new skill, speed is more important to me than how pleasing the voice is.
Intent parser
Once the audio recording is converted to text, an intent parser combs through the text to identify the user's intent, i.e., what command they want the voice assistant to perform. Mycroft has two different types of intent parsers: one that works on keywords identified in the utterance, and another that is based on a neural network to take a "best guess" at what the user intended.
The job of the intent parser is to try to line up what the user wants with a skill that can be used to deliver those results. The two parsers Mycroft uses are Adapt and Padatious.
- The Adapt parser is meant to be a lightweight parser that can be used easily in embedded devices or devices with limited resources. It attempts to parse the STT output and create JSON, or machine-readable data structures. It is intended for applications that will have to deal with a small number of utterances. It is a great option where internet connectivity is limited or unavailable.
- Padatious' description on its website is quite good:
Padatious is a machine-learning, neural-network based intent parser. Unlike Adapt, which uses small groups of unique words, Padatious is trained on the sentence as a whole.
Padatious has a number of key benefits over other intent parsing technologies.
- With Padatious, intents are easy to create.
- The machine learning model in Padatious requires a relatively small amount of data.
- Machine learning models need to be trained. The model used by Padatious is quick and easy to train.
- Intents run independently of each other. This allows quickly installing new skills without retraining all other skill intents.
- With Padatious, you can easily extract entities and then use these in skills. For example, "Find the nearest gas station" ->
{ "place":"gas station"}.
Skills
After the intent parser attempts to recognize what the user is trying to achieve, the next step is to do something with that understanding. If it understands correctly, the intent parser will attempt to match what the user wants with a specific skill. A skill is a collection of code that executes to achieve a desired outcome. For example, if I tell Mycroft to "add bread to my grocery list," the corresponding code from my OurGroceries skill will execute to handle that task (if the intent is parsed correctly). The skill gets the keywords bread and grocery list and uses them as arguments for functions that add an entry called bread to a list called grocery list.
If the intent parser can't find a skill that matches the utterance, then the voice assistant will usually invoke a fallback. This is a skill that is designated to be a "catch-all" when the voice assistant cannot interpret the intent from an utterance. For example, it may search the internet instead of running code locally.
Install Mycroft
There are plenty of ways to get up and running with Mycroft. Mycroft supports Docker and Linux, has an image for the Raspberry Pi (called Picroft), and there's even a way to run Mycroft on Android. For development, I find it easiest to follow the Linux installation path. I am currently running Mycroft on multiple devices: a Raspberry Pi 4, on a 10-year-old Asus ROG laptop, the original System76 Galago Pro, and my new(ish) Dell Inspiron 5775 (circa 2017). So, if you have some hardware, Mycroft will probably run on it.
Your system will need to support Advanced Vector Extensions in the CPU. Chances are your processor supports it, but if you want to make sure, run the command grep avx /proc/cpuinfo.
For simplicity's sake, I recommend using Ubuntu, Fedora, or Arch Linux as your operating system, as they are the versions best supported by the setup process. To get started, simply clone the Git repo and start the dev_setup.sh script. I put mine in a subfolder where I store all my Git-related projects:
mkdir ~/git_projects
cd ~/git_projects
git clone https://github.com/MycroftAI/mycroft-core.git
cd mycroft-core
bash dev_setup.sh
The script will also install and configure virtualenv, a tool to create isolated Python environments. It is a way to isolate Mycroft from other applications, which helps better manage both dependencies and security. Learn more about virtual environments here and here.
It may take some time to download and build all the dependencies. During this process, the pip package manager and some build processes will install the dependencies required for Mycroft to function. It will also prompt you to build Mimic. This is not strictly necessary, but I strongly recommend it.
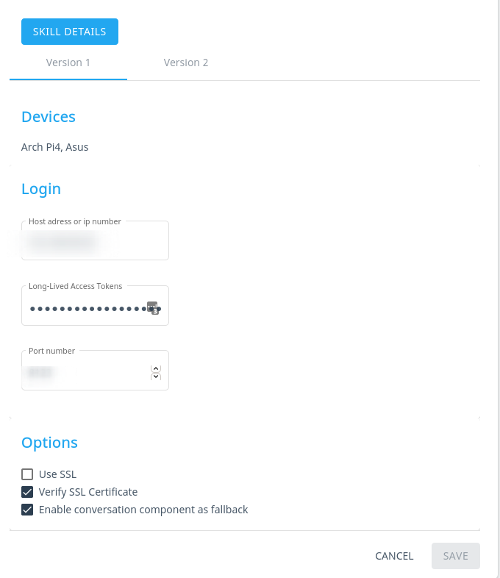
While the setup process is happening, head over to the Mycroft account page and sign up for an account. I know what you are thinking; I also rolled my eyes at creating yet another account. However, I have found it to be useful, particularly since some applications get information from the user from this portal. For example, this is where you configure the Home Assistant connection information:

(Steve Ovens, CC BY-SA 4.0)
After the process completes, you can start the Mycroft services with the start-mycroft.sh script:
./start-mycroft.sh all
Starting all mycroft-core services
Initializing...
Starting background service bus
Starting background service skills
Starting background service audio
Starting background service voice
Log files are located at /var/log/mycroft and are useful for debugging. Also extremely useful is the Mycroft command-line interface (CLI), which allows for some on-the-fly debugging as well as typing input instead of speaking. To launch the CLI, run mycroft-cli-client.
Pair devices
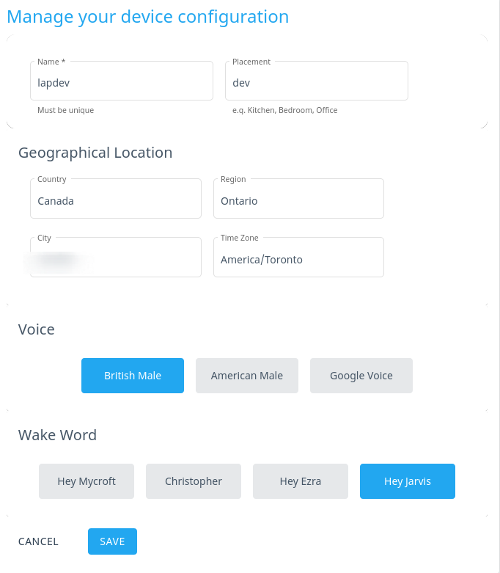
After Mycroft has fully booted up, you will hear a voice reading a pairing code. Head over to the devices page and add a new device. Here you will be able to enter your pairing code and choose the name of your device, its location in your house, your geographical location, the voice you want to be used, and one of the built-in wake words:

(Steve Ovens, CC BY-SA 4.0)
If you don't hear the pairing code, just say, Hey Mycroft, pair my device, and you should see the output in the mycroft-client-cli and hear it speak the code.
There are a lot of advanced options dealing with proxies and other requirements that are well documented, but I won't get into that here.
Wrapping up
Now you are up and running with a Mycroft instance that can run its built-in skills. Have fun talking to Mycroft, see what skills are out there already and which ones are installed by default. Exploring the ecosystem is a great way to determine what things are lacking and start thinking about how to address them.


2 Comments