Visual Studio Code (VS Code) is a cross-platform code editor created by Microsoft for Linux, Windows, and macOS. Unfortunately, Microsoft's version of VS Code is released under the Microsoft Software License, which is not an open source license. However, the source code is open source, released under the MIT license, with releases distributed by the VSCodium project.
VSCodium, like VS Code, has support for extensions, embedded Git control, GitHub integration, syntax highlighting, debugging, intelligent code completion, snippets, and more. In other words, for most users there's no difference between using VS Code and VSCodium, and the latter is completely open source!
What are VS Code extensions?
Extensions allow you to add capabilities to VS Code or VSCodium. You can install extensions in the GUI or from a terminal.
You can also build your own extensions. There are several reasons you might want to learn to build an extension:
- To add something: If a feature you want is missing, you can create an extension to add it.
- For fun and learning: The extension API allows you to explore how VSCodium works, which is a fun thing to do.
- To improve your skills: Creating an extension enhances your programming skills.
- For fame: Creating an extension that is useful to others can increase your public profile.
Install the tools
Before you begin, you must already have Node.js, npm, and VS Code or VSCodium installed.
To generate an extension, you will also need the following tools: Yeoman, an open source client-side scaffolding tool that helps you kickstart new projects, and vscode-generator-code, a Yeoman generator build created by the VS Code team.
Build an extension
In this tutorial, you will build an extension that initializes a Docker image for an application.
Generate an extension skeleton
To install and run the Yeoman generator globally, enter the following in a command prompt or terminal:
npm install -g yo generator-codeNavigate to the folder where you want to generate the extension, type the following command, and hit Enter:
yo codeAt the prompt, you must answer some questions about your extension:
- What type of extension do you want to create? Choose one of the options by using the Up and Down arrows. In this article, I will explain only the first one, New Extension (TypeScript).
- What's the name of your extension? Enter the name of your extension. Mine is called initdockerapp. (I am sure you will have a better name.)
- What's the identifier of your extension? Leave this as it is.
- What's the description of your extension? Write something about your extension (you can fill this in or edit it later, too).
- Initialize a Git repository? This initializes a Git repository, and you can add
set-remotelater. - Which package manager to use? You can choose yarn or npm; I will use npm.
Hit the Enter key, and it will start installing the required dependencies. And finally:
"Your extension initdockerapp has been created!"
Excellent!
Check the project's structure
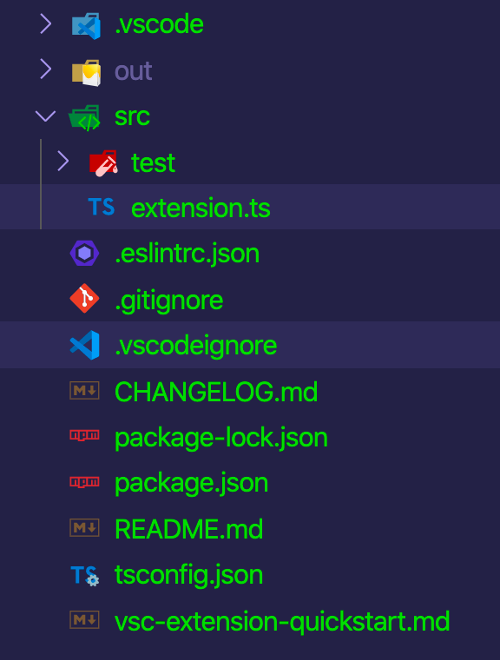
Examine what you generated and the project structure. Navigate to the new folder and type cd initdockerapp in your terminal.
Once you are in, type .code. It will open in your editor and look something like this:

(Hussain Ansari, CC BY-SA 4.0)
The two most important files to pay attention to are package.json and extension.ts inside the src folder.
package.json
First, look at package.json, which should look something like this:
{
	"name": "initdockerapp",
	"displayName": "initdockerapp",
	"description": "",
	"version": "0.0.1",
	"engines": {
		"vscode": "^1.44.0"
	},
	"categories": [
		"Other"
	],
	"activationEvents": [
		"onCommand:initdockerapp.initialize"
	],
	"main": "./out/extension.js",
	"contributes": {
		"commands": [
			{
				"command": "initdockerapp.initialize",
				"title": "Initialize A Docker Application"
			}
		]
	},
	"scripts": {
		"vscode:prepublish": "npm run compile",
		"compile": "tsc -p ./",
		"lint": "eslint src --ext ts",
		"watch": "tsc -watch -p ./",
		"pretest": "npm run compile && npm run lint",
		"test": "node ./out/test/runTest.js"
	},
	"devDependencies": {
		"@types/vscode": "^1.44.0",
		"@types/glob": "^7.1.1",
		"@types/mocha": "^7.0.2",
		"@types/node": "^13.11.0",
		"eslint": "^6.8.0",
		"@typescript-eslint/parser": "^2.26.0",
		"@typescript-eslint/eslint-plugin": "^2.26.0",
		"glob": "^7.1.6",
		"mocha": "^7.1.1",
		"typescript": "^3.8.3",
		"vscode-test": "^1.3.0"
	}
}
{
	"name": "initdockerapp",
	"displayName": "initdockerapp",
	"description": "",
	"version": "0.0.1",
	"engines": {
		"vscode": "^1.44.0"
	},
	"categories": [
		"Other"
	],
	"activationEvents": [
		"onCommand:initdockerapp.initialize"
	],
	"main": "./out/extension.js",
	"contributes": {
		"commands": [
			{
				"command": "initdockerapp.initialize",
				"title": "Initialize A Docker Application"
			}
		]
	},
	"scripts": {
		"vscode:prepublish": "npm run compile",
		"compile": "tsc -p ./",
		"lint": "eslint src --ext ts",
		"watch": "tsc -watch -p ./",
		"pretest": "npm run compile && npm run lint",
		"test": "node ./out/test/runTest.js"
	},
	"devDependencies": {
		"@types/vscode": "^1.44.0",
		"@types/glob": "^7.1.1",
		"@types/mocha": "^7.0.2",
		"@types/node": "^13.11.0",
		"eslint": "^6.8.0",
		"@typescript-eslint/parser": "^2.26.0",
		"@typescript-eslint/eslint-plugin": "^2.26.0",
		"glob": "^7.1.6",
		"mocha": "^7.1.1",
		"typescript": "^3.8.3",
		"vscode-test": "^1.3.0"
	}
}
If you are a Node.js developer, some of this might look familiar since name, description, version, and scripts are common parts of a Node.js project.
There are a few sections that are very important.
engines: States which version of VSCodium the extension will supportcategories: Sets the extension type; you can choose from Languages, Snippets, Linters, Themes, Debuggers, Formatters, Keymaps, and Othercontributes: A list of commands that can be used to run with your extensionmain: The entry point of your extensionactivationEvents: Specifies when the activation event happens. Specifically, this dictates when the extension will be loaded into your editor. Extensions are lazy-loaded, so they aren't activated until an activation event occurs
src/extension.ts
Next, look at src/extension.ts, which should look something like this:
// The module 'vscode' contains the VSCodium extensibility API
// Import the module and reference it with the alias vscode in your code below
import * as vscode from "vscode";
const fs = require("fs");
const path = require("path");

// this method is called when your extension is activated
// your extension is activated the very first time the command is executed
export function activate(context: vscode.ExtensionContext) {

	// Use the console to output diagnostic information (console.log) and errors (console.error)
	// This line of code will only be executed once when your extension is activated
	console.log('Congratulations, your extension "initdockerapp" is now active!');

	// The command has been defined in the package.json file
	// Now provide the implementation of the command with registerCommand
	// The commandId parameter must match the command field in package.json
	let disposable = vscode.commands.registerCommand('initdockerapp.initialize', () => {
		// The code you place here will be executed every time your command is executed

		let fileContent =`
		FROM node:alpine
		WORKDIR /usr/src/app

		COPY package.json .
		RUN npm install

		COPY . .

		EXPOSE 3000
		CMD ["npm", "start"]
		`;

		fs.writeFile(path.join(vscode.workspace.rootPath, "Dockerfile"), fileContent, (err:any) => {
			if (err) {
				return vscode.window.showErrorMessage("Failed to initialize docker file!");
			}
			vscode.window.showInformationMessage("Dockerfile has been created!");
		});
	});

	context.subscriptions.push(disposable);
}

// this method is called when your extension is deactivated
export function deactivate() {}
This is where you write the code for your extension. There's already some auto-generated code, which I'll break down.
Notice that the name initdockerapp.initialize inside vscode.command.registerCommand is the same as the command in package.json. It takes two parameters:
- The name of the command to register
- A function to execute a command
The other function to note is fs.writeFile, which you wrote inside the vscode.command.registerCommand function. This creates a dockerfile inside your project root, and appends the code to create a Docker image.
Debug the extension
Now that you've written the extension, its time to debug it. Click the Run menu and select Start Debugging (or just press F5) to open a debugging window.
Open the project inside the debugging window by clicking on either the Add Folder or the Clone Repository button.
Next, open a command panel with Ctrl+Shift+P (on macOS, substitute the Command key for Ctrl) and run Initialize A Docker Application.
- The first time you run this command, the activate function has not been executed since VSCodium was launched. Therefore, activate is called, and the activate function registers the command.
- If the command has already been registered, then it executes.
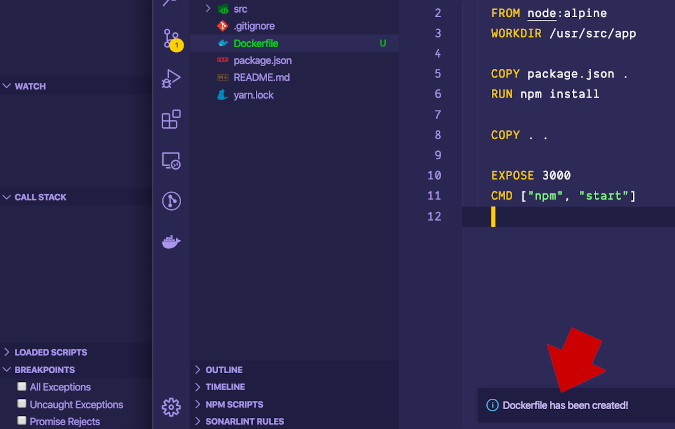
You'll see a message in the lower-right corner that says: "Dockerfile has been created!" This created a Dockerfile with some pre-defined code that looks something like this:

(Hussain Ansari, CC BY-SA 4.0)
Summary
There are many helpful APIs that will help you create the extensions you want to build. The VS Code extension API has many other powerful methods you can use.
You can learn more about VS Code APIs in the VS Code Extension API documentation.


Comments are closed.