In the last two articles in this series on home automation with Home Assistant (HA), I walked through setting up a few integrations with a Zigbee Bridge and some custom ESP8266 devices that I use for automation. The first four articles in the series discussed what Home Assistant is, why you may want local control, some of the communication protocols for smart home components, and how to install Home Assistant in a virtual machine (VM) using libvirt.
Now that you have a basic home automation setup, it is a good time to take a baseline of your system. In this seventh article, I will talk about snapshots, backups, and backup strategies. Let's get right into it.
Backups vs. copies
I'll start by clearing up some ambiguity: A copy of something is not the same as a backup. Here is a brief overview of the difference between a copy and a backup. Bear in mind that this comes from the lens of an IT professional. I work with client data day in and day out. I have seen many ways that backups can go sideways, so the following descriptions may be overkill for home use. You'll have to decide just how important your Home Assistant data really is.
- Copies: A copy is just what it sounds. It is when you highlight something on your computer and hit Ctrl+C and paste it somewhere else with Ctrl+V. Many people may view this as backing up the source, and to some extent, that is true. However, a copy is merely a representation of a point in time. If it's taken incorrectly, the newly created file can be corrupt, leading to a false sense of security. In addition, the source may have a problem—meaning the copy will also have a problem. If you have just a single copy of a file, it's often the same as having nothing at all. When it comes to backup, the saying "one is none" is absolutely true. If you do not have files going back over time, you won't have a good idea of whether the system creating the backups has a problem.
- Backups and snapshots: In Home Assistant, it is a bit tricky to differentiate between a copy and a backup. First, Home Assistant uses the term "snapshot" to refer to what we traditionally think of backups. In this context, a backup is very similar to a copy because you don't use any type of backup software, at least not in the traditional sense. Normally, backup software is designed specifically to get all the files that are hidden or otherwise protected. For example, backup software for a computer (such as CloneZilla) makes an exact replica (in some cases) of the hard drive to ensure no files are missed. Home Assistant knows how to create snapshots and does it for you. You just need to worry about storing the files somewhere.
Set a good backup strategy
Before I get into how to deal with snapshots in Home Assistant, I want to share a brief story from a recent client. Remember when I mentioned that simply having a single copy of your files doesn't give you any indication that a problem has occurred? My client was doing all of the right things when it came to backups. The team was using the proper methodology for backups, kept multiple files going back a certain period of time, ensured there were more than two copies of each backup, and was especially careful that backups were not being stored locally on the machine being backed up. Sounds great, doesn't it? They were doing everything right. Well, almost. The one thing they neglected was testing the backups. Most people put this off or disregard it entirely. I admit I am guilty of not testing my backups frequently. I do it when I remember, which is usually once every few months or so.
In my client's case, a software upgrade created a new requirement from the backup program. This was missed. The backups continued to hum along, and the automated checks passed. There were files after every backup run, they were larger than a certain amount, and the magic file checks reported the correct file type. The problem was that the file sizes shrunk significantly due to the software change. This meant the client was not backing up the data it thought.
This story has a happy ending, which brings me to my point: Because the client was doing everything else right, we could go through the backups and identify the precise moment when something changed. From this, we linked this to the date of an upgrade some weeks back. Fortunately, there was no emergency that precipitated the investigation. I happened to be doing a standard audit when I discovered the discrepancy.
The moral of the story? Without proper backup strategies, we would have had a much harder time tracking down this problem. Also, in the event of a failure, we would have had no recovery point.
A good backup strategy usually entails daily, weekly, and monthly backups. For example, you may decide to keep all your daily backups for two weeks, four weekly backups, and perhaps four monthly backups. This, in my opinion, is overkill for Home Assistant after you have a stable setup. You'll have to choose the level of precision you need. I take a backup before I make any change to the system. This gives me a known-good situation to revert to.
Create snapshots
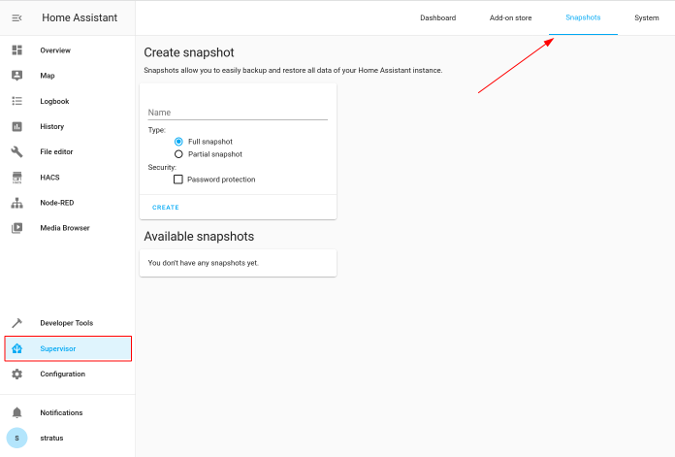
Great, so how do you create a snapshot in Home Assistant? The Snapshots menu resides inside the Supervisor tab on the left-size panel.
(Steve Ovens, CC BY-SA 4.0)
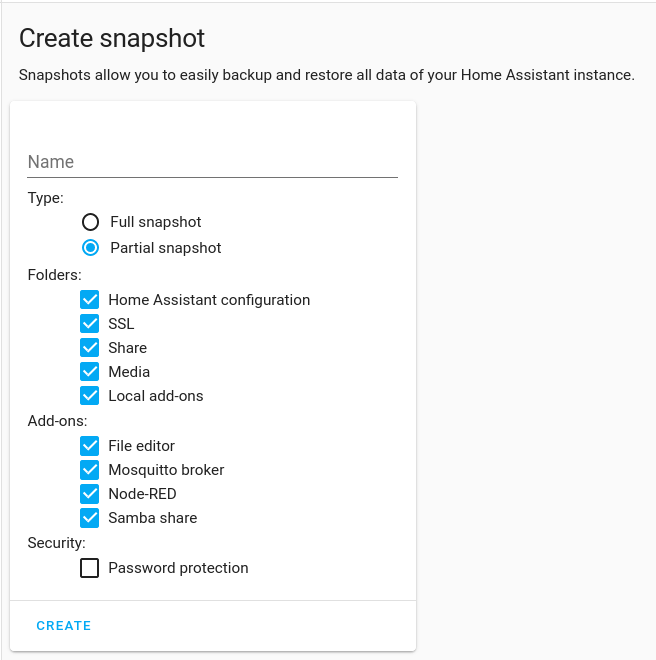
You have two options for creating a snapshot: Full snapshot or Partial snapshot. A Full snapshot is self-explanatory. You have some options with a Partial snapshot.
(Steve Ovens, CC BY-SA 4.0)
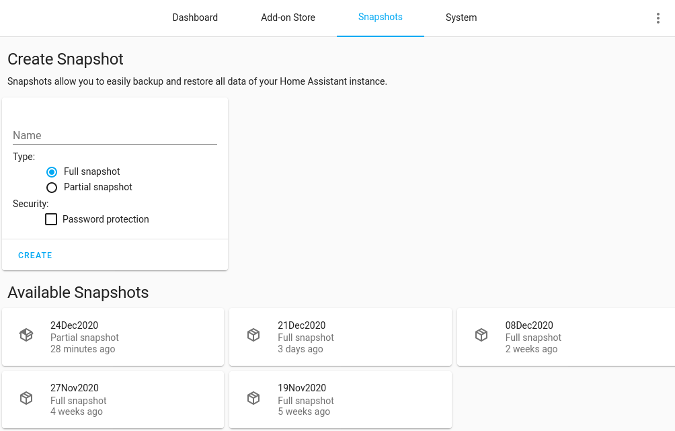
Any component you install in Home Assistant will populate in this menu. Choose a name for your backup and click Create. This will take some time, depending on the speed of the disk and the size of the backup. I recommend keeping at least four backups on your machine if you can afford the space.
(Steve Ovens, CC BY-SA 4.0)
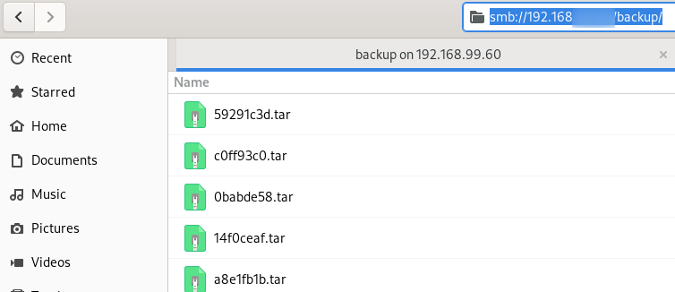
You can retrieve these files from Home Assistant with File Browser if you set up the Samba share extension.
(Steve Ovens, CC BY-SA 4.0)
Save these files somewhere safe. The name you give the backup is contained in the metadata inside Home Assistant, and the file names are randomly generated. After I copy them to a different location, I usually rename them because when I test the restoration process on a different machine, the new file name does not matter.
My homelab strategy
I run my Home Assistant instance on top of KVM on a Linux host. I have had a few requests to go into a little more detail on this, so feel free to skip past this section as it's not directly related to HA.
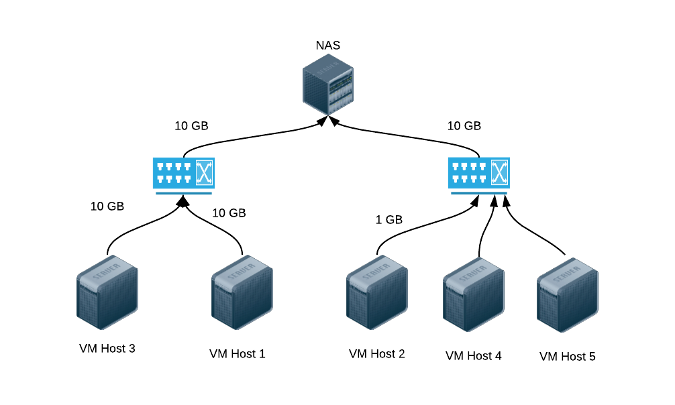
Due to the nature of my job, I have a fairly large variety of hardware, which I use for a homelab. Sometimes this is because physical hosts are easier to work with than VMs for certain clustering software. Other times, this is because I keep workloads isolated to specific hardware. Either way, this means I already have a certain amount of knowledge built up around managing and dealing with KVM. Not to mention the fact that I run almost exclusively open source software (with a few exceptions). Here is a basic layout of my homelab:
(Steve Ovens, CC BY-SA 4.0)
The network-attached storage (NAS) has dual 10GB network cards that feed into uplink ports. Two of the KVM hosts have 10GB network interface cards (NICs), while the hosts on the right have regular 1GB network cards.
For Home Assistant, this is well into overkill territory. However, this infrastructure was not designed for HA. HA runs just fine on a Raspberry Pi 4 (4GB version) at my parents' house.
The VM that hosts Home Assistant has three vCPU cores of a Broadwell Core I5 CPU (circa 2015) with 8GB of RAM. The CPU tends to remain around 25% usage, and I rarely use more than 2.2GB of RAM. This is with 11 add-ons, including InfluxDB and Grafana, which are heavier applications.
While I do have shared storage, I do not use it for live migration or anything similar. Instead, I use this for backend storage for specific mount points in a VM. For example, I store the data directory from Nextcloud on the NAS, divorcing the data from the service.
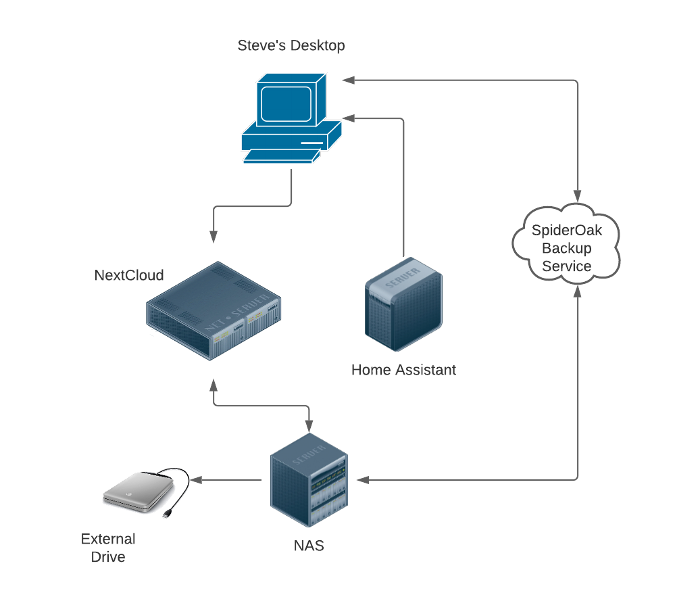
At any rate, I have a few approaches to backups with this setup. Naturally, I use the Home Assistant snapshotting function to provide the first layer of protection. I tend to store only four weeks' worth of data on the VM. What do I do with the files themselves? Here is a diagram of how I try to keep my backups safe:
(Steve Ovens, CC BY-SA 4.0)
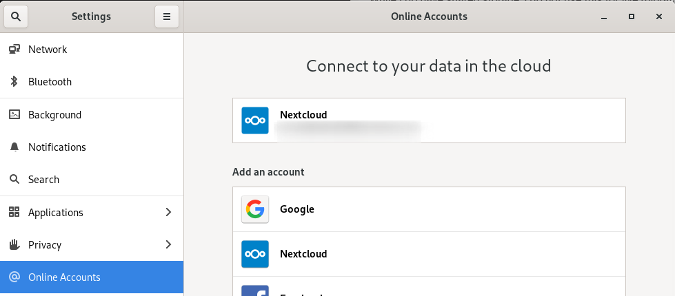
Using the Samba add-on, I pull a copy of the snapshot onto my GNOME desktop. I configure Nextcloud using GNOME's Online Accounts settings.
(Steve Ovens, CC BY-SA 4.0)
Nextcloud takes a copy and puts it on my NAS. Both my desktop and the NAS use SpiderOak One Backup clients to ensure the backups are linked to more than one host. In the unlikely event that I delete a device from my SpiderOak account, the file is still linked to another device. I chose SpiderOak because it supports a Linux client, and it is privacy-focused and has no insight into what files it stores. The files are encrypted before being uploaded, and only the owner has the ability to decrypt them. The downside is that if you lose or forget your password, you lose your backups.
Finally, I keep a cold copy on an external hard drive. I have a 14TB external drive that remains off and disconnected from the NAS except when backups are running. It's not on the diagram, but I also occasionally replicate to a computer at my in-laws' house.
I can also take snapshots of the VM during critical operations (such as Home Assistant's recent upgrade from using a numbered point release to a month-based numbering system).
I use a similar pipeline for most things that I back up, although I recognize it is a bit overkill. Also, this whole process has the flaw that it relies on me. Aside from SpiderOak and Nextcloud, I have not automated this process. I have scripts that I run, but I do not run them in a cron or anything like that. In hindsight, perhaps I should work on that.
This setup may be considered extreme, but the built-in versioning in Nextcloud and SpiderOak, along with making copies in multiple locations, means that I am unlikely to suffer a failure that I can't recover from. At the very least, I should be able to dig up a close reference.
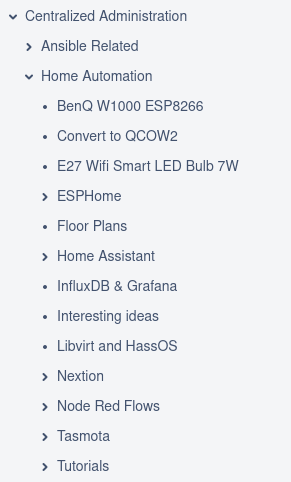
As a final precaution, I make sure to keep the important information about how I set things up on my private wiki on Wiki.js. I keep a section just for home automation.
(Steve Ovens, CC BY-SA 4.0)
When you get into creating Node-RED automations (in the next article), I suggest you keep your own notes. I take a screenshot of the flow, write a brief description, so I know what I was attempting to achieve, and dump the flow to JSON (for brevity, I omitted the JSON from this screenshot):
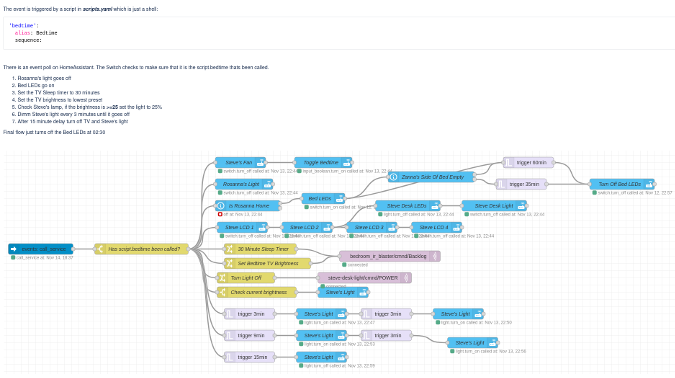
(Steve Ovens, CC BY-SA 4.0)
Wrapping up
Backups are essential when you're using Home Assistant, as it is a critical component of your infrastructure that always needs to be functioning. Small downtime is acceptable, but the ability to recover from a failure quickly is crucial. Granted, I have found Home Assistant to be rock solid. It has never failed on its own; any problems I have had were external to HA. Still, if you are going to make HA a central part of your house, I strongly recommend putting a good backup strategy in place.
In the next article, I'll take a look at setting up some simple automations with Node-RED. As always, leave a comment below if you have questions, ideas, or suggestions for topics you'd like to see covered.



Comments are closed.