Even if you haven't heard of a theremin, you're probably familiar with the eerie electronic sound it makes from watching TV shows and movies like the 1951 science fiction classic The Day the Earth Stood Still. Theremins have also appeared in popular music, although often in the form of a theremin variant. For example, the "theremin" in the Beach Boys' "Good Vibrations" was actually an electro-theremin, an instrument played with a slider invented by trombonist Paul Tanner and amateur inventor Bob Whitsell and designed to be easier to play.
Soviet physicist Leon Theremin invented the theremin in 1920. It was one of the first electronic instruments, and Theremin introduced it to the world through his concerts in Europe and the US in the late 1920s. He patented his invention in 1928 and sold the rights to RCA. However, in the wake of the 1929 stock market crash, RCA's expensive product flopped. Theremin returned to the Soviet Union under somewhat mysterious circumstances in the late 1930s. The instrument remained relatively unknown until Robert Moog, of synthesizer fame, became interested in them as a high school student in the 1950s and started writing articles and selling kits. RA Moog, the company he founded, remains the best-known maker of commercial theremins today.
What does this have to do with open source?
In 2008, Swiss engineer Urs Gaudenz was at a festival put on by the Swiss Mechatronic Art Society, which describes itself as a collective of engineers, hackers, scientists, and artists who collaborate on creative uses of technology. The festival included a theremin exhibit, which introduced Gaudenz to the instrument.
At a subsequent event focused on bringing together music and technology, one of the organizers told Gaudenz that there were a lot of people who wanted to build theremins from kits. Some kits existed, but they often didn't work or play well. Gaudenz set off to build an open theremin that could be played in the same manner and use the same operating principles as a traditional theremin but with a modern electronic board and microcontroller.
The Open.Theremin project (currently in version 3) is completely open source, including the microcontroller code and the hardware files, which include the schematics and printed circuit board (PCB) layout. The hardware and the instructions are under GPL v3, while the control code is under LGPL v3. Therefore, the project can be assembled completely from scratch. In practice, most people will probably work from the kit available from Gaudi.ch, so that's what I'll describe in this article. There's also a completely assembled version available.
How does a theremin work?
Before getting into the details of the Open.Theremin V3 and its assembly and use, I'll talk at a high level about how traditional theremins work.
Theremins are highly unusual in that they're played without touching the instrument directly or indirectly. They're controlled by varying your distance and hand shape from two antennas, a horizontal volume loop antenna, typically on the left, and a vertical pitch antenna, typically on the right. Some theremins have a pitch antenna only—Robert Plant of Led Zeppelin played such a variant—and some, including the Open.Theremin, have additional knob controls. But hand movements associated with the volume and pitch antennas are the primary means of controlling the instrument.
I've been referring to the "antennas" because that's how everyone else refers to them. But they're not antennas in the usual sense of picking up radio waves. Each antenna acts as a plate in a capacitor. This brings us to the basic theremin operating principle: the heterodyne oscillator that mixes signals from a fixed and a variable oscillator.
Such a circuit can be implemented in various ways. The Open.Theremin uses a combination of an oscillating crystal for the fixed frequency and an LC (inductance-capacitance) oscillator tuned to a similar but different frequency for the variable oscillator. There's one circuit for volume and a second one (operating at a slightly different frequency to avoid interference) for pitch, as this functional block diagram shows.
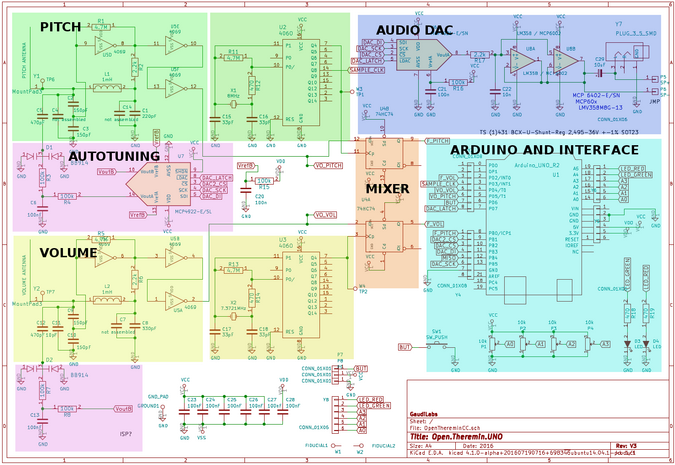
Theremin block diagram. (Gaudi Labs, GPL v3)
You play the theremin by moving or changing the shape of your hand relative to each antenna. This changes the capacitance of the LC circuit. These changes are, in turn, processed and turned into sound.
Assembling the materials
But enough theory. For this tutorial, I'll assume you're using an Open.Theremin V3 kit. In that case, here's what you need:
- Open.Theremin V3 kit
- Arduino Uno with mounting plate
- Soldering iron and related materials (you'll want fairly fine solder; I used 0.02")
- USB printer-type cable
- Wire for grounding
- Replacement antenna mounting hardware: Socket head M3-10 bolt, washer, wing nut (x2, optional)
- Speaker or headphones (3.5mm jack)
- Tripod with standard ¼" screw
The Open.Theremin is a shield for an Arduino, which is to say it's a modular circuit board that piggybacks on the Arduino microcontroller to extend its capabilities. In this case, the Arduino handles most of the important tasks for the theremin board, such as linearizing and filtering the audio and generating the instrument's sound using stored waveforms. The waveforms can be changed in the Arduino software. The Arduino's capabilities are an important part of enabling a wholly digital theremin with good sound quality without analog parts.
The Arduino is also open source. It grew out of a 2003 project at the Interaction Design Institute Ivrea in Ivrea, Italy.
Building the hardware
There are good instructions for building the theremin hardware on the Gaudi.ch site, so I won't take you through every step. I'll focus on the project at a high level and share some knowledge that you may find helpful.
The PCB that comes with the kit already has the integrated circuits and discrete electronics surface-mounted on the board's backside, so you don't need to worry about those (other than not damaging them). What you do need to solder to the board are the pins to attach the shield to the Arduino, four potentiometers (pots), and a couple of surface-mount LEDs and a surface-mount button on the front side.
Before going further, I should note that this is probably an intermediate-level project. There's not a lot of soldering, but some of it is fairly detailed and in close proximity to other electronics. The surface-mount LEDs and button on the front side aren't hard to solder but do take a little technique (described in the instructions on the Gaudi.ch site). Just deliberately work your way through the soldering in the suggested order. You'll want good lighting and maybe a magnifier. Carefully check that no pins are shorting other pins.
Here is what the front of the hardware looks like:
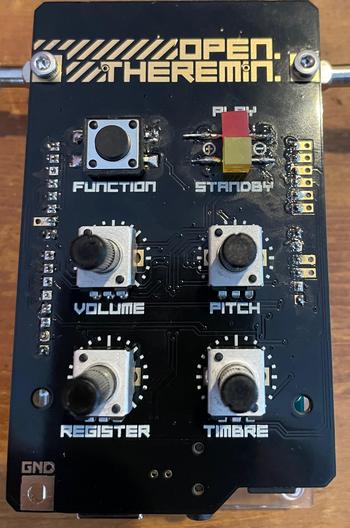
Open.Theremin front (Gordon Haff, CC-BY-SA 4.0)
This shows the backside; the pins are the interface to the Arduino.
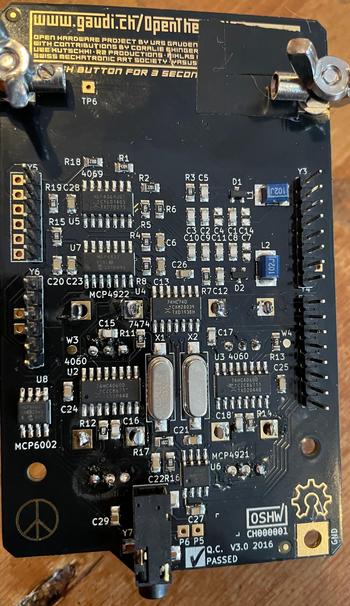
Open.Theremin back (the pins are the interface to the Arduino) (Gordon Haff, CC-BY-SA 4.0)
I'll return to the hardware after setting up the Arduino and its software.
Loading the software
The Arduino part of this project is straightforward if you've done anything with an Arduino and, really, even if you haven't.
- Install the Arduino Desktop IDE
- Download the Open.Theremin control software and load it into the IDE
- Attach the Arduino to your computer with a USB cable
- Upload the software to the Arduino
It's possible to modify the Arduino's software, such as changing the stored waveforms, but I will not get into that in this article.
Power off the Arduino and carefully attach the shield. Make sure you line them up properly. (If you're uncertain, look at the Open.Theremin's schematics, which show you which Arduino sockets aren't in use.)
Reconnect the USB. The red LED on the shield should come on. If it doesn't, something is wrong.
Use the Arduino Desktop IDE one more time to check out the calibration process, which, hopefully, will offer more confirmation that things are going according to plan. Here are the detailed instructions.
What you're doing here is monitoring the calibration process. This isn't a real calibration because you haven't attached the antennas, and you'll have to recalibrate whenever you move the theremin. But this should give you an indication of whether the theremin is basically working.
Once you press the function button for about a second, the yellow LED should start to blink slowly, and the output from the Arduino's serial monitor should look something like the image below, which shows typical Open.Theremin calibration output. The main things that indicate a problem are frequency-tuning ranges that are either just zeros or that have a range that doesn't bound the set frequency.
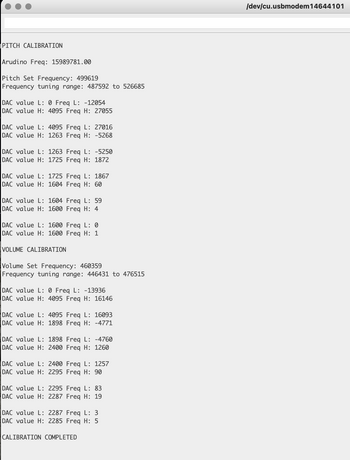
(Gordon Haff, CC-BY-SA 4.0)
Completing the hardware
To finish the hardware, it's easiest if you separate the Arduino from the shield. You'll probably want to screw some sort of mounting plate to the back of the Arduino for the self-adhesive tripod mount you'll attach. Attaching the tripod mount works much better on a plate than on the Arduino board itself. Furthermore, I found that the mount's adhesive didn't work very well, and I had to use stronger glue.
Next, attach the antennas. The loop antenna goes on the left. The pitch antenna goes on the right (the shorter leg connects to the shield). Attach the supplied banana plugs to the antennas. (You need to use enough force to mate the two parts that you'll want to do it before attaching the banana plugs to the board.)
I found the kit's hardware extremely frustrating to tighten sufficiently to keep the antennas from rotating. In fact, due to the volume antenna swinging around, it ended up grounding itself on some of the conductive printing on the PCB, which led to a bit of debugging. In any case, the hardware listed in the parts list at the top of this article made it much easier for me to attach the antennas.
Attach the tripod mount to a tripod or stand of some sort, connect the USB to a power source, plug the Open.Theremin into a speaker or headset, and you're ready to go.
Well, almost. You need to ground it. Plugging the theremin into a stereo may ground it, as may the USB connection powering it. If the person playing the instrument (i.e., the player) has a strong coupling to ground, that can be sufficient. But if these circumstances don't apply, you need to ground the theremin by running a wire from the ground pad on the board to something like a water pipe. You can also connect the ground pad to the player with an antistatic wrist strap or equivalent wire. This gives the player strong capacitive coupling directly with the theremin, which works as an alternative to grounding the theremin.
At this point, recalibrate the theremin. You probably don't need to fiddle with the knobs at the start. Volume does what you'd expect. Pitch changes the "zero beat" point, i.e., where the theremin transitions from high pitched near the pitch antenna to silence near your body. Register is similar to what's called sensitivity on other theremins. Timbre selects among the different waveforms programmed into the Arduino.
There are many theremin videos online. It is not an easy instrument to play well, but it is certainly fun to play with.
The value of open
The open nature of the Open.Theremin project has enabled collaboration that would have been more difficult otherwise.
For example, Gaudenz received a great deal of feedback from people who play the theremin well, including Swiss theremin player Coralie Ehinger. Gaudenz says he really doesn't play the theremin but the help he got from players enabled him to make changes to make Open.Theremin a playable musical instrument.
Others contributed directly to the instrument design, especially the Arduino software code. Gaudenz credits Thierry Frenkel with improved volume control code. Vincent Dhamelincourt came up with the MIDI implementation. Gaudenz used circuit designs that others had created and shared, like designs for the oscillators that are a central part of the Open.Theremin board.
Open.Theremin is a great example of how open source is not just good for the somewhat abstract reasons people often mention. It can also lead to specific examples of improved collaboration and more effective design.







Comments are closed.