The free software movement famously got started because of a poorly designed printer. Decades later, printer and scanner manufacturers continue to reinvent the wheel, ignoring established and universal protocols. As a result, every now and again, you'll stumble onto a printer or scanner that just doesn't seem to work with your operating system.
This happened to me recently with a Canon 3-in-1 scanner (the Canon Maxify MB2720). I was able to solve the scanner's problem with open source. Specifically, I set up a Samba share to make the scanner available on my network.
The Samba project is a Windows interoperability suite of programs for Linux and Unix. Although it's mostly low-level code that many users never knowingly interact with, the software makes it easy to share files over your local network, regardless of what platforms are used.
I'm using Fedora, so these instructions should work for any RPM-based Linux distribution. Minor modifications may be necessary for other distributions. Here's how I did it.
Get the Canon tools
Download the required Windows Canon Quick Utility Toolbox software from Canon's website. The software is required because it is the only way to configure the printer's destination folder location and credentials. Once this is done, you do not need to use the tool unless you want to make a change.
Before configuring the printer, you must set up a Samba share on your Linux computer or server. Install Samba with the following command:
$ sudo dnf -y install sambaCreate /etc/smb.conf file with the following content:
[global]
        workgroup = WORKGROUP
        netbios name = MYSERVER
        security = user
        #CORE needed for CANON PRINTER SCAN FOLDER
        min protocol = CORE
        #NTML AUTHV1 needed for CANON PRINTER SCAN FOLDER
        ntlm auth = yes
        passdb backend = tdbsam

        printing = cups
        printcap name = cups
        load printers = no
        cups options = raw

        hosts allow = 127. 192.168.33.
        max smbd processes = 1000

[homes]
        comment = Home Directories
        valid users = %S, %D%w%S
        browseable = No
        writable = yes
        read only = No
        inherit acls = Yes

[SCANS]
        comment = MB2720 SCANS
        path = /mnt/SCANS
        public = yes
        writable = yes
        browseable = yes
        printable = no
        force user = tux
        create mask = 770
In the force user line near the end, change the username from tux to your own username.
Unfortunately, the Canon printer won't work with Server Message Block (SMB) protocols higher than CORE or NTML authentication v2. For this reason, the Samba share must be configured with the oldest SMB protocol and NTML authentication versions. This is not ideal by any means and has security implications, so I created a separate Samba server dedicated to the scanner use case. My other Samba server, which shares all home networked files, still uses SMB protocol 3 and NTML authentication v2.
Start the Samba server service and enable it for restart:
$ sudo systemctl start smb
$ sudo systemctl enable smb
Create a Samba user
Create your Samba user and a password for it:
$ sudo smbpasswd -a tuxEnter your password at the prompt.
Assuming you want to mount your Samba scans on a Linux system, you need to do a few steps.
Create a Samba client credentials file. Mine looks like this:
$ sudo cat /root/smb-credentials.txt
username=tux
password=mySTRONGpassword
Change the permissions so that it isn't world-readable:
$ sudo chmod 640 /root/smb-credentials.txtCreate a mount point and add it to /etc/fstab:
$ sudo mkdir /mnt/MB2720-SCANSAdd the following line into your /etc/fstab:
//192.168.33.50/SCANS /mnt/MB2720-SCANS cifs vers=3.0,credentials=/root/smb-credentials.txt,gid=1000,uid=1000,_netdev 0 0This mounts the Samba share scans to the new mount point using CIFS, forcing SMBv3, and using the username and password stored in /root/smb-credetials.txt. It also passes the user's group identifier (GID) and the user identifier (UID), giving you full ownership of the Linux mount. The _netdev option is required so that the mount point is mounted after networking is fully functional (after a reboot, for instance) because this mount requires networking to be accessed.
Configure the Canon software
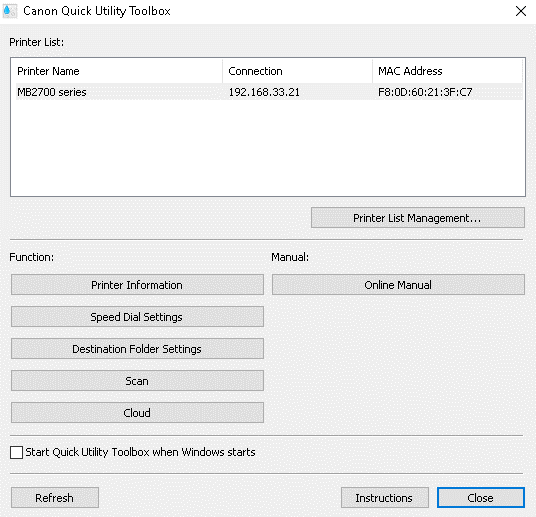
Now that you have created the Samba share, configured it on the server, and configured the share to be mounted on your Linux client, you need to launch the Canon Quick Utility Toolbox to configure the printer. Because Canon doesn't release this toolbox for Linux, this step requires Windows. You can try running it on WINE, but should that fail, you'll have to either borrow a Windows computer from someone or run a Windows developer virtual machine in GNOME Boxes or VirtualBox.
Power on the printer, and then start the Canon Quick Utility Toolbox. It should find your printer. If it can't see your printer, you must configure the printer for either LAN or wireless networking first.
In the toolbox, click on Destination Folder Settings.

(Marc Skinner, CC BY-SA 4.0)
Enter the printer administration password—my default password was canon.
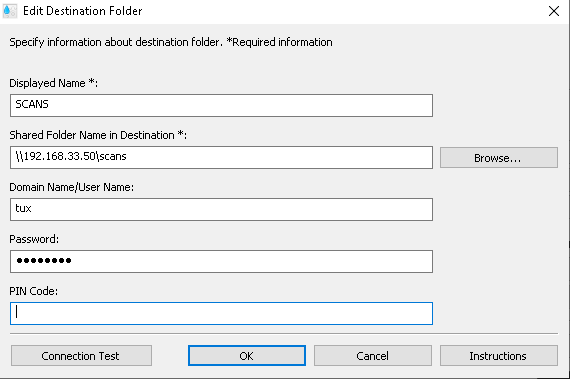
Click the Add button.

Fill out the form with a Displayed Name, your Samba share location, and your Samba username and password.
I left the PIN Code blank, but if you want to require a PIN to be entered each time you scan from the printer, you can set one. This would be useful in an office where each user has their own Samba share and PIN to protect their scans.
Click Connection Test to validate the form data.
Click the OK button.
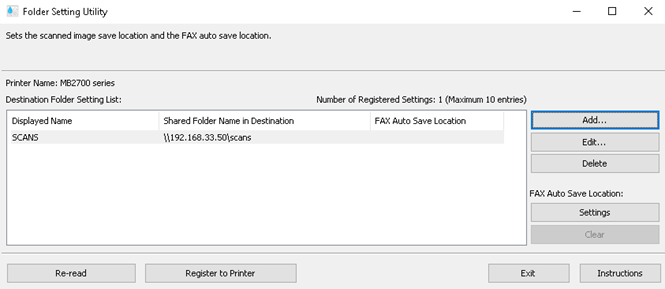
Click Register to Printer to save your configuration back to the printer.

(Marc Skinner, CC BY-SA 4.0)
Everything is set up. Click Exit. You're done with Windows now, and probably the toolbox, unless you need to change something.
Start scanning
You can now scan from the printer and select your Destination Folder from its LCD menu. Scans are saved directly to the Samba share, which you have access to from your Linux computer.
For convenience, create a symbolic link on your Linux desktop or home directory with the following command:
$ sudo ln -sd /mnt/MB2720-SCANS /home/tux/Desktop/MB2720-SCANSThat's all there is to it!


Comments are closed.