I have a printer in my office, but sometimes I work on my laptop in another room of the house. This isn't a problem for me for two reasons. First of all, I rarely print anything on paper and have gone months without using the printer. Secondly, though, I've set the printer to be shared over my home network, so I can send files to print from anywhere in the house. I didn't need any special equipment for this setup. It's accomplished with just my usual Linux computer and the Common Unix Printing System (CUPS).
Installing CUPS on Linux
If you're running Linux, BSD, or macOS, then you probably already have CUPS installed. CUPS has been the open source solution to Unix printing since 1997. Apple relied on it so heavily for their fledgling Unix-based OS X that they ended up buying it in 2007 to ensure its continued development and maintenance.
If your system doesn't already have CUPS installed, you can install it with your package manager. For example, on Fedora, Mageia, or CentOS:
$ sudo dnf install cupsOn Debian, Linux Mint, and similar:
$ sudo apt install cupsAccessing CUPS on Linux and Mac
To access CUPS, open a web browser and navigate to localhost:631, which tells your computer to open whatever's on port 631 on itself (your computer always refers to itself as localhost).
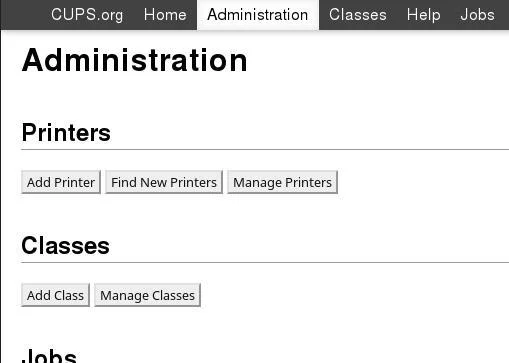
Your web browser opens a page providing you access to your system's printer settings. From here, you can add printers, modify printer defaults, monitor queued jobs, and allow printers to be shared over your local network.

Figure 1: The CUPS web user interface.
Configuring a printer with CUPS
You can either add a new printer or modify an existing one from within the CUPS interface. Modifying a printer involves the exact same pages as adding a new one, except that when you're adding a printer, you make new choices, and when you're modifying a printer, you confirm or change existing ones.
First, click on the Administration tab, and then the Add Printer button.
If you're only modifying an existing printer, click Manage Printers instead, and then choose the printer you want to change. Choose Modify Printer from the Administration drop-down menu.
Regardless of whether you're modifying or adding, you must enter administrative authorization before CUPS allows you to continue. You can either log in as root, if that's available to you, or as your normal user identity, as long as you have sudo privileges.
Next, you're presented with a list of printer interfaces and protocols that you can use for a printer. If your printer is plugged directly into your computer and is on, it's listed as a Local Printer. If the printer has networking built into it and is attached to a switch or router on your network, you can usually use the Internet Printing Protocol (ipp) to access it (you may have to look at your router to determine the IP address of the printer, but read your printer's documentation for details). If the printer is a Hewlett-Packard, you may also be able to use HPLIP to access it.
Use whatever protocol makes sense for your physical setup. If you're unsure of what to use, you can try one, attempt to print a test page, and then try a different one in the case of failure.
The next screen asks for human-friendly details about the printer. This is mostly for your reference. Enter a name for the printer that makes sense (I usually use the model number, but large organizations sometimes name their printers after things like fictional starships or capital cities), a description, and the location.
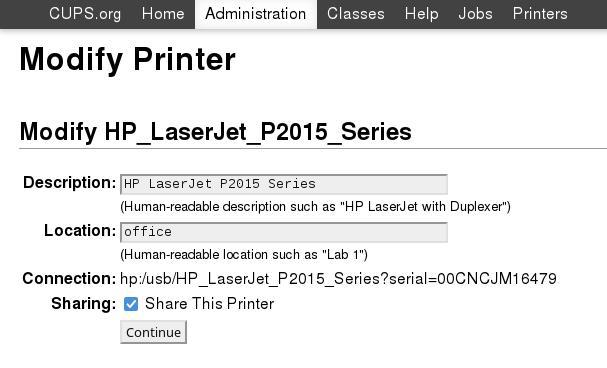
You may also choose to share the printer with other computers on your network.

Figure 2: CUPS web user interface to share printers.
If sharing is not currently enabled, click the checkbox to enable sharing.
Drivers
On the next screen, you must set your printer driver. Open source drivers for printers can often be found on openprinting.org. There's a good chance you already have a valid driver, as long as you have the gutenprint package installed, or have installed drivers bundled with the printer. If the printer is a PostScript printer (many laser printers are), you may only need a PPD file from openprinting.org rather than a driver.
Assuming you have drivers installed, you can choose your printer's make (manufacturer) for a list of available drivers. Select the appropriate driver and continue.
Connecting to a shared printer
Now that you have successfully installed and configured your printer, you can connect to it from any other computer on your network. For example, suppose you have a laptop called client that you use around the house. You want to add your shared printer to it.
On the GNOME and Plasma desktops, you can add a printer from the Printer screen of Settings:
- If you have your printer connected to a computer, then you enter the IP address of the computer (because the printer is accessible through its host).
- If you have your printer connected to a switch or router, then enter the IP address of the printer itself.
On macOS, printer settings can be found in System Preferences.
Alternately, you can keep using the CUPS interface on your client computer. The process to access CUPS is the same: Ensure CUPS is installed, open a network, and navigate to localhost:631.
Once you've accessed the CUPS web interface, select the Administration tab. Click the Find New Printers button in the Printers section, and then add the shared printer to your network. You can also set the printer's IP address manually in CUPS by going through the normal Add Printer process.
Print from anywhere
It's the 21st century! Put the USB thumb drive down, stop emailing yourself files to print from another computer, and make your printer available to your home network. It's surprisingly easy and supremely convenient. And best of all, you'll look like a networking wizard to all of your housemates!


Comments are closed.