When you're dealing with audio files, you'll run into a few problems every so soften. This is especially true with voice recordings and audio that was converted to a digital format from a cassette tape or a vinyl record.
One of the biggest problems is noise. This could be hissing or background noise like the sound of the wind or a loud air conditioning unit, or even someone inadvertently breathing into a microphone. No matter what the source is, that noise is distracting. And while it's difficult to eliminate all of the noise from a digital audio recording, it is possible to clean the file up so that the noise tolerable.
A great way to do that is with Audacity. In this article, I look at how to clean up digital audio using the Linux version of Audacity. The techniques work equally well with the Windows and Mac OS versions of the software, too.
Enter Audacity
Audacity is an open source sound recorder and editor that enables you to record, modify, and export audio files.
While Audacity is powerful and fairly easy to use, it's not quite a professional-level tool. There's a lot Audacity can do, but there's just as much that it can't do. After using Audacity to work on your audio files you shouldn't expect the quality of audio you get from a store-bought CD or a high-quality digital download. The results will, however, be more than adequate for most purposes.
Getting started
If you don't have a copy of Audacity installed, download it or install it using your distribution’s package manager. Since MP3 is arguably the dominant digital audio format, chances are you'll be working with MP3 files almost exclusively. Audacity doesn't have built-in support for MP3s. You can add that support by downloading and installing an open source audio encoder called LAME. When used in conjunction with software like Audacity, LAME enables the software to import and export MP3 files that are of a high quality.
In Audacity, select File > Import > Audio. Find the audio file that you want to clean up and then click OK. Here's what raw audio looks like in Audacity:
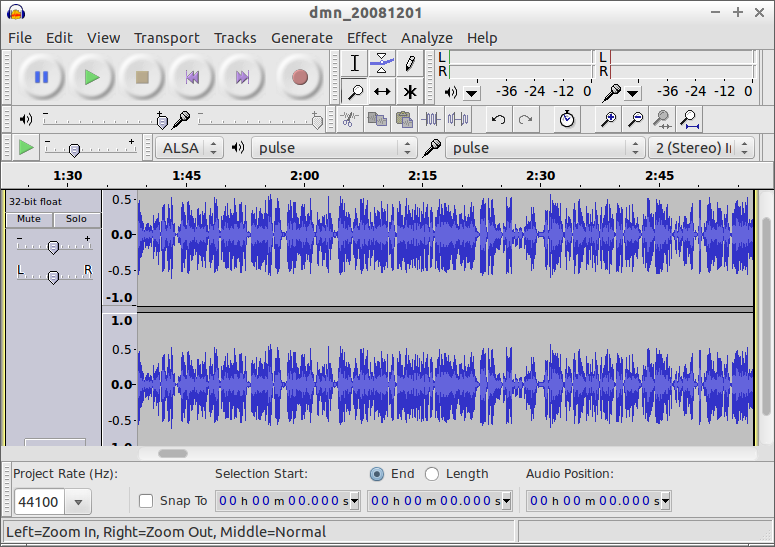
Notice that the audio is represented by a set of densely packed vertical lines called a waveform. The longer portions of the waveform are louder than the shorter portions. This becomes important later.
Listen to some or all of the audio before editing the file. This gives you an idea of the quality of the recording, and helps you plan how to edit the file. It also helps you identify the portions of the file that need to be cleaned up.
You can get good results using the following two-stage process:
-
Removing noise
-
Evening out the loud and soft portions of the audio
Removing the noise
Audacity has a great built-in noise reduction tool. To get it to do its job properly, you need to get your hands a bit dirty. So, first you need to get a noise profile which lets Audacity recognize what noise in the file actually is. The profile gives Audacity a baseline from which to work. To get a good noise profile, you need to find a section of the audio file in which there's no talking. This appears as a flat line in Audacity. Several seconds worth of dead air is best. If you don't have that much, use what you can.
Click and drag to highlight the noise. Then, select Effect > Noise Removal. Click Get Noise Profile.
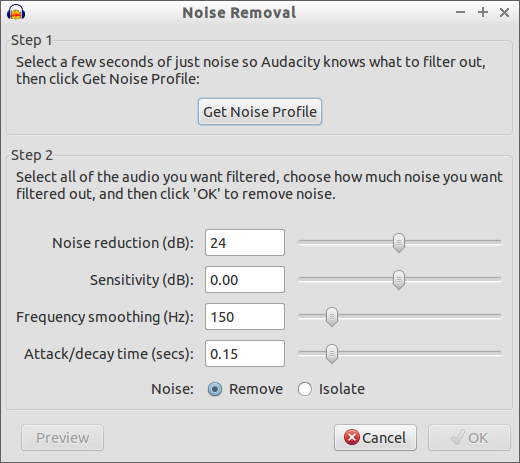
Depending on the size of the noise sample that you selected, this can take anywhere from one to several seconds.
Highlight the entire audio file by pressing CTRL+A on your keyboard. Select Effect > Noise Removal again. Move the sliders to the left (for less) or the right (for more), depending on how much noise you want to remove. Click Preview to test your selection.
If you move the sliders too far to the right, you get a noticeable echo. While the echo replaces the noise that you're trying to eliminate, it’s annoying too. With many audio files – especially ones that are just voice recordings – moving the sliders slightly left of center works best.
When you're satisfied that you've chosen the correct settings, click Remove Noise. Once again, depending on the length of the audio file the noise removal process can take anywhere from a couple of seconds to up to 20 seconds.
Click the Play button on the toolbar to test the noise level by playing the entire file. Remember that what you do isn't permanent. If the result isn't what you expected, undo it by pressing CTRL+Z on your keyboard. Then, repeat the noise removal process with different settings.
At the end of the noise removal phase, you'll find that much (if not all) of the noise is gone. Whatever's left probably isn't that annoying or distracting. You can clean the file even more using a utility called the Compressor.
Evening out the sound
Most audio files don't have a uniform volume. There are sections that are louder than others. Audacity can even out the loud and soft sections with its Compressor utility. The Compressor looks at the louder and softer portions of your audio file and then lowers the volume of the louder bits while not touching the softer portions.
To use the Compressor, first highlight the section of the file containing the sound that you want to even out. Then, select Effect > Compressor.
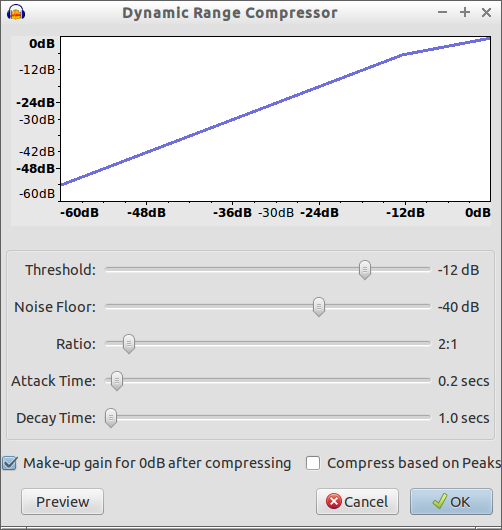
The Compressor dialog box looks intimidating, but once you get going it's fairly easy to use. Focus on the Threshold setting. The threshold is the maximum amount of volume that the Compressor will tolerate. The threshold is measured in decibels (db). Any bit of audio that is louder than the threshold has its volume reduced.
You should set a threshold somewhere between the loudest and softest parts of your audio. So, if the loudest part is -7db and the softest is -13db, then you should set a threshold of -10db. Set the threshold by clicking and dragging the Threshold slider.
Next, look at the Ratio setting. This sets the level of compression. Usually, the default of 2:1 is good enough for most recordings. There will be times when a higher ratio, like 3:1, might be better. I've never had any reason to set the ratio higher than 4:1.
Leave the Attack Time and Decay Time setting as they are. Also, leave the Make-up gain for 0db after compressing option checked. This will slightly increase the overall volume of your recording and, in many cases, help alleviate any sound drop outs.
Click the Preview button to test whether or not you chose the right settings. When you’re ready to go, click OK. Again, the compression process takes several seconds, depending on the size of the file.
As with the noise removal process, test the compression by highlighting the section you just compressed and then clicking Play. You can undo your edits by pressing CTRL+Z. Then, repeat the compression process with different settings.
Going back to MP3
Once you're satisfied that enough of the noise has been removed, save the audio as an MP3. Select File > Export. Then, choose MP3 files from the list of file types and select the folder on your computer in which you want to save the file.
Summing up
You'll need to experiment with Audacity and its tools in order to get the results that you want. It takes a bit of work, but you'll quickly come up with a set of settings and remedies that work for you.
Remember that no two audio files are alike. With each new file that you're cleaning up, you'll need to tweak the settings that you use.
While Audacity isn't a professional tool, it is a great choice for most audio cleanup tasks. With a little practice, you will become quite adept at using it to make your audio files sound better.
A version of this article was published at the Geeks.com’s Tech Tips blog (December, 2006). Reposted here via a Creative Commons.





6 Comments