If you've ever taken a digital photograph into GIMP to remove red eye or an ex-girlfriend or ex-boyfriend, or crop out a finger that got into the edge of the frame, then you are practically a compositor. A "comp artist," as they are called in the industry, specializes in taking disparate moving images and placing them in the same frame, usually to make it appear that the different elements were shot at the same time. On the big screen, you'll see this in nearly every movie since 1933's King Kong (or thereabouts), but the art has reached a science in the digital realm, where some movies are practically not so much as edited as they are superimposed.
There aren't many dedicated compositing applications on the market, and open source owns not one, but two of them. The first is Blender, which has well proven its worth as a compositor, most recently in Tears of Steel, a movie that combines live action with CG seamlessly. A more recent addition to the team has been Natron, an application that models itself on established compositing conventions and leverages existing initiatives for an open VFX landscape such as openeffects.org, opencolorio.org, and opencv.org.
Installing Natron
To install Natron, just download the installer from its website. Run it either as a normal user to install it into your home directory (you might install it to ~/bin/natron, for instance), or with the kdesu or gksudo commands to install it systemwide (for example, you might put it in /opt/natron so that any user can access it).
The install wizard will offer to install several third party tools, including the Tuttle effects; install everything.
Running Natron at the close of the installer may or may not work depending on how you installed it; either way, after the install, launch it from either your file manager or applications menu.
Basic compositing
Compositing is both a science and an art, but the user mechanics of Natron don't take long to pick up.
To get started, download the Slackermedia logo from the front page of slackermedia.info and save it to your hard drive in a sensible location. The full path to the image is http://slackermedia.info/images/bigskull.png
$ wget http://slackermedia.info/images/bigskull.png
Launch Natron if it's not already running.
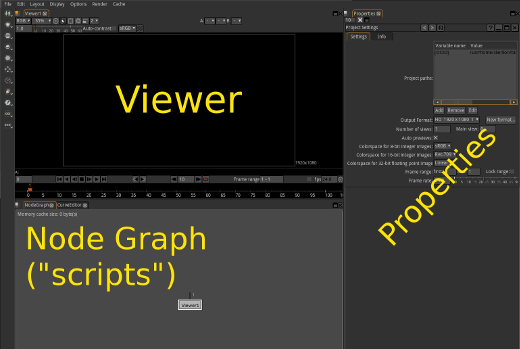
- The top left of the Natron window is a viewer.
- The bottom left is the Node Graph (called a "script panel" by most compers).
- The right half of the Natron window is the Properties panel.
In the Project Settings panel in the Properties area, set the colorspace if that is important to you (for this demo, it is not). Set the Frame Range from its current default value of 1-1 to 1-24. Set the Frame Rate to 12 or so (only because this is a demo and full specs are not required).
To import a movie or image sequence or, in this case, a single image, into Natron, right-click any where in the Node Graph area and select Image > Read, or just press the r key on your keyboard whilst your mouse cursor is within the bounds of the Node Graph.
Once the image is in your workspace, it may not show up in the viewer (depending on how you imported it) because it is not connected to the viewer. Click on the arrow head on the bottom edge of the Read image node and drag your mouse cursor over to the Viewer1 node. After you release the mouse button an arrow appears between the nodes and the image appears in your viewer window.
Natron sets your viewer size to the size of the first image you import. In the Project Settings panel in the Properties area, set the Output Format to a reasonable demo frame size. Since this is just a demo, a small frame size might be better, so set it to PAL unless you want to stress-test your computer to see what it can handle.
Everything is a node
In Natron, nearly everything is a node. If you are experienced with GIMP or Synfig, then whatever your impulse might be to do in either of those applications can be translated to finding a node in Natron to do the same job. It's not always a direct translation, but it's a good place to start.
With the Slackermedia logo in your workspace, add some text:
- Right-click in the Node Graph window.
- Select Draw > TuttleText
- In the Text field of the Tuttle Text properties panel, type a string. Set the font size and font to something you can easily see.
- Set Color to white and Background Color to black.
If you connect the TuttleText node to the Viewer1 node, the text takes over the viewer and it's all you see. You lose the logo, even though both are being fed to the viewer.
That's where the compositing comes in; to see two layers together, you must composite them together:
Right-click in the Node Graph window. Select Merge > Merge. Connect the image node to the A input of the merge node. Connect the text node to the B input of the merge node. Connect the merge node to the viewer.
If the viewer does not update properly, turn on Turbo Mode by clicking the rightmost button in the Timeline strip between the viewer window and Node Graph. This requires more RAM but if you have it, use it. If all else fails, disconnect the viewer and then re-connect it (more commonly known as "unplug it, and plug it back in again").
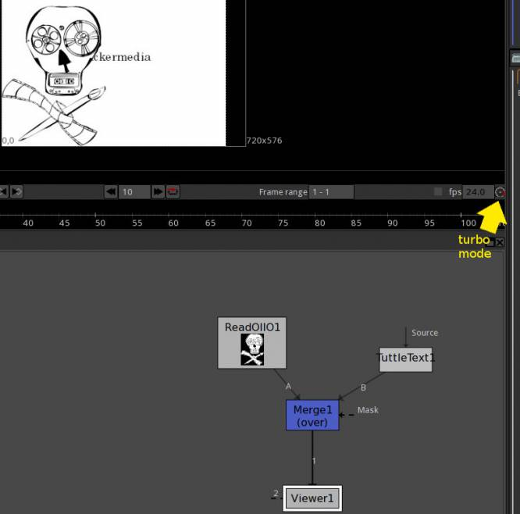
The two images are now composited together. The default merge is an over composite. There are several different types of compositing, and sometimes they go by slightly different names in different programs, but the principles are always the same.
Change the merge composite type in the Merge1 properties panel.
In this exercise, the source material is black and white, so all of the composite modes are basically binary in this case; everything is multiplied or added to absolute values. In most composites, this is not the case. If you want to see more realistic composite examples, try bringing in a photo or video of your own and see how it reacts to text or another image.
Basic animation
Natron would be an over-complex version of GIMP were it not for the fact that it composites pictures that move. Since most of the pictures in Natron will be moving, it's not unusual for the elements you are using to composite them together to have to move.
Currently, the Slackermedia logo and the text in the demo composite are static. Anything that has a keyframe button ![]() next to it can be animated, and there are several additional nodes that add more animate-able properties to your assets.
next to it can be animated, and there are several additional nodes that add more animate-able properties to your assets.
To animate something in Natron, use keyframes. The keyframe buttons are located in the Property Panels.:
- Move the playhead to frame 1 by using the play controls along the timeline, or just drag and drop it.
- In the TuttleText property panel, click the keyframe button and select Set Key (All Dimensions. This creates a new keyframe; in the timeline, the playhead turns blue.
- Move the project playhead to frame 18 (or some frame later in time), and click the keyframe button again to set a new keyframe.
- You have two keyframes, but no motion between the two points in time. The easiest way to tween in Natron is the Curve Editor window, which is a tab behind the Node Graph window. If there is no Curve Editor tab, click the Layout button to the left of the Node Graph tab and select Curve editor here.
- Switch to the Curve Editor window and locate the lines that represent the X and Y positions. As in Blender, use the mouse wheel (or the scroll function1 on your touchpad) to zoom in and out. Middle-mouse click to move around in the Curve Editor.
- Grab onto the keyframe markers in the Curve Editor to change the values of the TuttleText node in whatever way you want your animation to occur. For instance, try moving the text from right to left.
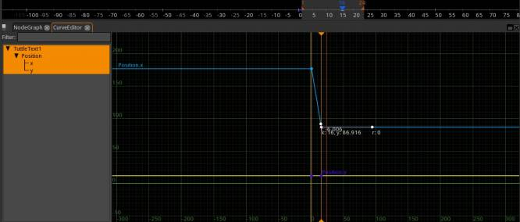
When you're finished your animation, send the playhead back to the start and press play.
Not all assets have handy position markers built in the way TuttleText does. You can add properties, like position, crop, size, rotation, and so on, by adding more nodes to your script. For example, to add a transform node:
- Click the Slackermedia logo node in the Node Graph window.
- Right-click anywhere in the Node Graph window.
- Select Transform > Transform. A transform node appears inline directly after the selected node.
- Click the transform node in the Node Graph window.
- In the Transform property panel, change the position, skew, scale, rotation (and more).
As with any property panel, anything with a keyframe button can be animated.
Chroma key example
There's a time and a place for motion graphics, but a more real-world example of Natron's ability is the ubiquitous green screen effect. For this, you need sample footage. Sample footage abounds online, but much of what you find online is heavily compressed, which by definition discards information. For a clean green screen, the less compressed your footage, the better.
If you have no green screen footage to use, try doing an Internet search for green screen shots; there are plenty online that you can use at least to experiment on, if not release.
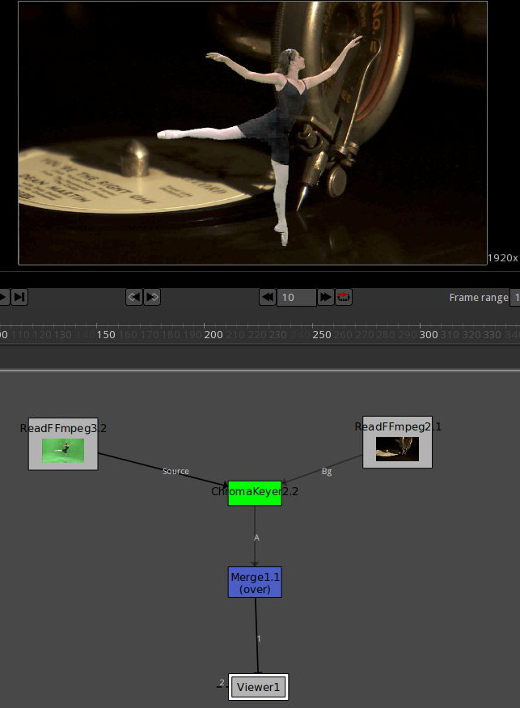
- Add a green screen shot with a Read node (r on your keyboard, or a right-click anywhere in the Node Graph window).
- Add a background shot or matte photo, also with a Read node (r on your keyboard, or a right-click anywhere in the Node Graph window).
- Add the "green screen effect", more technically known as a chroma key, from Keyer > ChromaKeyer.
- Connect the green screen node to the chromakeyer source.
- Connect the background node to the chromakeyer background.
- Connect the output of the Chromakeyer node to the Viewer node.
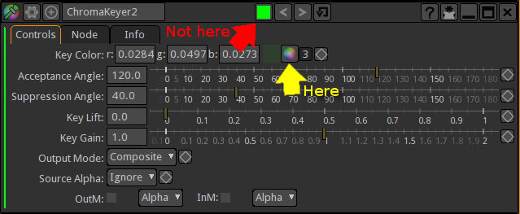
Use the color picker in the Chromakeyer properties panel (use the color picker in the panel not the title bar of the panel. The title bar color picker is for the visual appearance of the node in your scripts area, it has no affect on the actual function of the node.
Once you have a good chroma key, you'll see it in your viewer.
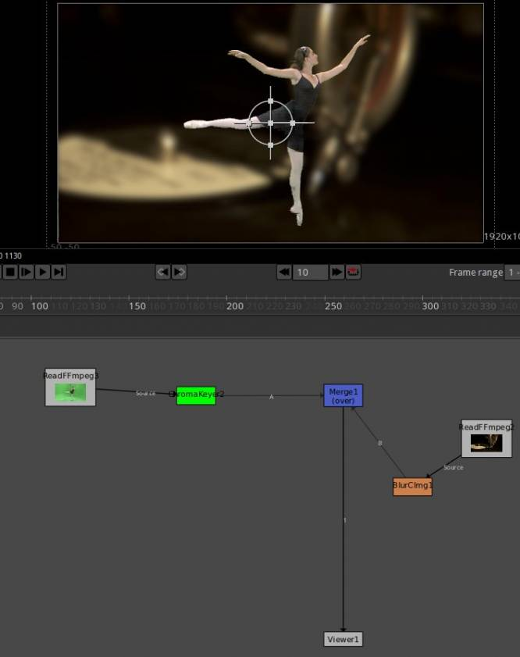
To get a feel for how flexible Natron is, and how a little extra effort in compositing can render improved results, let's add a little style to the shot.
- Add a Merge node to the Node Graph window.
- Connect the output of the ChromaKeyer to the A side of the Merge node.
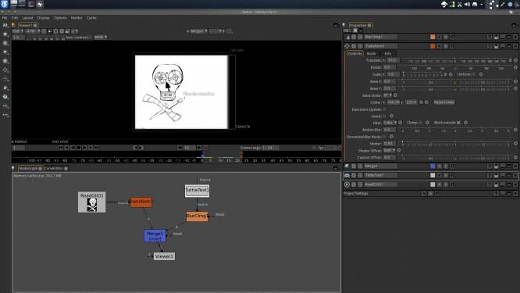
- Add an Filters > BlurCImg1 node after your background image, and disconnect the background (or the blur) from the ChromaKeyer. By freeing the background from the chroma key process, you add flexibility to how you can process the output of the keyer.
- Connect the blur node to the B side of the Merge node.
- Connect the Merge node to the Viewer.
- In the BlurCImg1 property panel, increase the blur amount until the background gets a "soft focus" look.
Now you have a scene with the suggestion of depth-of-field at best, or a de-emphasis on any clutter at worst.
In this example, the ballerina in the shot is still a little rough around the edges. There are several ways to deal with that issue, but in this case an artificial glow to suggest stage lighting is what the client is looking for. This is a good example of how output can be doubled up on itself to produce a unique effect.
- Without removing any nodes or connections, click and drag to select Read and Chromakeyer nodes. Right-click on your selection and choose Edit > Duplicate Nodes.
- Move the duplicated nodes to the side so you can work with them.
- Add a Merge > Dissolve node.
- Connect the new Chromakeyer output to the Dissolve node.
- Add a Filter > Tuttle Blur node and connect it to the Dissolve node.
- Now disconnect the original Chromakeyer from the Merge node and re-connect it into your new Dissolve node.
- Connect the Dissolve node to the Merge node.
- In the TuttleBlur properties panel, increase the blur amount just enough so that an outer glow appears around the subject.
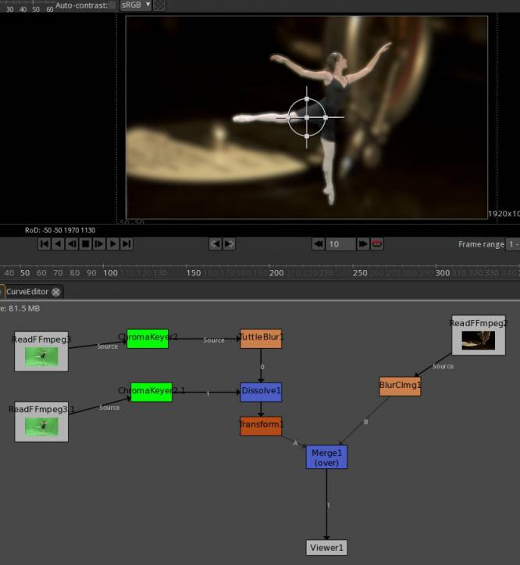
The composite is starting to look like a composite now. Of course, before we released it to the world as a video, we would want to do color grading (yes, there's a node for that) and probably a transform or two to position things better in the frame, but this gives you the basic idea of what is possible and how it all can be done..
The important lesson here is the segmentation technique; rather than hooking all nodes into a central Merge node, the script keeps individual effects in their own subroutines, which are then finally connected to a Merge just above the final viewer. That's not always how a composite will go, but it's important to keep in mind that few scripts are just three or four nodes, and fewer still are linear.
Natron is still a relatively young project. There is a surfeit of documentation on Natron proper, but the compositing principles and even the kinds of effects it uses (and indeed the very effects themselves) are well documented.
Many online tutorials even have free downloadable example assets that you can use in the application they are teaching. Those same assets and principles will work in Natron, so look around online if you are not familiar with node-based compositing; with a little translation, you can learn everything you need to know.
Makers
This article is part of Seth Kenlon's Multimedia Makers column, where he shares tutorials and tips on creating multimedia with Linux and its vast creative toolkit. In partnership with slackermedia.info and gnuworldorder.info.


Comments are closed.