When I started doing classroom-based research involving computers in the late 1990s, the first thing I had to do was bring some computers into a classroom. My adviser had gotten a grant for six first-generation Bondi Blue iMacs to be installed at the middle school where we doing our research. As soon as we entered the school carrying those inviting gumdrop-shaped machines, my worries about finding participants evaporated.
Computers anywhere, especially in middle school classrooms, were still relatively uncommon back then, and we were able to parlay their novelty into direct engagement with our educational intervention.
Nowadays, computers are far more prevalent, and students routinely carry mobile devices with far more computing power than those first-generation iMacs. While there is still a subset of students (adult and youth) who are interested enough in computer science that they'll sit in front of whatever device is available, the novelty and engagement of working on a computer are not enough to pull in kids that might otherwise pass by.
It's still possible to grab students with engaging device-based education, but now you need to use the mobile devices that your learners use all the time. This is where App Inventor shines.
A mobile programming framework
App Inventor is a programming framework for building Android applications using a visual blocks language (similar to Scratch or Snap). It was first prototyped by Hal Abelson and Mark Friedman while Hal was on sabbatical from MIT at Google, and it has since evolved from its original roots as a Java-based frontend to the USB debugger to a web-based one using the Blockly library.
App Inventor makes it possible to quickly and easily dive into building mobile applications for phones and tablets.
In the canonical introductory exercise, learners build a simple soundboard application—tap the picture of a cat and the phone plays a "meow" sound. After building the framework, learners can replace the sound with whatever they would like, add extra buttons, and build a custom soundboard with whatever amusing sound effects they desire. As soon as their first app is built, learners tend to immediately show off their work to their peers (especially ones that aren't yet working on an App Inventor project), playing whatever humorous sounds they recorded.
It's that phenomenon, where novice programmers immediately show off what they've built—a legitimate standalone application that can run on any Android device—that makes App Inventor such a compelling platform for teaching computer programming today. There may come a day when hand-built mobile applications go the way of the early iMac hockey puck mouse, but that day has not yet come.
Event-driven approach
App Inventor encourages learners to take an event-driven approach to thinking about their program. This model is very useful for modern programming (consider how much work is done by modern programs inside an event dispatch loop). By skipping over the notion of a main() that executes to completion, we can dive directly into asking questions like "what should happen when the user presses this button?" This can be a very natural way to teach programming concepts, especially with a project-based approach.
The App Inventor environment has two major parts, client and server, both of which are open source, under the Apache 2.0 license.
While you can run your own instance (especially cool if you want to build custom blocks that extend the language in some way), most users use the free instance running at appinventor.mit.edu. The web client is built around the Blockly library, another open source project that originated at Google. Blockly is designed as a kind of meta-language, a framework for building blocks-based programming languages for the web. I frequently use the Maze Blockly puzzle as the first introduction to blocks-based programming and thinking like a programmer, but Blockly can also be used to generate JavaScript code as well.
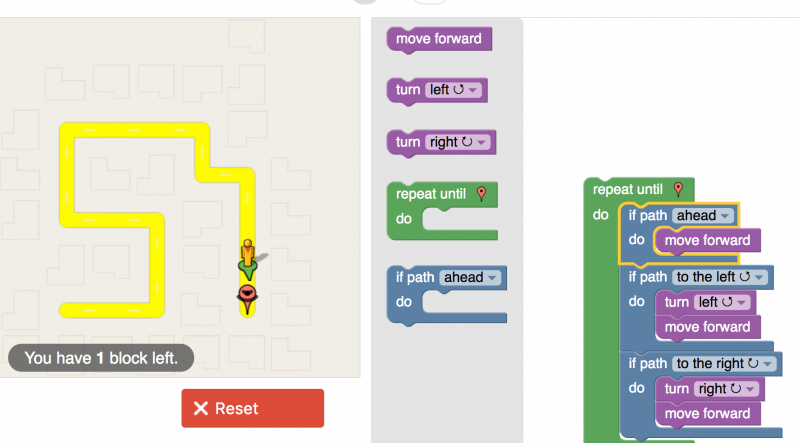
opensource.com
On the server end of things, App Inventor is a big Java server built to run in a Google App Engine container. The server handles mundane things like storing people's work, login credentials, and so on, as well as the more exciting and interesting compilation process by which users' blocks representations are converted to Android Package Kit (APK) files that can be downloaded and run.
In addition to the programming interface, users need to have an execution context. The simplest option is installing a special companion app on their Android devices. The companion app can be paired with their App Inventor session and will provide a live-updating instance of their work. In practice, I have found some school WiFi environments can't support this, as it requires peer network connections between the users' computers and devices). In those situations, either a USB debugger connection can be used between the phone and computer or an emulator can be run on the computer itself. If there is a shortage of usable devices, having students work on the emulator first makes sense, and then they can take turns uploading their applications to the phone. Students can also work by exporting their code as an APK and installing it directly on a device (provided third-party, unsigned apps are allowed on the phone), but that workflow is slow. That's why it's better to use live updating, especially for the companion app, as the USB connection can be quite tricky to establish (sometimes requiring the installation of drivers and always requiring the installation of the Android Debug Bridge).
Putting App Inventor into practice
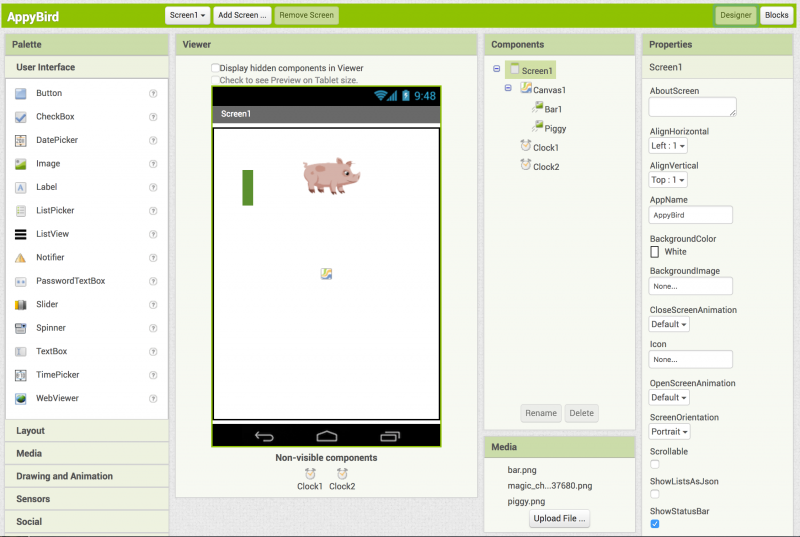
opensource.com
The design environment allows the user to build screens out of interface widgets such as buttons, input fields, and canvases (which can contain movable sprites or be painted to directly). The design environment also allows the activation of phone-specific inputs, such as orientation/shake sensing, the camera, and even Ajax requests to remote APIs.
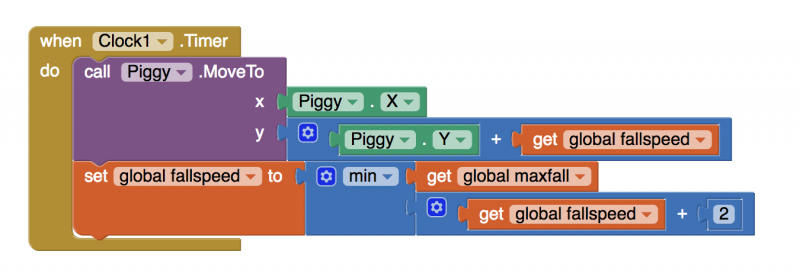
The programming environment, as mentioned above, is largely event-driven. A block of code is triggered when something happens, often a tap or a clock tick every N milliseconds. The block can contain standard imperative language constructs (loops and branches) and can set an app-global variable state. It is also possible to define functions with local parameters and return values (or ones that manipulate global state, which is a common novice approach with straightforward applications).
opensource.com
opensource.com
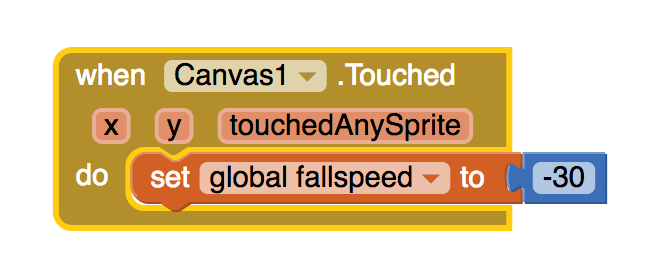
This, for example, is the animation routine for a Flappy Bird clone called "Appy Bird"—the sprite moves every clock tick. Also, on the clock tick, the sprite's velocity is reduced by a constant amount (simulating acceleration downwards), and on a screen tap, the velocity is set to an upward (positive) constant value. By adjusting the game's tick rate and acceleration, it is possible to fine tune for the most satisfying gameplay feel.
The Appy Bird game is a bit complicated when introducing App Inventor, but it's well within the reach of someone who has a bit more experience (or wants to continue building games after a week or so of introductory work).

opensource.com
While it is (or perhaps was three years ago when Flappy Bird was in the pop culture zeitgeist) fun to build an interactive flying pig game, App Inventor provides a handle on many other features that are unique to mobile devices. For example, your students may enjoy building something that responds to the tilt orientation of the device (perhaps moving a marble sprite around a maze by tilting), records the G forces the phone is experiencing (and graphs it by direct-drawing to a canvas), or interacts with the phone's SMS system to auto-reply to all incoming texts with, "Sorry, I'm driving right now, but I'll get back to you later," whenever the phone is traveling above a certain velocity (as computed by its GPS).
One of my students built a tool that allowed students to take geotagged pictures of murals in their neighborhood to upload to a Google Fusion Table (which then displayed the murals on a map overlay for the class and school to see). The direct-draw canvas (where students learn the strange coordinate system of computer displays) can be quite compelling to math students. A common challenge I give is: "draw a square wherever the user taps," extended to "let the user pick a number N, and then draw regular N-gons where they tap," culminating in "use the application storage system to remember the drawing the user made so they can reload and edit it later." (Note that the app storage erases when the application is run in debug mode, so direct-loading an APK is needed to really test this feature).
3 tips for teaching App Inventor
There are a number of good resources about using App Inventor to teach programming concepts, such as David Wolber's book App Inventor 2: Create Your Own Android Apps and the material at appinventor.mit.edu.
In addition, I've discovered a few principles you can use with any App Inventor lessons, whether you're teaching younger kids or adult learners. These principles derive from a model of project-based inquiry learning, which is used in math and science education in grades six through 12 (which, naturally, is aligned with the research I was doing in the late 1990s with those iMacs).
1. Engage your learners with a simple project that encapsulates some programming concept, but don't explicitly teach the concept first.
It is common in teaching to lecture about an idea first, and then provide a lab or problem set that exemplifies that concept. I prefer inverting this relationship; as the teacher, I know that my students are ready to learn about if/then/else constructs, but I don't need to start the class in front of the whiteboard explaining them. Instead, I can leverage a strength of a blocks-based language: Syntax errors are very difficult to create and blocks tend to be self-documenting. If I create a simple challenge that requires a language construct, I can usually let students figure out how those constructs work in the service of solving the challenge. As a specific example, after they do the simple cat soundboard exercise described above, I challenge my students to make the cat stop meowing after the button has been pressed five times. There are a number of ways to accomplish this, but all require tracking some kind of state and making a decision based on that state. Afterward, I will do a brief lecture that synthesizes what they did and then return to a new challenge: After the silent cat has been tapped an additional five times, it should say, "stop it." Ultimately, this program does not differ much from a FizzBuzz assignment (except that it does not use modular arithmetic), but it is far more engaging.
This single and simple principle for teaching using App Inventor is extraordinarily powerful and important. While many people in computer science learned well in the lecture-then-demonstrate environment that pervades education, orders of magnitude more people did not respond well to that teaching style. In general, a lecture is more useful when the listeners know enough about the topic that it makes sense to them immediately—that is, they see the utility while you are talking about it.
2. Allow your students a chance to be smart in different ways.
Some people want to learn to program because they want to make games, or tell stories, or build clever interactions. If you structure assignments in a way that affords creative expression, you will be constantly surprised with what your students build. In practice, this primarily means making sure that the underlying projects you select are extendible in many directions. The soundboard could easily evolve into a multi-button synthesizer panel, it could embody a game of remember-the-sequence, or it could just have a lot of really clever sounds and funny images. If you give your students different ideas about what they could build and then give them time to build interesting things, they will not only stretch their own understanding, they will usually run up against the next important concept in your progression (such as in the soundboard lesson sequence, either looping or functional decomposition, depending on which features the students elaborate on).
3. Encourage small group work.
This aligns with the first two points: If you allow for a rich set of project-based learning experiences, your students will work and learn better together in groups, especially groups that are heterogeneously mixed by ability and interest. It is important to keep a close eye on how your groups are functioning and encourage frequent role switching (e.g., who is driving the keyboard, who is asking questions and monitoring progress, who is designing interactions).
If you apply these three principles to teaching App Inventor (or really, any kind of programming education), your students are likely to be more actively engaged with the lessons and constantly surprising you with how much they can build with relatively few language constructs.



Comments are closed.