My first day with Kubernetes involved dockerizing an application and deploying it to a production cluster. I was migrating one of Buffer's highest throughput (and low-risk) endpoints out of a monolithic application. This particular endpoint was causing growing pains and would occasionally impact other, higher priority traffic.
After some manual testing with curl, we decided to start pushing traffic to the new service on Kubernetes. At 1%, everything was looking great—then 10%, still great—then at 50% the service suddenly started going into a crash loop. My first reaction was to scale up the service from four replicas to 20. This helped a bit—the service was handling traffic, but pods were still going into a crash loop. With some investigation using kubectl describe, I learned that Kubelet was killing the pods due to OOMKilled, i.e., out of memory. Digging deeper, I realized that when I copied and pasted the YAML from another deployment, I set some memory limits that were too restrictive. This experience got me started thinking about how to set requests and limits effectively.
Requests vs. limits
Kubernetes allows for configurable requests and limits to be set on resources like CPU, memory, and local ephemeral storage (a beta feature in v1.12). Resources like CPU are compressible, which means a container will be limited using the CPU management policy. Other resources, like memory, are monitored by the Kubelet and killed if they cross the limit. Using different configurations of requests and limits, it is possible to achieve different qualities of service for each workload.
Limits
Limits are the upper bound a workload is allowed to consume. Crossing the requested limit threshold will trigger the Kubelet to kill the pod. If no limits are set, the workload can consume all the resources on a given node. If there are multiple workloads running that do not have limits, resources will be allocated on a best-effort basis.
Requests
Requests are used by the scheduler to allocate resources for a workload. The workload can use all the requested resources without intervention from Kubernetes. If no limits are set and the request threshold is crossed, the container will be throttled back down to the requested resources. If limits are set and no requests are set, the requested resources match the requested limits.
Quality of service
There are three basic qualities of service (QoS) that can be achieved with resources and limits—the best QoS configuration will depend on a workload's needs.

Guaranteed QoS
A guaranteed QoS can be achieved by setting the limit only. This means that a container can use all the resources that have been provisioned to it by the scheduler. This is a good QoS for workloads that are CPU bound and have relatively predictable workloads, e.g., a web server that handles requests.

Burstable QoS
A burstable QoS is configured by setting both requests and limits with the request lower than the limit. This means a container is guaranteed resources up to the configured request and can use the entire configured limit of resources if they are available on a given node. This is useful for workloads that have brief periods of resource utilization or require intensive initialization procedures. An example would be a worker that builds Docker containers or a container that runs an unoptimized JVM process.

Best effort QoS
The best effort QoS is configured by setting neither request nor limits. This means that the container can take up any available resources on a machine. This is the lowest priority task from the perspective of the scheduler and will be killed before burstable and guaranteed QoS configurations. This is useful for workloads that are interruptible and low-priority, e.g., an idempotent optimization process that runs iteratively.

Setting requests and limits
The key to setting good requests and limits is to find the breaking point of a single pod. By using a couple of different load-testing techniques, it is possible to understand an application's different failure modes before it reaches production. Almost every application will have its own set of failure modes when it is pushed to the limit.
To prepare for the test, make sure you set the replica count to one and start with a conservative set of limits, such as:
# limits might look something like
replicas: 1
...
cpu: 100m # ~1/10th of a core
memory: 50Mi # 50 Mebibytes
Note that it is important to use limits during the process to clearly see the effects (throttling CPU and killing pods when memory is high). As iterations of testing complete, change one resource limit (CPU or memory) at a time.
Ramp-up test
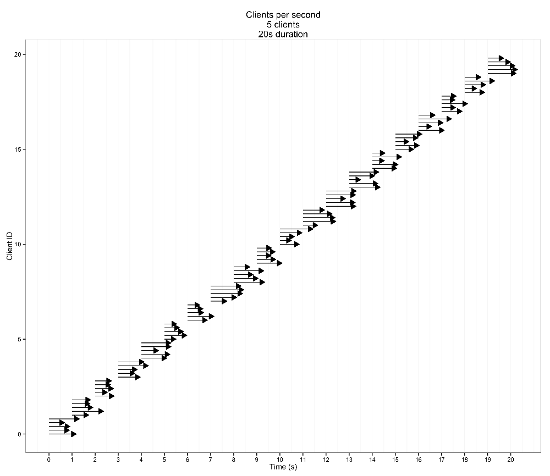
The ramp-up test increases the load over time until either the service under load fails suddenly or the test completes.

If the ramp-up test fails suddenly, it is a good indication that the resource limits are too constraining. When a sudden change is observed, increase the resource limits by double and repeat until the test completes successfully.
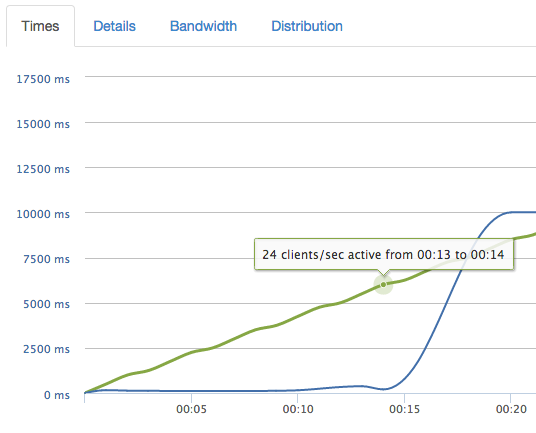
When the resource limits are close to optimal (for web-style services at least), the performance should degrade predictably over time.
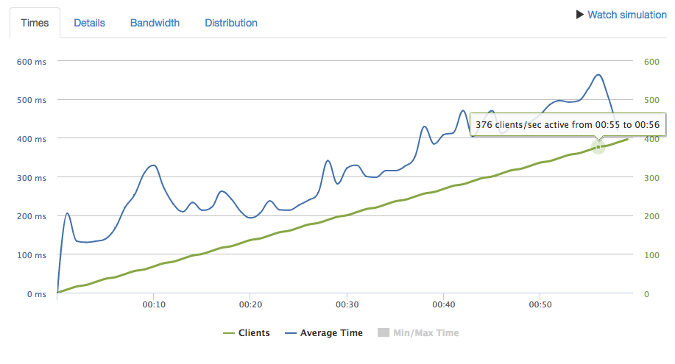
If there is no change in performance as the load increases, it is likely that too many resources are allocated to the workload.
Duration test
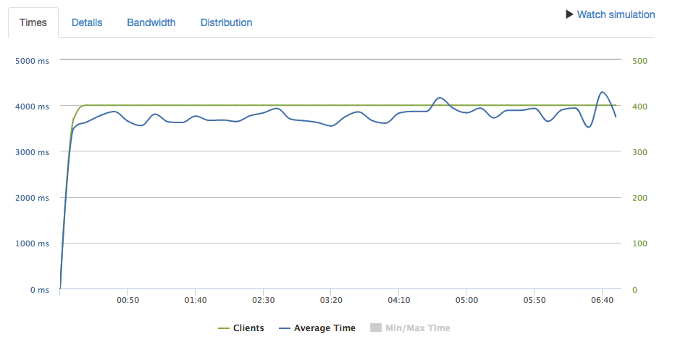
After running the ramp-up test and adjusting limits, it is time to run a duration test. The duration test applies a consistent load for an extended period (at least 10 minutes, but longer is better) that is just under the breaking point.
The purpose of this test is to identify memory leaks and hidden queueing mechanisms that would not otherwise be caught in a short ramp-up test. If adjustments are made at this stage, they should be small (>10% change). A good result would show the performance holding steady for the duration of the test.
Keep a fail log
When going through the testing phases, it is critical to take notes on how the service performed when it failed. The failure modes can be added to run books and documentation, which is useful when triaging issues in production. Some observed failure modes we found when testing:
- Memory slowly increasing
- CPU pegged at 100%
- 500s
- High response times
- Dropped requests
- Large variance in response times
Keep these around for a rainy day, because one day they will save you or a teammate a long day of triaging.
Helpful tools
While it is possible to use tools like Apache Bench to apply load and cAdvisor to visualize resource utilization, some tools are better suited for setting resource limits.
Loader.IO
Loader.io is a hosted load-testing service. It allows you to configure both the ramp-up test and the duration test, visualize application performance and load as the tests are running, and quickly start and stop tests. The test result history is stored, so it is easy to compare results as resource limits change.

Kubescope CLI
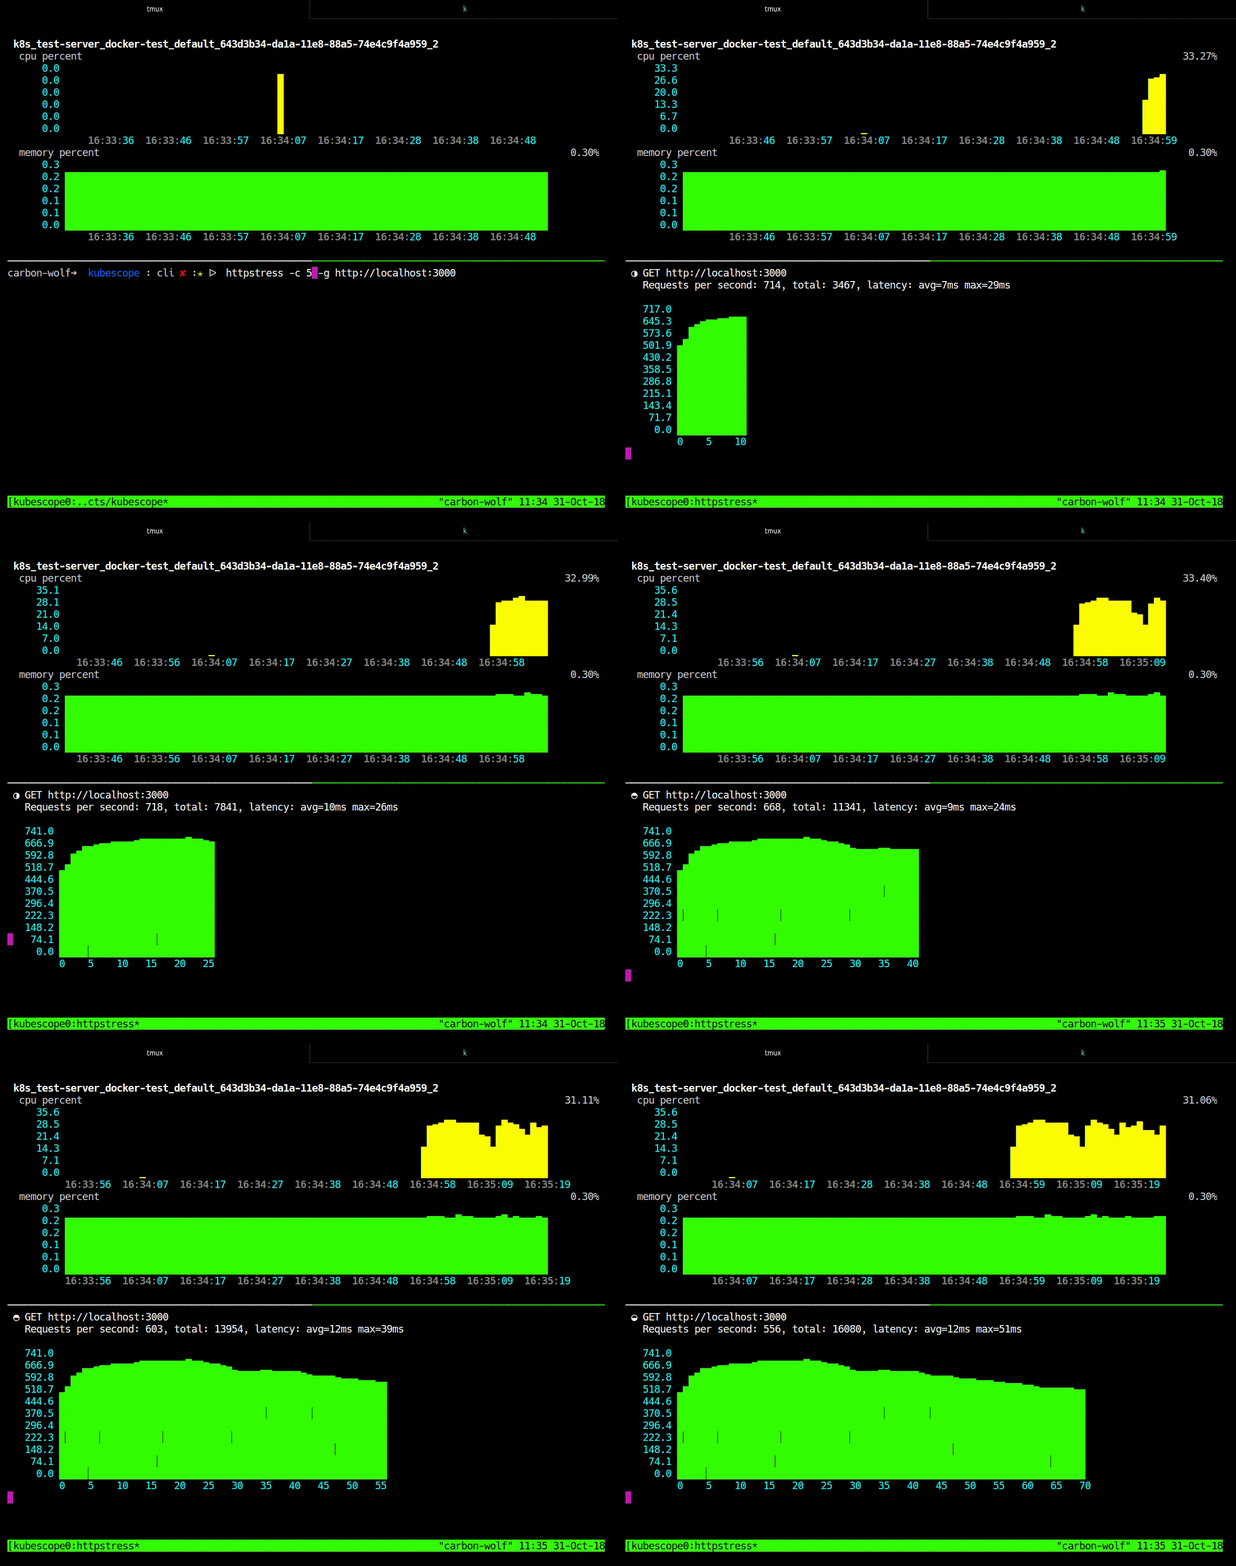
Kubescope CLI is a tool that runs in Kubernetes (or locally) and collects and visualizes container metrics directly from Docker (shameless plug). It collects metrics every second (rather than every 10–15 seconds) using something like cAdvisor or another cluster metrics collection service. With 10–15 second intervals, enough time passes that you can miss bottlenecks during testing. With cAdvisor, you have to hunt for the new pod for every test since Kubernetes kills it when the resource limit is crossed. Kubescope CLI fixes this by collecting metrics directly from Docker (you can set your own interval) and using regular expressions to select and filter which containers you want to visualize.
Conclusion
I found out the hard way that a service is not production-ready until you know when and how it breaks. I hope you'll learn from my mistakes and use some of these techniques to set resource limits and requests on your deployments. This will add resiliency and predictability to your systems, which will make your customers happy and will hopefully help you get more sleep.
Harrison Harnisch will present Getting The Most Out Of Kubernetes with Resource Limits and Load Testing at KubeCon + CloudNativeCon North America, December 10-13 in Seattle.


Comments are closed.