In 2019, is there anything that the mighty, $35, credit card-sized Raspberry Pi computer can't do? It seems there isn't; recent Raspberry Pi projects include a functional smartphone, a computer vision kit, and even a movie projector for a more traditional home theater experience.
A Raspberry Pi (RPi) can even be turned into a server for virtual private networking (VPN). One of the many things you can tinker with on an RPi is data communications; this is one reason why they are often called "Swiss Army knives for hackers"—and not necessarily the malicious kind.
RPis can function as servers for many projects, and if you have more than one personal computing device on a personal network, the RPi can be put to work as a dedicated server. From Minecraft servers to website hosts to IRC to network printing operations, many of these projects involve a series of software installation and configuration steps, as is the case for the RPi VPN server you'll build in this tutorial.

Raspberry Pi 2 Model B Desktop (Quad Core)
Why would you want a Raspberry Pi VPN server?
The main reason to run your own open source VPN server from an RPi is overall security, which no one can take for granted. If you arrive on a webpage through an open internet connection—one not established with a proxy or a VPN tunnel—chances are the website administrator can get your IP address and determine where you were when you connected.
Furthermore, your internet service provider will have a record of your browsing session, and you can't be sure that a man-in-the-middle attack didn't capture the information exchanged by your computing device and the web hosting server.
If you are browsing inside a repressive regime that monitors and censors internet activity, the fact that you are reading content related to setting up VPN servers may catch the attention of unpleasant individuals such as intelligence agents.
A more lighthearted reason for undertaking an RPi VPN server project is because it is fun. The Raspberry Pi Foundation wants you to tinker with the devices and talk with people about your RPi projects to expand computer literacy. This project is a great one to do for fun and function.
Create a double-hop connection
While you could go with the RPi as your sole VPN protection, keep in mind that the operative word here is "lightweight." As in "the RPi server costs less than $40 and is the size of a credit card." So, I suggest you include an actual VPN server in addition to the RPi VPN server you'll build in this project. To use a little techie lingo, you'll have a double-hop connection, which means twice the security.
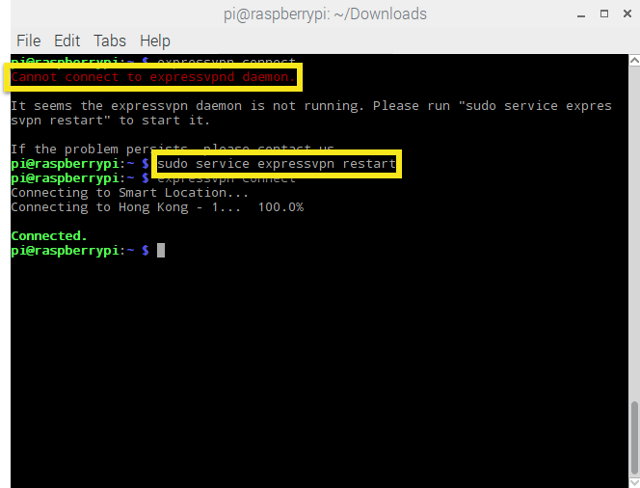
There are hundreds of consumer VPN applications today; look for one that supports the OpenVPN protocol, which is newer than most other VPN communication protocols like PPTP and L2TP, and considered the current gold standard in secure communication. A few examples would be Private Internet Access, ExpressVPN, or the OpenVPN app itself, all three of which allow their users to connect using the open-source OpenVPN protocol. Here is a guide to set up Express on an RPi server, which makes the process fairly simple.

Setting up the Raspberry Pi with ExpressVPN
The most important factors in choosing a VPN are privacy, price, and speed. Look for a provider that operates servers in many countries and a solution that will maintain good speed even when joined with the RPi server.
With that out of the way, it's time to get serious using Raspberry Pi to create a VPN server from scratch.
Getting started
As with everything related to the RPi, the first step is to ensure your device is running the correct Linux distribution. In this case, that would be Raspbian, preferably a version that is at least Jessie or Stretch. As you can glean from its name, Raspbian is a Debian-based operating system and thus part of a Linux family often considered a truly universal OS platform.
Ideally, you have a wired Ethernet connection between your RPi and your router; otherwise, you will have to make sure to use the wlan0 argument instead of eth0 when configuring the server.
You want to go into SSH server mode for this project, which you can enable through the Pi menu under Interfacing Options. If you are more of a terminal user, you can enter:
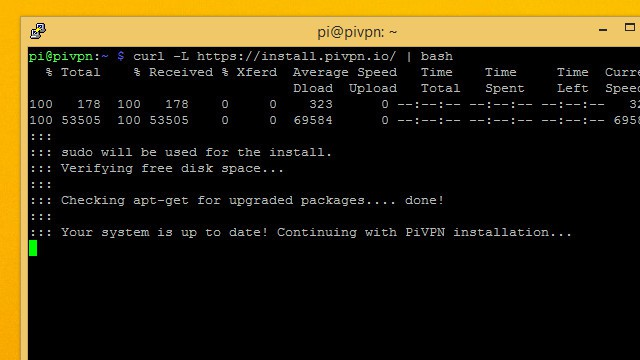
sudo raspi-configEither way, SSH will not be enabled until you reboot the RPi. The next step is to install PiVPN, which you can get from GitHub. But you really want to skip the browser session because you are already in SSH, so bring up the terminal and enter:
curl -L https://install.pivpn.io | bash

Installing PiVPN
When prompted for updates and dependencies, accept all of them and wait for the installation process, which could take a while. You will be introduced to the PiVPN installer, which is nicely presented in a graphic interface.
Let the installer script set up a logical static IP address unless you already have a favorite one in mind. Here's where you have to choose between wlan0 or eth0 —the latter is for a wired connection to your router while the former is for WiFi. If you allow the PiVPN installer to enter predetermined values for the static IP address, they will be the same as your router's.
After a few minutes of calibration and configuration (which you can see happening in the terminal), the PiVPN interface will prompt you to select a local user; your user name will be pi, and you can check this link to add other users later. To this effect, you can always use the terminal after installation by entering the pivpn command and reviewing the options, for example:
pivpn -a newadditionaluser nopassThis command will create a profile username of "newadditionaluser" without a password.
Important: Enable unattended upgrades
The next step is crucial to open a data communications port in your RPi. The screen will prompt you to enable unattended upgrades, which you will want to confirm with Yes. Do not take a chance of declining updates while you have an open port; if you do, malicious hackers running port scans will find you.
After this step, you will see the terminal running before you get to the OpenVPN dialog menu. PiVPN will not work without this package, so it will remind you about installation and identify the port number it will run—i.e., the one you opened and secured with unattended upgrades in the previous step.
Since you will be running your own VPN server, you can choose your data encryption strength; the recommended level is 2,048. The next screens will create a security certificate based on your regional and hardware settings; there is no need to change them. It will take some time to generate your keys, especially if you choose 4,096-bit encryption; your RPi may run hotter with such strong encryption, but it will not melt.
Choose a domain name server; Google is a good option. Reboot when you are prompted to do so.
Set up the PiVPN client
Once you are back from the reboot, open the terminal and type:
pivpn addYou will be prompted to name your client and create a password. From now on, your VPN connections will go through this server, adding a layer of security to your browsing, apps, VoIP, and gaming sessions.
In today's world, no one should sneer at more security. Plus, as I mentioned, playing around with Raspberry Pi is just plain fun.


3 Comments