In this strange and difficult time of a global pandemic, we are all called upon to do things differently, to change our routines, and to learn new things.
I have worked from home for many years, so that is nothing new to me. Even though I am allegedly retired, I write articles for Opensource.com and Enable Sysadmin and books. I also manage my own home network, which is larger than you might think, and my church's network and Linux hosts, and I help a few friends with Linux. All of this keeps me busy doing what I like to do, and all of it is usually well within my comfort zone.
But COVID-19 has changed all of that. And, like many other types of organizations, my church had to move quickly to a new service-delivery paradigm. And that is what churches do—deliver a specific kind of service. As the church sysadmin and with some knowledge of audio recording and editing (back in the '70s, I mixed the sound and was the only roadie for a couple of regional folk-rock groups in Toledo, Ohio), I decided to learn the open source audio recording and editing software Audacity to help meet this challenge.
This is not a comprehensive how-to article about using Audacity. It is about my experiences getting started with this powerful audio-editing tool, but there should be enough information here to help you get started.
I have learned just what I need to know in order to accomplish my task: combining several separate audio clips into a single MP3 audio file. If you already know Audacity and do things differently or know things that I don't, that is expected. And if you have any suggestions to help me accomplish my task more easily, please share them in the comments.
The old way
I try not to use the term "normal" now because it is hard to know exactly what that is—if such a state even exists. But our old method of producing recordings for our shut-ins, members who are traveling, and anyone else was to record the sermon portion of our regular, in-person church services and post them on our website.
To do this, I installed a TASCAM SS-R100 solid-state recorder that stores the sermons as MP3 files on a thumb drive. We uploaded the recordings to a special directory of our website so people could download them. The recordings are uploaded using a Bash program I wrote for the task. Automate everything! I trained a couple of others to perform these tasks using sudo in case I was not available.
This all worked very well. Until it didn't.
The new way
As soon as the first restrictions on large gatherings occurred, we made some changes. We could still have small gatherings, so four of us met Sunday mornings and recorded an abbreviated service using our in-house recorder and doing the upload the usual way. This worked, but as the crisis deepened and it became more of a risk to meet with even a few people, we had to make more changes.
Like a huge number of other organizations, we realized we each needed to perform our parts of creating services in separate locations from our own homes.
Now, depending upon the structure of the service, I receive several recordings that I need to combine to create the full church service. Our music director records each anthem and interlude using her iPhone and sends me the recordings in the M4A (MPEG-4 audio) format. They each range in length from seconds to five minutes and are up to 3MB in size. Likewise, our rector sends me two to six recordings, also in M4A format, that contains his portion of the service. Sometimes, other musicians in our church send solos or duets recorded with their significant others; these can be in MP3 or M4A formats.
Then, I pull all of this together into a single recording that can be uploaded to our server for people to download. I use Audacity for this because it was available in my repo, and it was easy to get started.
Getting started with Audacity
I had never used Audacity before this, so, like many others these days, I needed to learn something new just in time to accomplish what I needed to do. I struggled a bit at first, but it turned out to be fun and very enlightening.
Audacity was easy to install on my Fedora 31 workstation because, as in many distros, it is available from the Fedora repository.
The first time I opened Audacity with the program launcher icon, the application's window was empty with no projects nor tracks present. Audacity projects have an AUP extension, so if you have an existing project, you could click on the file in your favorite file manager and launch Audacity that way.
Convert M4A to MP3
As installed by Fedora, Audacity does not recognize M4A files. Regardless of how you proceed, you need to install the LAME MP3 encoder and FFmpeg import/export library, both of which are available from the Fedora repository and, most likely, any other distro's repository.
There are websites that explain how to configure Audacity to use these tools to import and convert audio files from M4A to other types (such as MP3), but I decided to write a script to do it from the command line. For one reason, using a script is faster than doing a lot of extra clicking in a GUI interface, and for another, the file names need some work, so I already needed a script to rename the files. Many people use non-alphanumeric characters to name files, but I don't like dealing with special keyboard characters from the command line. It's easier to manage files with simple alphanumeric names, so my script removes all non-alphanumeric characters from the file names and then converts the files to MP3 format.
You may choose a different approach, but I like the scripted solution. It is fast, and I only need to run the script once, no matter how many files need to be renamed and converted to MP3.
Create a new project
You can create a new project whether or not any audio tracks are loaded. I recommend creating the project first, before importing any audio files (aka "clips"). From the Menu bar, select File > Save Project > Save Project As. This opens a warning dialog window that says, "'Save project' is for an Audacity project, not an audio file." Click the OK button to continue to a standard file-save dialog.
I found that I needed to do this twice. The first time, the warning dialog did not display any buttons, so I had to close the dialog using the window menu or the x icon in the Title bar.
Name the project whatever you like, and Audacity automatically adds the AUP extension. You now have an empty project.
Add audio files to your project
The first step is to add your audio files to the project. Using the Menu bar, open File > Import > Audio and then use the file dialog to select one or more files to import. For my first test project, I loaded all the files at once without sorting the tracks nor aligning the clips in the desired sequence along the timeline. This time, I started by loading the audio files one at a time in the sequence I wanted them from top to bottom. As each file is imported, it is placed into a new track below any existing tracks. The following image shows the files loaded all at one time in the sequence they appear in the working directory.
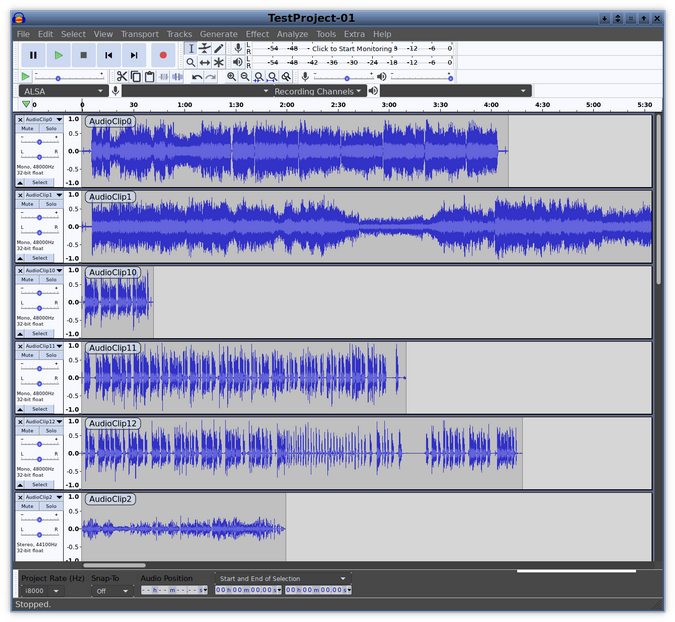
There is a timeline across the top of the window's track area. There is also a scroll bar at the bottom of the window, so you can scroll along the timeline when the tracks extend beyond the width of the Audacity window. There is also a vertical scroll bar if there are more tracks than fit into the window.
Notice the names in the upper-left corner of the waveform section of each track—they are the file names of each track without the extension. These are not there by default, but I find them helpful. To display these names, use the Menu bar to select Edit > Preferences and place a check in the Show Audio Track Name As Overlay box.
Order your audio clips
Once you have some files loaded into the Audacity workspace, you can start manipulating them. To order your audio clips, select one and use the Time-Shift tool (↔) to slide them horizontally along the tracks; continue doing this until all the clips line up end to end in the order you want them. Note that the clip you are moving is book-ended by a pair of vertical alignment lines. When they line up perfectly, the end lines of the two aligned tracks change color to alert you.
You can hover the mouse pointer over the tool icons in the Audacity toolbars to see a pop-up that displays the name of that tool. This helps beginners understand what each tool does.

Here, the Selection tool is selected in the Audacity toolbar. The Time-Shift tool is second from the left on the bottom row.
The following image shows what happens when you slide the audio clips into place on the project timeline without sorting the tracks into a particular sequence. This may not be optimal for how you like to work. It is not for me.
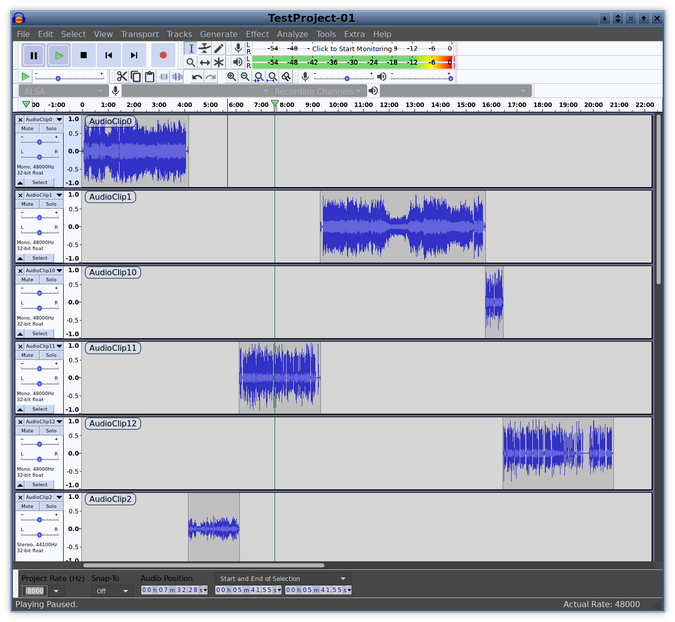
To remove segments of (or complete) audio clips, select them with the Selection tool—you can also select multiple adjacent tracks. Then you can press the Delete button on your keyboard to delete the selected segment(s).
In the image above, you can see a vertical black line in track 1 and a vertical green line crossing all the tracks. These are the audio cursors that show the playback positions of a track or the entire project. Choose the Selection tool and click the desired position within a track, then click the Play button on the transport controls (in the upper-left of the Audacity window) to begin playback. Playback will continue past the end of the selected track and all the way to the end of the project. If tracks overlap on the timeline, they will play simultaneously.
To begin playback immediately, click the desired starting point on the timeline. To play part of a track, hold down the Left mouse button to select a short segment of the track, and then click the Play button. The other transport buttons—Pause, Stop, and so—on are identified with universal icons and work as you would expect.
You can also click the Silence Audio Selection button—the fifth button from the left on the Edit toolbar (shown below)—to completely silence a selected segment while leaving it in place for timing purposes. This is how I silenced a number of background clicks and noises.
It took me a while to figure out how to sort the tracks vertically, and it turns out there are a few different ways to accomplish the task.
You can use the track menu to reorder arrangement. Each track has its own Control Panel on the left side (shown below). The track drop-down Menu bar at the top of the Control Panel opens a menu that provides several track-sequencing options to move a track up, down, to the top, or to the bottom.
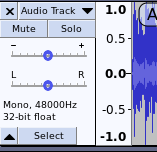
The items to move a track up or down move the track one position at a time, so you have to select it as many times as necessary to get the track in the desired position.
To drag and drop tracks, you must click on the space occupied by the track details. In this screenshot, that's "Mono, 48000Hz 32 bit float". It can be tricky, because if you click too high, you adjust the panning (the left and right stereo position) and if you click too low, you may collapse or select the track. Target the "Mono" or "Stereo" label (whatever your track happens to be) label, and then click and drag the track up or down to reposition it in your workspace.
Apply amplification and noise reduction effects
Some tracks need the overall volume to be adjusted. I used the Selection tool to double-click and select the entire track (but you could also select a portion of a track). On the Menu bar, select Effect > Amplify to display a small dialog window. You can use the slider or enter a value to specify the amount of amplification. Negative numbers decrease the volume. If you try to increase the volume, you need to place a check in the Allow Clipping box. Then click OK.
I found that amplification is a bit tricky; it is easy to use too much or too little. Start by using small numbers to see the results. You can always use Ctrl+Z to undo your changes if you go too far in either direction.
Another effect I find useful is noise reduction. One of the tracks was recorded with a noticeable 60Hz hum, which is usually due to poor grounding of the microphone or recorder. Fortunately, there were only several seconds of hum and no other sound at the beginning of the recording.
Applying the noise reduction effect was a little confusing at first. First, I selected a few samples of the humming sound to tell Audacity what sound needed to be reduced, and then I navigated to Effect > Noise Reduction. This opens the Noise Reduction dialog. I clicked on the Get Noise Profile button in the Step 1 section of the dialog, which uses the selected sample as the basis for a set of filter presets. After it gathers the selected sample, though, the dialog disappeared (this is by design). I re-opened the dialog, used the slider to select the noise reduction level in decibels (I set it to 15dB and left the other sliders alone), and then clicked OK.
This worked well—you can hear the residual hum only if you know it is there. I need to experiment with this some more, but since the result was acceptable, so I did not play with the settings any further.
The reason the dialog box closes after getting a noise profile is actually for the sake of expediency. If you're processing many tracks or segments of audio, each with a different noise profile, you can open the Noise Reduction effect, get the current noise profile, and then select the audio you want to clean. You can then run the Noise Reduction filter using Ctrl+R, the keyboard shortcut for running the most recent filter. Instead of getting a new noise profile, however, Audacity uses the one you've just stored, and performs the filter instead. This way, you can get a sample with a few clicks but clean lots of audio with just one keyboard shortcut.
And so much more
I have only worked with a few of the basics and have not even begun to scratch the surface of Audacity. I can already see that it has so many more features and tools that will enable me to create even more professional-sounding projects.
For example, in addition to working with existing audio files, Audacity can make recordings from line inputs, the desktop sound stream, and microphone inputs. It can do special effects like fade in and out and cross-fades. And I have not even tried to figure out what many of the other effects and tools are capable of.
I have a feeling I will need to learn more in the near future. Hopefully, this story of my very limited experience with Audacity will prompt you to check it out. For much more information, you can find the Audacity manual online.






4 Comments