The command line is an important part of every developer's workflow. This makes it important that you set up your terminal in ways that improve your productivity and decrease your frustration.
In this article, I'll explain how I customize my macOS Z shell (zsh) terminal with iTerm2, Oh My Zsh, and Powerline10k. If you're a Mac user and would like to try it, follow along with this how-to. If you're a Linux user, you can read this article about themes and plugins for Zsh.
Install Homebrew
Homebrew is the easiest way to install and manage utilities on a Mac. Before you can install Homebrew, you must install the Xcode tools (or the complete version of Xcode, if you prefer). Install Xcode tools with:
xcode-select — installThen install Homebrew by entering this command in a macOS terminal or Linux shell prompt:
$ curl -fsSL --output homebrew_installer.sh \
https://raw.githubusercontent.com/Homebrew/install/master/install.sh
Before executing an install script on your system, review it to ensure it's not malicious:
$ more homebrew_installer.sh Once you're comfortable with what the script is going to do, you can safely execute it:
$ bash homebrew_installer.shIf you get an error on MacOS, run xcode-select -r to reset xcode-select.
For more information about Homebrew, read Matthew Broberg's article Introduction to Homebrew: the painless way to install anything on a Mac.
Install iTerm 2
I use iTerm2 as my terminal emulator. I really enjoy it because of its many great features, including search, autocomplete, paste history, and thousands of helpful functions, helpers, plugins, themes, and a few things that may make you shout with joy.
Install iTerm 2 with Homebrew using:
brew cask install iterm2Or, you can download and install iTerm2 from its website and drag and drop the file into your Application folder.
If you're on Linux, the default terminals (such as GNOME terminal, Konsole, XFCE terminal, or similar) match or exceed the features of iTerm2, so you can use whatever you already have installed.
Install and set up Zsh as default
Test whether you already have Z shell installed:
$ zsh --versionIf you don't have Z shell installed, you can install it with Homebrew on MacOS or Linux:
$ brew install zshOr your default package manager on Linux:
$ sudo dnf install zshSet zsh as your default shell by running the following command in iTerm2, and then relaunch the terminal:
$ chsh -s /bin/zshYou can verify the shell you're running with the echo command. By echoing the zeroth argument of your command, designated by the variable $0, you can learn what shell you're interfacing with.
$ echo $0
/bin/zsh
Install Oh My Zsh
Oh My Zsh is a delightful open source framework for Z shell that can be used on GNU Linux and macOS computers. It modernizes the terminal with simple solutions for managing your zsh configuration. Instead of a .bash_profile, zsh uses a .zshrc file to save your customizations.
Its features include:
- Instead of the
cd(change directory) command, navigate directories with just:..(parent dir),...(parent from parent dir),/(root), or~(home). - Instead of the
mkdirandcdcommands, use thetakecommand to create a directory and change the path to it. - Switch between the last and current path with a hyphen
-. - List all alias commands with
aliasor filter them withgrep; for example,alias | grep git. - With the Z plugin, quickly change to another path by naming the folder rather than the complete path.
- Recursive path expansion (for example,
/u/lo/bexpands to/user/local/binafter pressing the Tab key) - Spelling corrections, approximate completion, and automatic correction when you make a minor mistake typing a directory name
- Plugin and theme exports
- Syntax highlighting
- History substring search and accessing specific lines by running the history command with
!followed by its line number; e.g.,!137 - Autocomplete, jump between options with Tab, and press Return to make a selection; works with directories, files, and commands
- Git integration
- Much more
Install Oh My Zsh with:
$ curl -fsSL --output omz_installer.sh
https://raw.github.com/robbyrussell/oh-my-zsh/master/tools/install.sh
Read the script over to ensure it's safe, and then execute it:
$ zsh omz_installer.shThen restart iTerm2 to experience the new world of Oh My Zsh.
$ sh ./omz_installer.sh
Cloning Oh My Zsh...
Cloning into '/home/sek/.oh-my-zsh'...
remote: Enumerating objects: 1155, done.
[...]
Using the Oh My Zsh template file and adding it to ~/.zshrc.

Time to change your default shell to zsh:
Do you want to change your default shell to zsh? [Y/n] n
Shell change skipped.
         __                                     __
  ____  / /_     ____ ___  __  __   ____  _____/ /_
 / __ \/ __ \   / __ `__ \/ / / /  /_  / / ___/ __ \
/ /_/ / / / /  / / / / / / /_/ /    / /_(__  ) / / /
\____/_/ /_/  /_/ /_/ /_/\__, /    /___/____/_/ /_/
                        /____/                       ....is now installed!

Before you scream Oh My Zsh! please look over the ~/.zshrc file to select plugins, themes, and options.

• Follow us on Twitter: https://twitter.com/ohmyzsh
• Join our Discord server: https://discord.gg/ohmyzsh
• Get stickers, shirts, coffee mugs and other swag: https://shop.planetargon.com/collections/oh-my-zsh

➜  ~
Check the installed version with:
zsh --versionUpgrade it with:
upgrade_oh_my_zshCustomize your terminal's theme, fonts, colors, and more
To get the best out of zsh, you'll want to install some dependencies.
Use a custom theme
Powerlevel10k is a popular theme for zsh. It emphasizes speed, flexibility, and out-of-the-box experience.
Install Powerlevel10k for Oh My Zsh with:
git clone https://github.com/romkatv/powerlevel10k.git $ZSH_CUSTOM/themes/powerlevel10kThen enable it in ~/.zshrc. Open the config file (.zshrc) by running:
Nano ~/.zshrcChange the value of ZSH_THEME to:
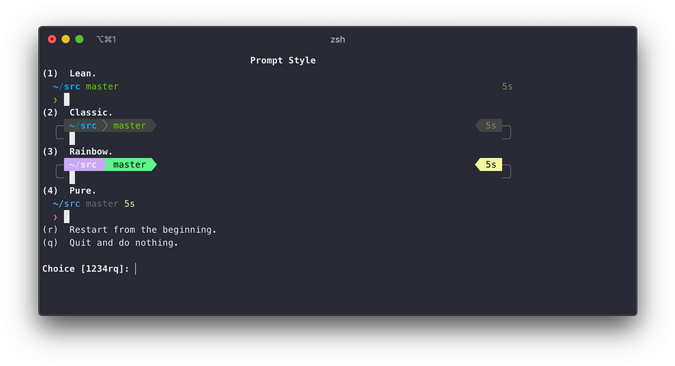
ZSH_THEME="powerlevel10k/powerlevel10k"Save and update the changes by running the command source ~/.zshrc. Powerlevel10k's configuration wizard should start automatically; enter p10k configure if it doesn't. Now you can start choosing your user interface options.

(Hussain Ansari, CC BY-SA 4.0)
Change your color scheme
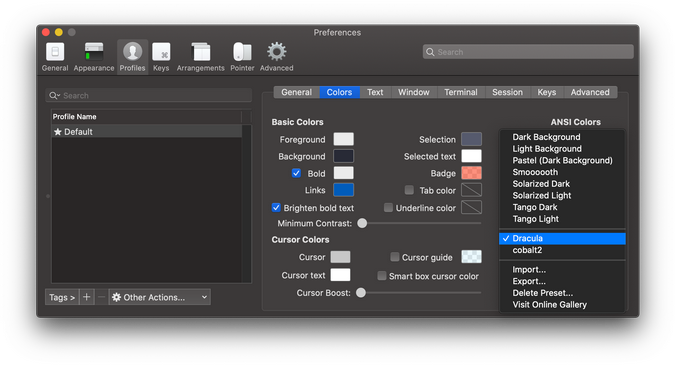
You can change the terminal's color scheme to match your preferences. In this tutorial, I am using Dracula dark theme for iTerm2.
If you are a Git user, you can install the Dracula theme and keep it up to date by cloning the repo:
$ git clone https://github.com/dracula/iterm.gitOr you can install it manually by downloading the .zip file and unzipping it. Then:
- Navigate to iTerm2 > Preferences > Profiles > Colors.
- Open the Color Presets drop-down in the bottom-right corner.
- Select Import from the list.
- Select the Dracula.itermcolors file.
- Select Dracula from Color Presets.

(Hussain Ansari, CC BY-SA 4.0)
Install fonts
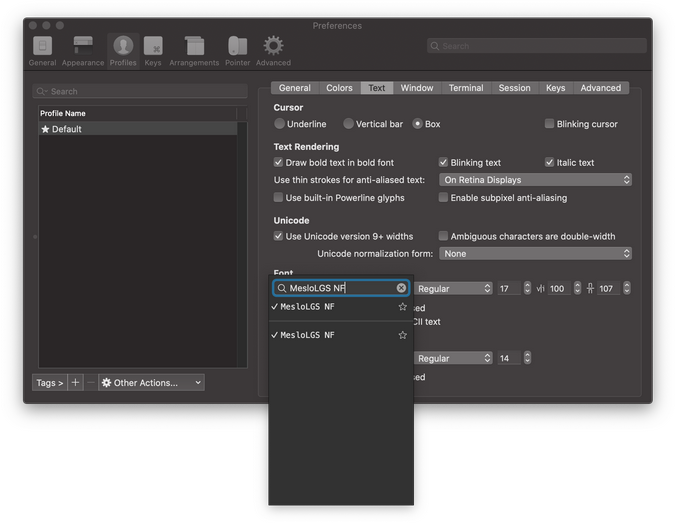
Powerline10k has a wide variety of fonts you can use. If you want to unlock all of Powerlevel10k's prompt styles, download and install Meslo Nerd Font before running p10k configure. To install it, navigate to iTerm2 > Preferences > Profiles > Text and set Font to MesloLGS NF.

(Hussain Ansari, CC BY-SA 4.0)
You can find more information about installing fonts in the Powerline10k GitHub repository.
Recommended plugins
Oh My Zsh has a lot of plugins that add features. Two I recommend highly are:
-
zsh-autosuggestions: Autocompletes suggestions based on your history. It's really useful for commonly used commands like
docker run,php artisan, andmagerun. Install it with:$ git clone https://github.com/zsh-users/zsh-autosuggestions \ ${ZSH_CUSTOM:-~/.oh-my-zsh/custom}/plugins/zsh-autosuggestions -
zsh-syntax-highlighting: This feature highlights correctly typed commands green, incorrect commands red, and underlines folders and files.
$ git clone https://github.com/zsh-users/zsh-syntax-highlighting.git \
${ZSH_CUSTOM:-~/.oh-my-zsh/custom}/plugins/zsh-syntax-highlighting
To activate the plugins, in ~/.zshrc, change the line that starts with plugins= to:
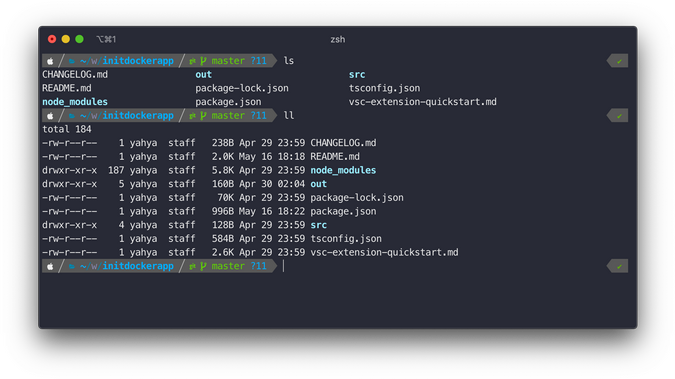
plugins=( git zsh-syntax-highlighting zsh-autosuggestions)Restart the terminal and enjoy!

(Hussain Ansari, CC BY-SA 4.0)
What's next?
This is only the beginning of how you can customize zsh to suit your workflow. Please share your favorite zsh productivity tips in the comments.


2 Comments