Whether you're programming a game or an app with Python or Lua, you're probably using PNG graphics for your game assets. An advantage of the PNG format, which is not available in a JPEG, is the ability to store an alpha channel. Alpha is, essentially, the "color" of invisibility or transparency. Alpha is the part of an image you don't see. For example, if you were to draw a doughnut, the doughnut hole would be filled with alpha, and you could see whatever was behind it.
A common problem is how to find the alpha part of an image. Sometimes, your programming framework, whether it's Python Arcade, Pygame, LÖVE, or anything else, detects the alpha channel and treats it (after the appropriate function calls) as transparency. That means it renders no new pixels where there's alpha, leaving that doughnut hole empty. It's 100% transparent or 0% opaque and functionally "invisible."
Other times, your framework and your graphic asset don't agree on where the alpha channel is located (or that an alpha channel exists at all), and you get pixels where you wanted transparency.
This article describes the most sure-fire way I know to work around that.
Chroma key
In computer graphics, there are a few values that contribute to how a pixel is rendered. Chrominance, or chroma, describes the saturation or intensity of a pixel. The chroma key technique (also known as green screening) was originally developed as a chemical process, in which a specific color (blue at first and later green) was deliberately obscured by a matte during the copying of a film negative, allowing another image to be substituted where there once was a blue or green screen. That's a simplified explanation, but it demonstrates the origins of what is known as the alpha channel in computer graphics.
An alpha channel is information saved in a graphic to identify pixels that are meant to be transparent. RGB graphics, for example, have red, green, and blue channels. RGBA graphics contain red, green, blue, and alpha. The value of alpha can range from 0 to 1, with decimal points being valid entries.
Because an alpha channel can be expressed in several different ways, relying on an embedded alpha channel can be problematic. Instead, you can pick a color and turn it into an alpha value of 0 in your game framework. For that to work, you must know the colors in your graphic.
Prepare your graphic
To prepare a graphic with an explicit color reserved exclusively for a chroma key, open the graphic in your favorite graphic editor. I recommend GIMP or Glimpse, but mtPaint or Pinta or even Inkscape can work just as well, depending on the nature of your graphics and your ability to translate these instructions to a different tool.
Start by opening this graphic of Tux the penguin:

(Seth Kenlon, CC BY-SA 4.0)
Select the graphic
Once the graphic is open, go to the Windows menu and select Dockable Dialogs and then Layers. Right-click on Tux's layer in the Layer palette. From the pop-up menu, select Alpha to Selection. If your image does not have a built-in alpha channel, then you must create your own selection manually.
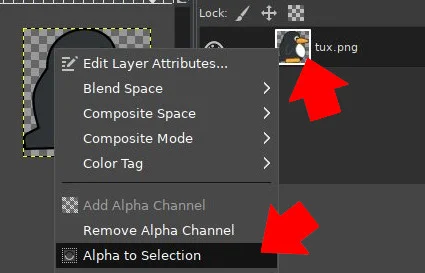
(Seth Kenlon, CC BY-SA 4.0)
To create a selection manually, click the Paths tool from the toolbox.
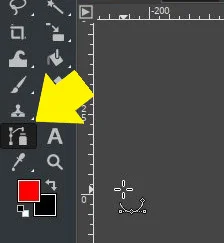
opensource.com
(Seth Kenlon, CC BY-SA 4.0)
Using the Paths tool, move your mouse around the graphic, clicking and releasing (do not drag) at each major intersection of its outline. Don't worry about following curves; just find the major intersections and corners. This creates a node at each point, with a straight line drawn between them. You don't need to close your path, so when you reach the final intersection before the one where you started, you're done.
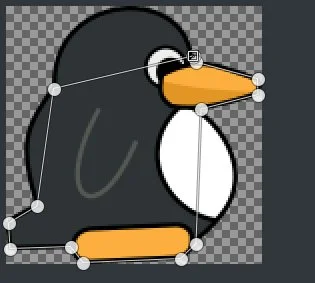
(Seth Kenlon, CC BY-SA 4.0)
Once you've created your outline path, go to the Windows menu and select Dockable Dialogs and then Tool Options. In the Tool Options panel, select Edit (Ctrl). With this activated, you can edit the paths you've just drawn by clicking the lines or nodes and adjusting them to fit your graphic better. You can even give the lines curves.
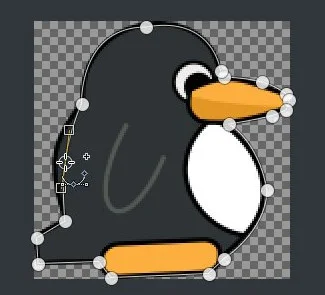
(Seth Kenlon, CC BY-SA 4.0)
Now select the Paths panel from the Windows > Dockable Dialogs menu. In the Paths panel, click the Path to Selection button. Your graphic is now selected.
Grow the selection
If you feel your selection is too tight, you can give yourself a little slack by growing the selection. I sometimes do this when I want to impose or thicken a border around a graphic.
To grow a selection, click the Select menu and choose Grow. Enter a pixel value and click OK.
Invert the selection
You have your graphic selected, but what you actually want to select is everything except your graphic. That's because you're creating an alpha matte to define what in your graphic will be replaced by something else. In other words, you need to mark the pixels that will be turned invisible.
To invert the selection, click on the Select menu and choose Invert. Now everything except your graphic is selected.
Fill with alpha
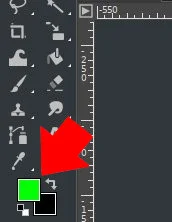
With everything except your graphic selected, choose the color you want to use to designate your alpha matte. The most common color is green (as you might guess from the term "green screen"). There's nothing magical about the color green or even a particular shade of green. It's used because humans, frequent subjects of graphic manipulation, contain no green pigment, so it's easy to key out green without accidentally keying out part of the central subject. Of course, if your graphic is a green alien or an emerald or something that does contain green, you should use a different color. You can use any color you want, as long as it's solid and consistent. If you're doing this to many graphics, your choice should be consistent across all graphics.
(Seth Kenlon, CC BY-SA 4.0)
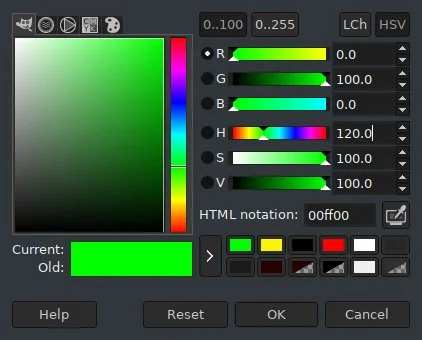
Set your foreground color with the color value you've chosen. To ensure that your choice is exact, use the HTML or HSV representation of the color. For example, if you're using pure green, it can be expressed in GIMP (and most open source graphic applications) as 00ff00 (that's 00 red, FF green, and 00 blue, with F being the maximum amount).
(Seth Kenlon, CC BY-SA 4.0)
Whatever color you choose, make sure you take note of the HTML or HSV values so you use the exact same color for every graphic.
To fill in your alpha matte, click the Edit menu and choose Fill with FG Color.
Flatten and export
If you've left a border around your graphic, set your background color to the color you want to use as the border stroke. This is usually either black or white, but it can be anything that suits your game's aesthetic.
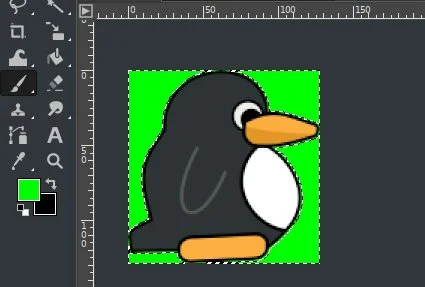
Once you have set the background color, click on the Image menu and select Flatten Image. It's safe to do this whether or not you added a border. This process removes the alpha channel from your image, filling in any "transparent" pixels with the background color.
(Seth Kenlon, CC BY-SA 4.0)
You now have an image ready for your game engine. Export the image to whatever format your game engine prefers, and then import it into your game using whatever function calls it requires. In your code, set the alpha value to 00ff00 (or whatever color you used), and then use the game engine's graphic transforms to treat that color as an alpha channel.
Other methods
This isn't the only way to get transparency in your game graphics. Check your game engine's documentation to find out how it tries to process alpha channels by default, and when you're not certain, try letting your game engine auto-detect transparency in your graphic before you go about editing it. Sometimes, your game engine's expectations and your graphic's preset values happen to match, and you get transparency without having to do any extra work.
When that fails, though, try a little chroma key. It's worked for the film industry for nearly 100 years, and it can work for you too.




1 Comment