AutoKey is an open source Linux desktop automation tool that, once it's part of your workflow, you'll wonder how you ever managed without. It can be a transformative tool to improve your productivity or simply a way to reduce the physical stress associated with typing.
This article will look at how to install and start using AutoKey, cover some simple recipes you can immediately use in your workflow, and explore some of the advanced features that AutoKey power users may find attractive.
Install and set up AutoKey
AutoKey is available as a software package on many Linux distributions. The project's installation guide contains directions for many platforms, including building from source. This article uses Fedora as the operating platform.
AutoKey comes in two variants: autokey-gtk, designed for GTK-based environments such as GNOME, and autokey-qt, which is QT-based.
You can install either variant from the command line:
sudo dnf install autokey-gtkOnce it's installed, run it by using autokey-gtk (or autokey-qt).
Explore the interface
Before you set AutoKey to run in the background and automatically perform actions, you will first want to configure it. Bring up the configuration user interface (UI):
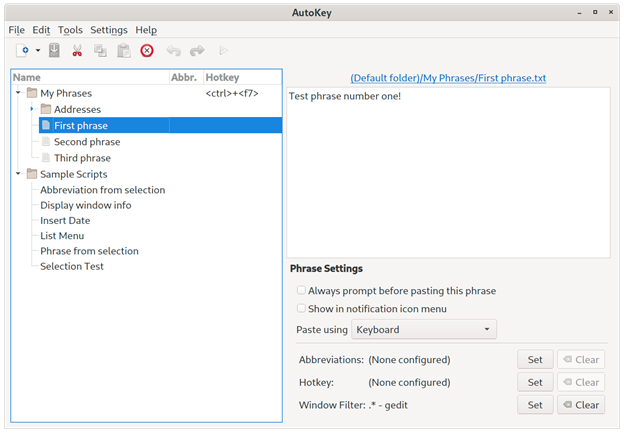
autokey-gtk -cAutoKey comes preconfigured with some examples. You may wish to leave them while you're getting familiar with the UI, but you can delete them if you wish.

(Matt Bargenquast, CC BY-SA 4.0)
The left pane contains a folder-based hierarchy of phrases and scripts. Phrases are text that you want AutoKey to enter on your behalf. Scripts are dynamic, programmatic equivalents that can be written using Python and achieve basically the same result of making the keyboard send keystrokes to an active window.
The right pane is where the phrases and scripts are built and configured.
Once you're happy with your configuration, you'll probably want to run AutoKey automatically when you log in so that you don't have to start it up every time. You can configure this in the Preferences menu (Edit -> Preferences) by selecting Automatically start AutoKey at login.

(Matt Bargenquast, CC BY-SA 4.0)
Correct common typos with AutoKey
Fixing common typos is an easy problem for AutoKey to fix. For example, I consistently type "gerp" instead of "grep." Here's how to configure AutoKey to fix these types of problems for you.
Create a new subfolder where you can group all your "typo correction" configurations. Select My Phrases in the left pane, then File -> New -> Subfolder. Name the subfolder Typos.
Create a new phrase in File -> New -> Phrase, and call it "grep."
Configure AutoKey to insert the correct word by highlighting the phrase "grep" then entering "grep" in the Enter phrase contents section (replacing the default "Enter phrase contents" text).
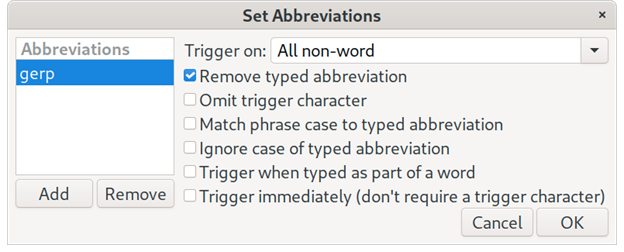
Next, set up how AutoKey triggers this phrase by defining an Abbreviation. Click the Set button next to Abbreviations at the bottom of the UI.
In the dialog box that pops up, click the Add button and add "gerp" as a new abbreviation. Leave Remove typed abbreviation checked; this is what instructs AutoKey to replace any typed occurrence of the word "gerp" with "grep." Leave Trigger when typed as part of a word unchecked so that if you type a word containing "gerp" (such as "fingerprint"), it won't attempt to turn that into "fingreprint." It will work only when "gerp" is typed as an isolated word.

(Matt Bargenquast, CC BY-SA 4.0)
Restrict corrections to specific applications
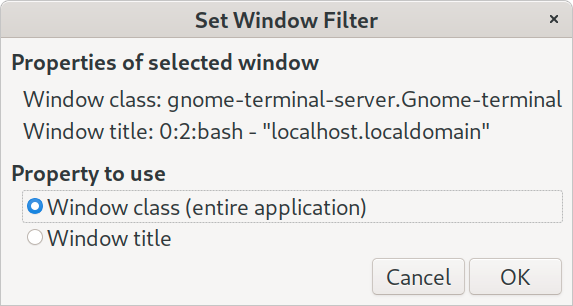
You may want a correction to apply only when you make the typo in certain applications (such as a terminal window). You can configure this by setting a Window Filter. Click the Set button to define one.
The easiest way to set a Window Filter is to let AutoKey detect the window type for you:
- Start a new terminal window.
- Back in AutoKey, click the Detect Window Properties button.
- Click on the terminal window.
This will auto-populate the Window Filter, likely with a Window class value of gnome-terminal-server.Gnome-terminal. This is sufficient, so click OK.

<p class="rtecenter"><sup>(Matt Bargenquast, <a href="https://opensource.com/%3Ca%20href%3D"https://creativecommons.org/licenses/by-sa/4.0/" rel="ugc">https://creativecommons.org/licenses/by-sa/4.0/" target="_blank">CC BY-SA 4.0</a>)</sup></p>
Save and test
Once you're satisfied with your new configuration, make sure to save it. Click File and choose Save to make the change active.
Now for the grand test! In your terminal window, type "gerp" followed by a space, and it should automatically correct to "grep." To validate the Window Filter is working, try typing the word "gerp" in a browser URL bar or some other application. It should not change.
You may be thinking that this problem could have been solved just as easily with a shell alias, and I'd totally agree! Unlike aliases, which are command-line oriented, AutoKey can correct mistakes regardless of what application you're using.
For example, another common typo I make is "openshfit" instead of "openshift," which I type into browsers, integrated development environments, and terminals. Aliases can't quite help with this problem, whereas AutoKey can correct it in any occasion.
Type frequently used phrases with AutoKey
There are numerous other ways you can invoke AutoKey's phrases to help you. For example, as a site reliability engineer (SRE) working on OpenShift, I frequently type Kubernetes namespace names on the command line:
oc get pods -n openshift-managed-upgrade-operatorThese namespaces are static, so they are ideal phrases that AutoKey can insert for me when typing ad-hoc commands.
For this, I created a phrase subfolder named Namespaces and added a phrase entry for each namespace I type frequently.
Assign hotkeys
Next, and most crucially, I assign the subfolder a hotkey. Whenever I press that hotkey, it opens a menu where I can select (either with Arrow key+Enter or using a number) the phrase I want to insert. This cuts down on the number of keystrokes I need to enter those commands to just a few keystrokes.
AutoKey's pre-configured examples in the My Phrases folder are configured with a Ctrl+F7 hotkey. If you kept the examples in AutoKey's default configuration, try it out. You should see a menu of all the phrases available there. Select the item you want with the number or arrow keys.
Advanced AutoKeying
AutoKey's scripting engine allows users to run Python scripts that can be invoked through the same abbreviation and hotkey system. These scripts can do things like switching windows, sending keystrokes, or performing mouse clicks through supporting API functions.
AutoKey users have embraced this feature by publishing custom scripts for others to adopt. For example, the NumpadIME script transforms a numeric keyboard into an old cellphone-style text entry method, and Emojis-AutoKey makes it easy to insert emojis by converting phrases such as :smile: into their emoji equivalent.
Here's a small script I set up that enters Tmux's copy mode to copy the first word from the preceding line into the paste buffer:
from time import sleep

# Send the tmux command prefix (changed from b to s)
keyboard.send_keys("<ctrl>+s")
# Enter copy mode
keyboard.send_key("[")
sleep(0.01)
# Move cursor up one line
keyboard.send_keys("k")
sleep(0.01)
# Move cursor to start of line
keyboard.send_keys("0")
sleep(0.01)
# Start mark
keyboard.send_keys(" ")
sleep(0.01)
# Move cursor to end of word
keyboard.send_keys("e")
sleep(0.01)
# Add to copy buffer
keyboard.send_keys("<ctrl>+m")
The sleeps are there because occasionally Tmux can't keep up with how fast AutoKey sends the keystrokes, and they have a negligible effect on the overall execution time.
Automate with AutoKey
I hope you've enjoyed this excursion into keyboard automation with AutoKey and it gives you some bright ideas about how it can improve your workflow. If you're using AutoKey in a helpful or novel way, be sure to share it in the comments below.


4 Comments