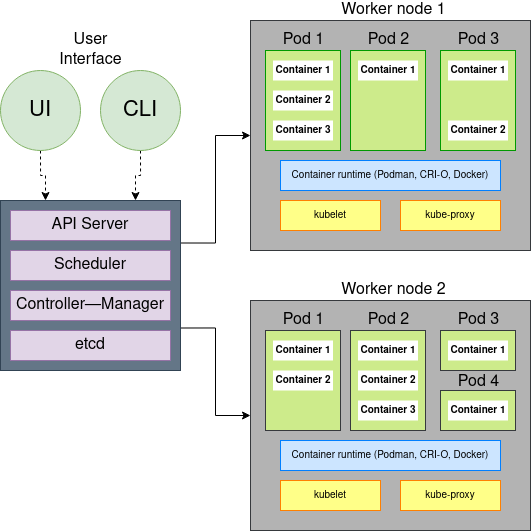
You use Kubernetes to orchestrate containers. It's an easy description to say, but understanding what that actually means and how you accomplish it is another matter entirely. If you're running or managing a Kubernetes cluster, then you know that Kubernetes consists of one computer that gets designated as the control plane, and lots of other computers that get designated as worker nodes. Each of these has a complex but robust stack making orchestration possible, and getting familiar with each component helps understand how it all works.

(Nived Velayudhan, CC BY-SA 4.0)
Control plane components
You install Kubernetes on a machine called the control plane. It's the one running the Kubernetes daemon, and it's the one you communicate with when starting containers and pods. The following sections describe the control plane components.
Etcd
Etcd is a fast, distributed, and consistent key-value store used as a backing store for persistently storing Kubernetes object data such as pods, replication controllers, secrets, and services. Etcd is the only place where Kubernetes stores cluster state and metadata. The only component that talks to etcd directly is the Kubernetes API server. All other components read and write data to etcd indirectly through the API server.
Etcd also implements a watch feature, which provides an event-based interface for asynchronously monitoring changes to keys. Once you change a key, its watchers get notified. The API server component heavily relies on this to get notified and move the current state of etcd towards the desired state.
Why should the number of etcd instances be an odd number?
You would typically have three, five, or seven etcd instances running in a high-availability (HA) environment, but why? Because etcd is a distributed data store. It is possible to scale it horizontally but also you need to ensure that the data in each instance is consistent, and for this, your system needs to reach a consensus on what the state is. Etcd uses the RAFT consensus algorithm for this.
The algorithm requires a majority (or quorum) for the cluster to progress to the next state. If you have only two ectd instances and either of them fails, the etcd cluster can't transition to a new state because no majority exists. If you have three ectd instances, one instance can fail but still have a majority of instances available to reach a quorum.
API server
The API server is the only component in Kubernetes that directly interacts with etcd. All other components in Kubernetes must go through the API server to work with the cluster state, including the clients (kubectl). The API server has the following functions:
- Provides a consistent way of storing objects in etcd.
- Performs validation of those objects so clients can't store improperly configured objects (which could happen if they write directly to the etcd datastore).
- Provides a RESTful API to create, update, modify, or delete a resource.
- Provides optimistic concurrency locking, so other clients never override changes to an object in the event of concurrent updates.
- Performs authentication and authorization of a request that the client sends. It uses the plugins to extract the client's username, user ID, groups the user belongs to, and determine whether the authenticated user can perform the requested action on the requested resource.
- Responsible for admission control if the request is trying to create, modify, or delete a resource. For example, AlwaysPullImages, DefaultStorageClass, and ResourceQuota.
- Implements a watch mechanism (similar to etcd) for clients to watch for changes. This allows components such as the Scheduler and Controller Manager to interact with the API Server in a loosely coupled manner.
Controller Manager
In Kubernetes, controllers are control loops that watch the state of your cluster, then make or request changes where needed. Each controller tries to move the current cluster state closer to the desired state. The controller tracks at least one Kubernetes resource type, and these objects have a spec field that represents the desired state.
Controller examples:
- Replication Manager (a controller for ReplicationController resources)
- ReplicaSet, DaemonSet, and Job controllers
- Deployment controller
- StatefulSet controller
- Node controller
- Service controller
- Endpoints controller
- Namespace controller
- PersistentVolume controller
Controllers use the watch mechanism to get notified of changes. They watch the API server for changes to resources and perform operations for each change, whether it's a creation of a new object or an update or deletion of an existing object. Most of the time, these operations include creating other resources or updating the watched resources themselves. Still, because using watches doesn't guarantee the controller won't miss an event, they also perform a re-list operation periodically to ensure they haven't missed anything.
The Controller Manager also performs lifecycle functions such as namespace creation and lifecycle, event garbage collection, terminated-pod garbage collection, cascading-deletion garbage collection, and node garbage collection. See Cloud Controller Manager for more information.
Scheduler
The Scheduler is a control plane process that assigns pods to nodes. It watches for newly created pods that have no nodes assigned. For every pod that the Scheduler discovers, the Scheduler becomes responsible for finding the best node for that pod to run on.
Nodes that meet the scheduling requirements for a pod get called feasible nodes. If none of the nodes are suitable, the pod remains unscheduled until the Scheduler can place it. Once it finds a feasible node, it runs a set of functions to score the nodes, and the node with the highest score gets selected. It then notifies the API server about the selected node. They call this process binding.
The selection of nodes is a two-step process:
- Filtering the list of all nodes to obtain a list of acceptable nodes to which you can schedule the pod (for example, the PodFitsResources filter checks whether a candidate node has enough available resources to meet a pod's specific resource requests).
- Scoring the list of nodes obtained from the first step and ranking them to choose the best node. If multiple nodes have the highest score, a round-robin process ensures the pods get deployed across all of them evenly.
Factors to consider for scheduling decisions include:
- Does the pod request hardware/software resources? Is the node reporting a memory or a disk pressure condition?
- Does the node have a label that matches the node selector in the pod specification?
- If the pod requests binding to a specific host port, is that port available?
- Does the pod tolerate the taints of the node?
- Does the pod specify node affinity or anti-affinity rules?
The Scheduler doesn't instruct the selected node to run the pod. All the Scheduler does is update the pod definition through the API server. The API server then notifies the kubelet that the pod got scheduled through the watch mechanism. Then the kubelet service on the target node sees that the pod got scheduled to its node, it creates and runs the pod's containers.
[ Read next: How Kubernetes creates and runs containers: An illustrated guide ]
Worker node components
Worker nodes run the kubelet agent, which permits them to get recruited by the control plane to process jobs. Similar to the control plane, the worker node uses several different components to make this possible. The following sections describe the worker node components.
Kubelet
Kubelet is an agent that runs on each node in the cluster and is responsible for everything running on a worker node. It ensures that the containers run in the pod.
The main functions of kubelet service are:
- Register the node it's running on by creating a node resource in the API server.
- Continuously monitor the API server for pods that got scheduled to the node.
- Start the pod's containers by using the configured container runtime.
- Continuously monitor running containers and report their status, events, and resource consumption to the API server.
- Run the container liveness probes, restart containers when the probes fail and terminate containers when their pod gets deleted from the API server (notifying the server about the pod termination).
Service proxy
The service proxy (kube-proxy) runs on each node and ensures that one pod can talk to another pod, one node can talk to another node, and one container can talk to another container. It is responsible for watching the API server for changes on services and pod definitions to maintain that the entire network configuration is up to date. When a service gets backed by more than one pod, the proxy performs load balancing across those pods.
The kube-proxy got its name because it began as an actual proxy server that used to accept connections and proxy them to the pods. The current implementation uses iptables rules to redirect packets to a randomly selected backend pod without passing them through an actual proxy server.
A high-level view of how it works:
- When you create a service, a virtual IP address gets assigned immediately.
- The API server notifies the kube-proxy agents running on worker nodes that a new service exists.
- Each kube-proxy makes the service addressable by setting up iptables rules, ensuring each service IP/port pair gets intercepted and the destination address gets modified to one of the pods that back the service.
- Watches the API server for changes to services or its endpoint objects.
Container runtime
There are two categories of container runtimes:
- Lower-level container runtimes: These focus on running containers and setting up the namespace and cgroups for containers.
- Higher-level container runtimes (container engine): These focus on formats, unpacking, management, sharing of images, and providing APIs for developers.
Container runtime takes care of:
- Pulls the required container image from an image registry if it's not available locally.
- Extracts the image onto a copy-on-write filesystem and all the container layers overlay to create a merged filesystem.
- Prepares a container mount point.
- Sets the metadata from the container image like overriding CMD, ENTRYPOINT from user inputs, and sets up SECCOMP rules, ensuring the container runs as expected.
- Alters the kernel to assign isolation like process, networking, and filesystem to this container.
- Alerts the kernel to assign some resource limits like CPU or memory limits.
- Pass system call (syscall) to the kernel to start the container.
- Ensures that the SElinux/AppArmor setup is proper.
Working together
System-level components work together to ensure that each part of a Kubernetes cluster can realize its purpose and perform its functions. It can sometimes be overwhelming (when you're deep into editing a YAML file) to understand how your requests get communicated within your cluster. Now that you have a map of how the pieces fit together, you can better understand what's happening inside Kubernetes, which helps you diagnose problems, maintain a healthy cluster, and optimize your own workflow.


Comments are closed.