If you've been hearing a lot of talk about "the cloud" over the past several years, then you may also have heard rumblings about something called "the edge."
The term edge computing reflects the recognition that the cloud has boundaries. To reach those boundaries, your data has to connect with one of the physical datacenters powering the cloud. Getting data from a user's computer to a cluster of servers might be quick in some settings, but it depends heavily on geographic location and network infrastructure. The cloud itself can be as fast and powerful as possible, but it can't do much to offset the time required for the roundtrip your data has to make.
The answer is to use the edge of the boundaries of regional networks and the cloud. When initial services or computation happen on servers at the edge, it speeds up a user's interactions with the cloud.
By the same principle, you can create your own edge by running some services on your home server to minimize roundtrip lag times. Don't let the special terminology intimidate you. Edge computing can be as simple as an IoT device or running a server connected to federated services.
One particularly useful and easy change you can make to your home or business network to give it a boost is running a DNS caching service.
What is DNS?
The Domain Name System (DNS) is what enables us to translate the IP addresses of servers, whether they're in the cloud or just across town, to friendly website names like opensource.com.
Behind every domain name is a number—names are simply a convenience for humans, who are more likely to remember a few words than a string of numerals. When you type example.com into a web browser, your web browser silently sends a request over port 53 to a DNS server to cross-reference the name example.com with its registry, then sends back the last known IP address assigned to that name.
That's one roundtrip from your computer to the internet.
Armed with the correct number, your web browser makes a second request, this time with the number instead of the name, directly to your destination.
That's another roundtrip.
To make matters worse, your computer (depending on your configuration) may also be sending requests to DNS servers for named devices on your local network.
You can cut out all of this extra traffic by using a local cache. With a DNS caching service running on your network, once any one device on your network obtains a number assigned to a website, that number is stored locally, so no request from your network need ask for that number again.
As a bonus, running your own DNS caching server also enables you to block ads and generally take control of how any device on your network interacts with some of the low-level technologies of the internet.
Install Dnsmasq on Linux
Install Dnsmasq using your package manager.
On Fedora, CentOS, Mageia, and similar:
$ sudo dnf install dnsmasq dnsmasq-utils
On Debian and Debian-based systems, use apt instead of dnf.
Configure Dnsmasq
There are many options in Dnsmasq's default configuration file.
It's located at /etc/dnsmasq.conf by default, and it's well commented, so you can read through it and choose what you prefer for your network.
Here are some of the options I like.
Keep your local domains local:
# Never forward plain names (without a dot or domain part)
domain-needed
# Never forward addresses in the non-routed address spaces
bogus-priv
Ignore content from common ad sites. This syntax replaces the string between the first forward-slashes with the trailing address:
# replace ad site domain names with an IP with no ads
address=/double-click.net/127.0.0.1
Set the cache size. The default suggestion is 150, but I've never felt that 150 websites sounded like enough.
# Set the cachesize here
cache-size=1500
Finding resolv.conf
On most Linux systems, the systemd resolved service manages the /etc/resolv.conf file, which governs what DNS nameservers your computer contacts for name to IP address resolution.
You can disable resolved and run dnsmasq alone, or you can run them both, pointing dnsmasq to its own resolver file.
To disable resolved:
$ sudo systemctl disable --now systemd-resolvedAlternately, to run them both:
$ cat << EOF >> /etc/resolvmasq.conf
# my network name
domain home.local
# local hosts
enterprise 10.0.170.1
yorktown 10.0.170.4
# nameservers
nameserver 208.67.222.222
nameserver 208.67.220.220
EOF
In this example, home.local is a domain name I give, either over Dynamic Host Configuration Protocol (DHCP) or locally, to all devices on my network. The computers enterprise and yorktown are my home servers, and by listing them here along with their local IP addresses, I can contact them by name through dnsmasq. Finally, the nameserver entries point to known good nameservers on the internet. You can use the nameservers listed here, or you can use nameservers provided to you by your ISP or any public nameserver you prefer.
In your dnsmasq.conf file, set the resolv-file value to resolvmasq.conf:
resolv-file=/etc/resolvmasq.conf
Start dnsmasq
Some distributions may have already started dnsmasq automatically upon installation. Others let you start it yourself when you're ready. Either way, you can use systemd to start the service:
$ sudo systemd enable --now dnsmasq
Test it with the dig command.
When you first contact a server, the query time might be anywhere from 50 to 500 milliseconds (hopefully not more than that):
$ dig example.com | grep Query\ time
;; Query time: 56 msec
The next time you try it, however, the query time is drastically reduced:
$ dig example.com | grep Query\ time
;; Query time: 0 msec
Much better!
Enable dnsmasq for your whole network
Dnsmasq is a useful tool on one device, but it's even better when you let all the devices on your network benefit.
Here's how you open the dnsmasq service up to your whole local network:
1. Get the IP address of the server running the dnsmasq service
On the computer running dnsmasq, get the local IP address:
$ dig example.com | grep Query\ time
;; Query time: 0 msec
In this example, the IP address of the Raspberry Pi I'm running dnsmasq on is 10.0.170.170. Because this Pi is now an important part of my network infrastructure, I have its address statically assigned by my DHCP router. Were I to allow it to get a dynamic IP address, it probably would not change (DHCP is designed to be helpful that way) but if it did then my whole network would miss out on the benefit of dnsmasq.
2. Modify the server's firewall to allow traffic on port 53
Open a port in your server's firewall using firewall-cmd so it allows DNS requests and sends responses.
$ sudo firewall-cmd --add-service dns --permanent
3. Add the IP address of the server to the nameserver entry of your home router
Knowing that my local DNS server's address is 10.0.170.170 (remember that it's almost certainly different on your own network), I can add it as the primary nameserver in my home router.
There are many routers out there, and there's no singular interface.
However, the task is the same, and the workflow is usually relatively similar from model to model.
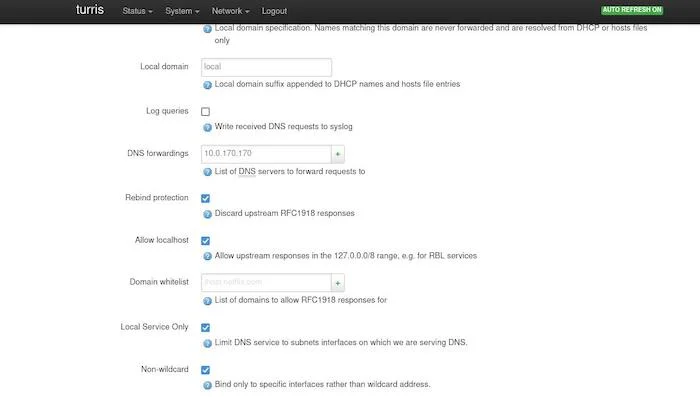
In my Turris Omnia router, the advanced interface allows DNS forwarding, which sends DNS requests to a server of my choosing.
Entering 10.0.170.170 (the IP of my dnsmasq server) here forces all DNS traffic to be routed through Dnsmasq for caching and resolution.

(Seth Kenlon, CC BY-SA 4.0)
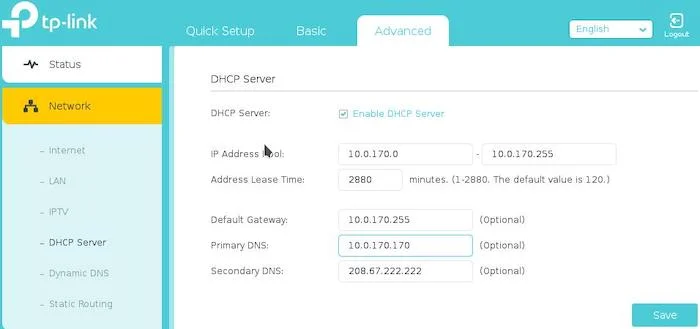
In my TP-Link router, on the other hand, DNS settings are configured in the DHCP panel.

(Seth Kenlon, CC BY-SA 4.0)
It may take some exploration, so don't be afraid to look around in your router's interface for DNS server settings. When you find it, enter your Dnsmasq server address and then save the changes.
Some models require the router to reboot when changes are made.
All devices on your network inherit settings from the router, so now all DNS traffic passing from a device to the internet gets passed through your Dnsmasq server.
Close to the edge
As more and more websites get added to your server's DNS cache, DNS traffic will have to go farther than your local Dnsmasq server less and less often.
The principle of computing locally and quickly whenever possible drives edge computing. You can imagine how important it is, just by going through this exercise, that technologies use strategic geographic locations to speed up internet interactions.
Whether you're working on edge computing at home, at work, or as a cloud architect, the edge is an important component of the cloud, and it's one you can use to your advantage.


Comments are closed.