IRC (Internet Relay Chat) is an online chat protocol and a network of large chat rooms that has existed since 1988. Each room lets members of a community talk with each other from all corners of the world.
Those new to IRC may have used a web chat interface. Many users have an IRC client to connect to their favorite IRC networks and channels. After a while, you may notice that each time you connect, you see a group of users who always seem to be in the channel. Are they really sitting in front of their computers with their IRC clients all day?
The simple answer to that is usually no.
Many avid IRC users use an IRC bouncer, a proxy service that remains persistently connected to your preferred IRC networks and channels. Instead of connecting directly to an IRC network, such as irc.example.com, you connect to a machine like bouncer.mysite.com, which runs the bouncer software. The bouncer, in turn, is connected to the IRC network. When you log into your bouncer, it shows messages in your channels that you may have missed while offline, as well as private messages from other users.
What is ZNC?
ZNC is a bouncer application that provides an awesome set of features. It is readily available in most Linux software repositories for you to install wherever you like. And, fortunately, using ZNC is quick and easy. In very little time, you too can have your own ZNC bouncer up and running.
You'll never have to leave an IRC channel again.
Installing and using ZNC
Installation
Before getting started, make sure your server is publicly accessible on the Internet and that the port you'll use for your bouncer is open. Usually, this is port 6667 for unencrypted or 6697 for encrypted SSL traffic. If you're unsure how to configure your firewall, run the following commands to open the desired port on your server. This command will only work if you have installed firewalld.
$ sudo firewall-cmd --add-port=<port number>/tcp
$ sudo firewall-cmd --runtime-to-permanent
Afterward, you can check the installation documentation for how to install it on your distribution of choice.
Initial configuration at the command line
Once installation finishes, you're ready to jump into configuration. To do so, run the configuration generator as the znc user. Use the following command:
$ sudo -u znc znc --makeconfYou'll be prompted through a series of configuration options for ZNC. An example of my configuration is below. Password entries have been omitted, and for some options like Nick, I've hit Enter to accept a default.
-- Global settings --
Listen on port (1025 to 65534): 6697
Listen using SSL (yes/no) [no]: yes
Listen using both IPv4 and IPv6 (yes/no) [yes]: # you can default this to yes unless you have a reason to prevent IPv6 traffic

-- Admin user settings --
Username (alphanumeric): jflory7
Enter password:
Confirm password:
Nick [jflory7]:
Alternate nick [jflory7_]:
Ident [jflory7]:
Real name [Got ZNC?]: Justin W. Flory
Bind host (optional):
If you wish to set up a network inside of your terminal, you can. If not, you can do this later on in your web administration portal.
Launch ZNC now? (yes/no) [yes]:

Success, you made it to your ZNC web panel.
Congratulations, your ZNC server is now running. If everything is set up correctly, you should be able to log into your web panel. To get to your web panel, open your web browser and enter the location http(s)://<server_ip>:<your_port>. You should now see the ZNC panel. If you opted to use SSL earlier, your browser will likely warn you about insecure SSL certificates. That's okay for now, because you generated them on your own to use for the server. You can safely ignore the warning.
Finishing configuration in the web panel
Once you log into your web panel, you're greeted by plenty of different options. Find the user account that you set up in the web panel and edit the user, so you can add a network. For the scope of this article, you'll add a popular IRC network, Freenode.
Note: Opensource.com is on Freenode.

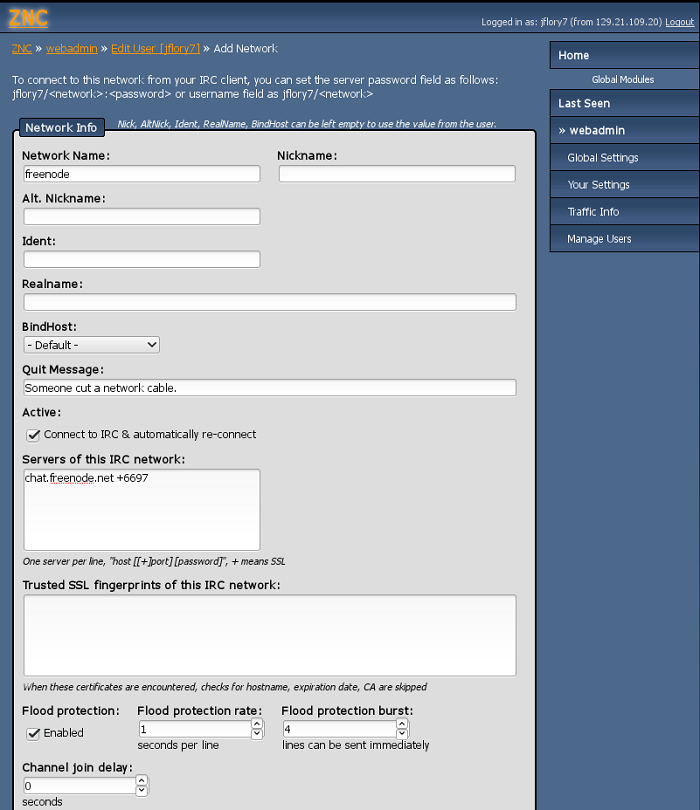
Your window will look similar to this for adding an IRC network.
The information for Freenode is listed below for you to add to ZNC. If you wish to connect to a different IRC network, please refer to the server information provided by that network. Freenode information:
- Network Name: Freenode
- Nickname, alt. nickname, ident, and real name can be left blank. They will be inherited from your user's global settings that you set earlier.
- Servers of this IRC network: chat.freenode.net +6697
- Modules:
- Modules are convenient "extras" that can make your IRC experience more customized or smoother. You can find the full list on the ZNC wiki, so experiment with ones you think you would find useful.
- Some of my favorites are: crypt, keepnick, kickrejoin, and simple_away.
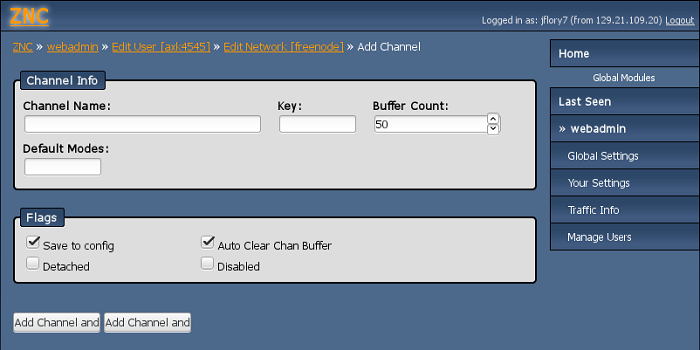
Once you finish, select "Save and return." The last step is to add some channels. You can do this in the network configuration page for the network you just configured. This is the easiest part. Look for the section on the page that mentions channels and select Add. You'll be greeted by a few different options, but for your purposes, only two are relevant. "Channel name" is the name of a channel you want to join, such as #opensource.com. The other setting you may find useful is "buffer count." The buffer count is the number of messages the software will store in the history for a particular channel when you log into IRC after being away. For most channels, 50 lines is probably plenty, but if you're in a particularly chatty channel and don't want to miss any messages, you can bump this setting to 200 or even 500 lines.

Easy as 1,2,3—add your favorite channels and you're ready to go.
Final steps
Now that ZNC is fully configured, start the service and make sure it automatically starts itself if the server ever reboots. To do that, run the following commands:
$ sudo systemctl start znc
$ sudo systemctl enable znc
ZNC is now up and running on your server, and you can use your IRC client to connect.
Setting up your IRC client
Now that the hard work is done, you should configure your IRC client to use your ZNC bouncer service. A popular IRC client available in most distributions is the HexChat client, but there are plenty of options for you to find what works best for you.

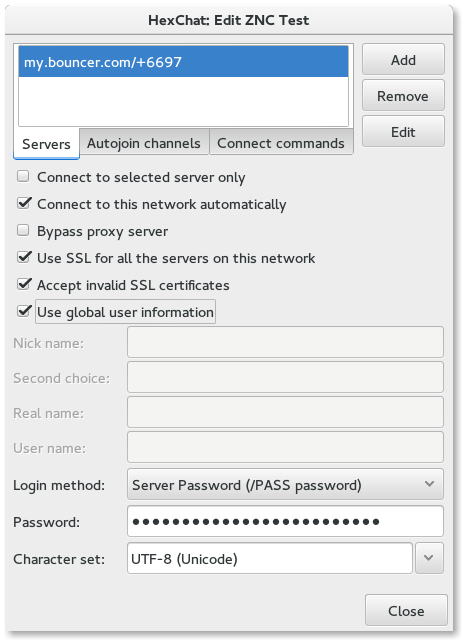
Change the generic information to the address and password for your server.
Instead of adding the settings for an IRC network to your client, you'll add information for your bouncer. The screenshot shows an example of how this might look for you. The server password is how you authenticate to your bouncer. Instructions for how to connect are at the top of the ZNC page for your user. They're generally formatted as username/network_name:password.
You can refer to the ZNC wiki for more information about connecting with your IRC client. Once you're finished adding the network, you can connect to the network. Now you never have to worry about missing another message in an IRC channel again.
Get our IRC quickstart guide.


2 Comments