Add GUIs to your programs and scripts easily with PySimpleGUI

Create a custom GUI in under five minutes.
335 readers like this.

Few people run Python programs by double-clicking the .py file as if it were a .exe file. When a typical user (non-programmer types) double-clicks an .exe file, they expect it to pop open with a window they can interact with. While GUIs, using tkinter, are possible using standard Python installations, it's unlikely many programs do this.

What if it were so easy to open a Python program into a GUI that complete beginners could do it? Would anyone care? Would anyone use it? It's difficult to answer because to date it's not been easy to build a custom GUI.

There seems to be a gap in the ability to add a GUI onto a Python program/script. Complete beginners are left using only the command line and many advanced programmers don't want to take the time required to code up a tkinter GUI.

GUI frameworks

There is no shortage of GUI frameworks for Python. Tkinter, WxPython, Qt, and Kivy are a few of the major packages. In addition, there are a good number of dumbed-down GUI packages that "wrap" one of the major packages, including EasyGUI, PyGUI, and Pyforms.

The problem is that beginners (those with less than six weeks of experience) can't learn even the simplest of the major packages. That leaves the wrapper packages as a potential option, but it will still be difficult or impossible for most new users to build a custom GUI layout. Even if it's possible, the wrappers still require pages of code.

PySimpleGUI attempts to address these GUI challenges by providing a super-simple, easy-to-understand interface to GUIs that can be easily customized. Even many complex GUIs require less than 20 lines of code when PySimpleGUI is used.

The secret

What makes PySimpleGUI superior for newcomers is that the package contains the majority of the code that the user is normally expected to write. Button callbacks are handled by PySimpleGUI, not the user's code. Beginners struggle to grasp the concept of a function, and expecting them to understand a call-back function in the first few weeks is a stretch.

With most GUIs, arranging GUI widgets often requires several lines of code… at least one or two lines per widget. PySimpleGUI uses an "auto-packer" that automatically creates the layout. No pack or grid system is needed to lay out a GUI window.

Finally, PySimpleGUI leverages the Python language constructs in clever ways that shorten the amount of code and return the GUI data in a straightforward manner. When a widget is created in a form layout, it is configured in place, not several lines of code away.

What is a GUI?

Most GUIs do one thing: collect information from the user and return it. From a programmer's viewpoint, this could be summed up as a function call that looks like this:

button, values = GUI_Display(gui_layout)

What's expected from most GUIs is the button that was clicked (e.g., OK, cancel, save, yes, no, etc.) and the values input by the user. The essence of a GUI can be boiled down to a single line of code.

This is exactly how PySimpleGUI works (for simple GUIs). When the call is made to display the GUI, nothing executes until a button is clicked that closes the form.

There are more complex GUIs, such as those that don't close after a button is clicked. Examples include a remote control interface for a robot and a chat window. These complex forms can also be created with PySimpleGUI.

Making a quick GUI

When is PySimpleGUI useful? Immediately, whenever you need a GUI. It takes less than five minutes to create and try a GUI. The quickest way to make a GUI is to copy one from the PySimpleGUI Cookbook. Follow these steps:

  • Find a GUI that looks similar to what you want to create
  • Copy code from the Cookbook
  • Paste it into your IDE and run it

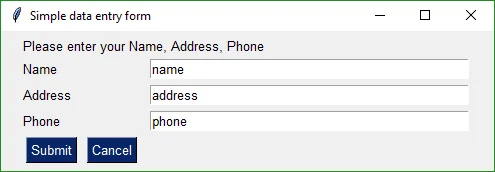
Let's look at the first recipe from the book.

import PySimpleGUI as sg

# Very basic form.  Return values as a list
form = sg.FlexForm('Simple data entry form')  # begin with a blank form

layout = [
          [sg.Text('Please enter your Name, Address, Phone')],
          [sg.Text('Name', size=(15, 1)), sg.InputText('name')],
          [sg.Text('Address', size=(15, 1)), sg.InputText('address')],
          [sg.Text('Phone', size=(15, 1)), sg.InputText('phone')],
          [sg.Submit(), sg.Cancel()]
         ]

button, values = form.LayoutAndRead(layout)

print(button, values[0], values[1], values[2])

It's a reasonably sized form.

PySimpleGUI data entry form

If you just need to collect a few values and they're all basically strings, you could copy this recipe and modify it to suit your needs.

You can even create a custom GUI layout in just five lines of code.

import PySimpleGUI as sg

form = sg.FlexForm('My first GUI')

layout = [ [sg.Text('Enter your name'), sg.InputText()],
           [sg.OK()] ]

button, (name,) = form.LayoutAndRead(layout)

PySimpleGUI form from 5 lines of code

Making a custom GUI in five minutes

If you have a straightforward layout, you should be able create a custom layout in PySimpleGUI in less than five minutes by modifying code from the Cookbook.

Widgets are called elements in PySimpleGUI. These elements are spelled exactly as you would type them into your Python code.

Core elements

Text
InputText
Multiline
InputCombo
Listbox
Radio
Checkbox
Spin
Output
SimpleButton
RealtimeButton
ReadFormButton
ProgressBar
Image
Slider
Column

Shortcut list

PySimpleGUI also has two types of element shortcuts. One type is simply other names for the exact same element (e.g., T instead of Text). The second type configures an element with a particular setting, sparing you from specifying all parameters (e.g., Submit is a button with the text "Submit" on it)

T = Text
Txt = Text
In = InputText
Input = IntputText
Combo = InputCombo
DropDown = InputCombo
Drop = InputCombo

Button shortcuts

A number of common buttons have been implemented as shortcuts. These include:

FolderBrowse
FileBrowse
FileSaveAs
Save
Submit
OK
Ok
Cancel
Quit
Exit
Yes
No

There are also shortcuts for more generic button functions.

SimpleButton
ReadFormButton
RealtimeButton

These are all the GUI widgets you can choose from in PySimpleGUI. If one isn't on these lists, it doesn't go in your form layout.

GUI design pattern

The stuff that tends not to change in GUIs are the calls that set up and show a window. The layout of the elements is what changes from one program to another.

Here is the code from the example above with the layout removed:

import PySimpleGUI as sg

form = sg.FlexForm('Simple data entry form')
# Define your form here (it's a list of lists)
button, values = form.LayoutAndRead(layout)

The flow for most GUIs is:

  • Create the form object
  • Define the GUI as a list of lists
  • Show the GUI and get results

These are line-for-line what you see in PySimpleGUI's design pattern.

GUI layout

To create your custom GUI, first break your form down into rows, because forms are defined one row at a time. Then place one element after another, working from left to right.

The result is a "list of lists" that looks something like this:

layout = [  [Text('Row 1')],
            [Text('Row 2'), Checkbox('Checkbox 1', OK()), Checkbox('Checkbox 2'), OK()] ]

This layout produces this window:

PySimpleGUI custom data entry form

Displaying the GUI

Once you have your layout complete and you've copied the lines of code that set up and show the form, it's time to display the form and get values from the user.

This is the line of code that displays the form and provides the results:

button, values = form.LayoutAndRead(layout)

Forms return two values: the text of the button that is clicked and a list of values the user enters into the form.

If the example form is displayed and the user does nothing other than clicking the OK button, the results would be:

button == 'OK'
values == [False, False]

Checkbox elements return a value of True or False. Because the checkboxes defaulted to unchecked, both the values returned were False.

Displaying results

Once you have the values from the GUI, it's nice to check what values are in the variables. Rather than printing them out using a print statement, let's stick with the GUI idea and output the data to a window.

PySimpleGUI has a number of message boxes to choose from. The data passed to the message box is displayed in a window. The function takes any number of arguments. You can simply indicate all the variables you want to see in the call.

The most commonly used message box in PySimpleGUI is MsgBox. To display the results from the previous example, write:

MsgBox('The GUI returned:', button, values)

Putting it all together

Now that you know the basics, let's put together a form that contains as many of PySimpleGUI's elements as possible. Also, to give it a nice appearance, we'll change the "look and feel" to a green and tan color scheme.

import PySimpleGUI as sg

sg.ChangeLookAndFeel('GreenTan')

form = sg.FlexForm('Everything bagel', default_element_size=(40, 1))

column1 = [[sg.Text('Column 1', background_color='#d3dfda', justification='center', size=(10,1))],
           [sg.Spin(values=('Spin Box 1', '2', '3'), initial_value='Spin Box 1')],
           [sg.Spin(values=('Spin Box 1', '2', '3'), initial_value='Spin Box 2')],
           [sg.Spin(values=('Spin Box 1', '2', '3'), initial_value='Spin Box 3')]]
layout = [
    [sg.Text('All graphic widgets in one form!', size=(30, 1), font=("Helvetica", 25))],
    [sg.Text('Here is some text.... and a place to enter text')],
    [sg.InputText('This is my text')],
    [sg.Checkbox('My first checkbox!'), sg.Checkbox('My second checkbox!', default=True)],
    [sg.Radio('My first Radio!     ', "RADIO1", default=True), sg.Radio('My second Radio!', "RADIO1")],
    [sg.Multiline(default_text='This is the default Text should you decide not to type anything', size=(35, 3)),
     sg.Multiline(default_text='A second multi-line', size=(35, 3))],
    [sg.InputCombo(('Combobox 1', 'Combobox 2'), size=(20, 3)),
     sg.Slider(range=(1, 100), orientation='h', size=(34, 20), default_value=85)],
    [sg.Listbox(values=('Listbox 1', 'Listbox 2', 'Listbox 3'), size=(30, 3)),
     sg.Slider(range=(1, 100), orientation='v', size=(5, 20), default_value=25),
     sg.Slider(range=(1, 100), orientation='v', size=(5, 20), default_value=75),
     sg.Slider(range=(1, 100), orientation='v', size=(5, 20), default_value=10),
     sg.Column(column1, background_color='#d3dfda')],
    [sg.Text('_'  * 80)],
    [sg.Text('Choose A Folder', size=(35, 1))],
    [sg.Text('Your Folder', size=(15, 1), auto_size_text=False, justification='right'),
     sg.InputText('Default Folder'), sg.FolderBrowse()],
    [sg.Submit(), sg.Cancel()]
     ]

button, values = form.LayoutAndRead(layout)
sg.MsgBox(button, values)

This may seem like a lot of code, but try coding this same GUI layout directly in tkinter and you'll quickly realize how tiny it is.
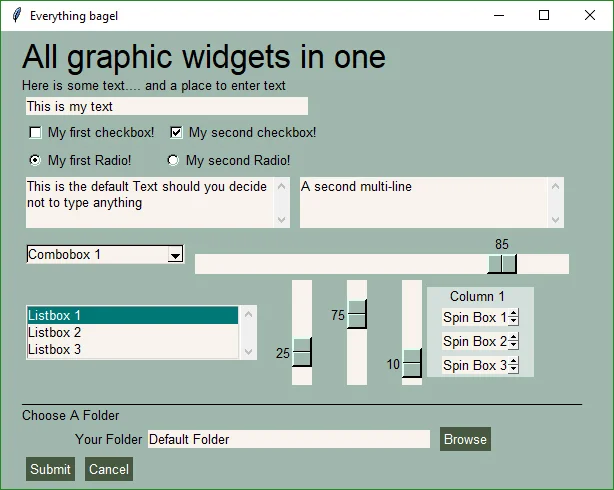
PySimpleGUI advanced custom data entry form

The last line of code opens a message box. This is how it looks:
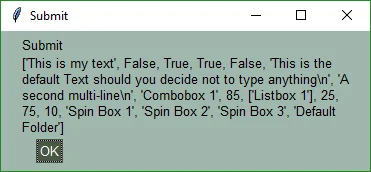
PySimpleGUI custom message box

Each parameter to the message box call is displayed on a new line. There are two lines of text in the message box; the second line is very long and wrapped a number of times

Take a moment and pair up the results values with the GUI to get an understanding of how results are created and returned.

Adding a GUI to Your Program or Script

If you have a script that uses the command line, you don't have to abandon it in order to add a GUI. An easy solution is that if there are zero parameters given on the command line, then the GUI is run. Otherwise, execute the command line as you do today.

This kind of logic is all that's needed:

if len(sys.argv) == 1:
	# collect arguments from GUI
else:
    # collect arguements from sys.argv

The easiest way to get a GUI up and running quickly is to copy and modify one of the recipes from the PySimpleGUI Cookbook.

Have some fun! Spice up the scripts you're tired of running by hand. Spend 5 or 10 minutes playing with the demo scripts. You may find one already exists that does exactly what you need. If not, you will find it's simple to create your own. If you really get lost, you've only invested 10 minutes.

Resources

Installation

PySimpleGUI works on all systems that run tkinter, including Raspberry Pi, and it requires Python 3

pip install PySimpleGUI

Documentation

Tags

24 Comments

Thank you for the writeup on this. I will forever be a beginner, as I have no interest in serious programming. Just like to doodle. Over the past couple of weeks, I've been thinking of trying to run some of the really easy "programming" / creative packages available under Windows.

Even HTAs have crossed my mind. Been thinking about doing this under WINE or virtualized. Linux simply doesn't cater to easy... Even bash can be over-engineered. PySimpleGUI looks perfect (for some solutions). This may help entice me to working with python more seriously.

This is an excellent introduction to a great solution to what has always been a vexing problem for me. I only had two minor issues with the code.

1. Since the library requires Python 3, the first line must be:

#! /usr/bin/python3

2. Again, for Python 3, you must use pip3 to install. Otherwise it ends up in the Python2 library collection.

Now, what is the most efficient way to combine this with psycopg2 to insert and update records in a database? Consider also that the tables have been somewhat normalized, so each record may be spread over two or three different tables, and the value list for some fields must be taken from tables of static data.

If the problem / application has a GUI or could benefit from a GUI, then PySimpleGUI isn't a bad place to start. If it's not a fit, you can quickly rule it out and move on.

If the project looks like it may be a candidate, spend 2 minutes looking through the Cookbook for a rough match. Copy, paste, and run the Recipe code. Then it's a matter of modifying the code to match your application.

The goal is to make it trivial to add a decent look GUI to software. It would be nice to introduce students to GUIs sooner than later in education by making it easy enough for beginners.

My advice to you would be to jump in and try stuff. Make something run. Make anything run. Then modify it or even start over. Point is that you've got a working environment, a blank canvas.

After taking a look, it won't work for me. While it's pretty easy to retrieve the id and display text from a static table, I need to only display the text in a list box, but return the id that matches the selection, since that is what will be stored in the new record. Maybe that would make a useful enhancement for a future release?

In reply to by PySimpleGUI

If "tables" are a fundamental thing you need to interact with, then PySimpleGUI is not yet able to provide a way of doing this in an interactive way.

Displaying a table is relatively easy and the results are pretty good:
https://user-images.githubusercontent.com/13696193/44960497-c667fd80-ae…

Here is the code if you want to try it

layout = [[sg.T('Table Test')]]
for i in range(20):
row = [sg.T(f'Row {i} ', size=(10,1))]
layout.append([sg.T(f'{i}{j}', size=(4,1), background_color='white', pad=(1,1)) for j in range(10)])
sg.FlexForm('Table').LayoutAndRead(layout)

There are 2 missing features that make this package not the best choice for database type operations:
1. Tables
2. Scrollable windows

There is no "table' widget I'm aware of in tkinter. I've looked at a few proposed solutions, but nothing has yet to rise to the top. The first step is to get the Column Element scrollable.

It should be noted that PySimpleGUI's primary mission is to implement "Simple GUIs".

In reply to by Robert McConnell (not verified)

I would urge you to write up an Issue and post it on the GitHub site if you have a feature idea or see a limitation.

I'm confused about the operation you are attempting on a Listbox. The best way to communicate on these things will be via GitHub.

In reply to by Robert McConnell (not verified)

The process is simple. I have a table of railroads that doesn't ever change. It includes a key (id), long and short names. So my two most important records in CSV form would be:

1, Pennsylvania Railroad, PRR
2, Coudersport and Port Allegany Railroad, CPA

I do a SQL select for the id and short name to get a list to chose from, then display that in a listbox. Once chosen by the user, I need to return the id to be stored in the new record.

I can't accept the GitHub terms of service, so that is not even a remote possibility.

In reply to by PySimpleGUI

Got it. Just finished creating scrollable Column Elements, which paves the way for tables and the application like you described.

What is the GitHub term of service that's blocking you? Perhaps it's been incorrectly stated.

In reply to by Robert McConnell (not verified)

Which terms? I hardly know where to start. But let me give you the top three.

1 Section Q. Indemnification: If some imbecile decides to sue me over a perceived slight, or because he wants to steal my work, I would have to sell everything I own to pay the retainer fee for any lawyer who could respond to that complaint. There is no way I could indemnify anyone in a case like that. If you don't think that is likely to happen, read up on the history of JMRI.

In addition, according to paragraph B3, they expect to hold teenagers to this requirement, and although I don't think the courts would allow that, it would still be very expensive for the kid's parents to find out.

2. Paragraph B4 says that when the web site is hacked, the users are still responsible for the breach, even though they have no control over the back end security. This is all too typical of the standard business contract where there is no actual negotiation involved. It becomes a one sided document with all of the risk dumped on the user. This presents me with a take it or leave it decision, and I choose to leave it.

3. Section R fails to define "material changes" in any meaningful way, there is only one weak example listed. That leaves far too much wriggle room for the lawyers, and it is entirely possible they could decide to sell all of the collected customer information, complete the changes to the web page in the middle of the night and have the money in the bank before the sun is up. Now that they are owned by Microsoft, I have to consider this a very real possibility.

In reply to by PySimpleGUI

Does it work in KDE/Plasma environment? Just tried copying an example + PySimpleGUI.py in a directory, and run, but I see only a very small "cross", like mouse pointer, no more ...

I'll open an issue on the GitHub. Please visit and enter more information so it can be debugged (Python version, Linux Version, etc).

In reply to by Barlafuss (not verified)

Visited .
Issue solved mainly following suggestion by Robert McConnell (thanks !) .

In reply to by PySimpleGUI

PySimpleGUI seems like a good match for a small GUI app I need to build, but it _must_ be based on Python 2.7. The code below is all I had to add at the top of PySimpleGUI.py, plus ( as expllained in the comment ) adding a function call inside *(), for every super() call ( NOT TESTED WITH Python 3 ! ) . However, one 'gotcha' that has me mystified is that I had to move every (args) in method calls to a position after the named ( 'keyword args' ) parameters. That is definitely not in accordance with Python convemtions, but it fixes errors ...

import platform

sVsn = platform.python_version()[0]

if sVsn == '2':
__metaclass__ = type # required for Python v.2.X

def fSuprArgs(self):
return () if sVsn != '2' else (self.__class__, self)

# place *(fSuprArgs(self)) as parameter in every call to super()

Are you saying you managed to get PySimpleGUI working with Python 2.7????!

I so, PLEASE post the file to the GitHub (or anywhere else of your choosing). This request comes up from time to time. I received one earlier this week.

In reply to by Noah F San (not verified)

Yes, it was a requirement for my project. Just tack the code above at the top of PySmpleGUI.py, insert the function call at every super() as: super(*(fSuprArgs(self))), move all *args to the last position in any parameter list where it appears, and you're done.

Careful, indentation gets mangled on this web page ...

I have already licensed the changes as CC-BY-SA, whatever that means, so feel free.

Please Note: Tested with Python 2.7.12 only, and NOT TESTED with Python 3!

Also, I have found there are many widgets that get confused, because they expect a color value tuple as the first param, so I always stuff (1, 1) and that prevents additional errors.

In reply to by PySimpleGUI

Replying to myself: Looks like I misunderstood parameter type cardinality. The link below shows that 'formal' keyword arguments _can_ come before *args, but *args must not come before **kwargs, when used together. So, the change that prevents errors is still legitimate Python, but of course I have no idea why it works.

http://www.network-theory.co.uk/docs/pytut/KeywordArguments.html

In reply to by Noah F San (not verified)

I made all of these changes and moved the *args to the end of all the functions.

And, it WORKED! At least on one simple form I tried. There is more work ahead. I'm STUNNED at this outcome! I can't thank you enough!!

In reply to by Noah F San (not verified)

One last message...

Thanks to your encouragement and coding help, I just released PySimpleGUI27 to PyPI

I tested it a lot, but I'm unable to test the PyPI version. It should work great. This is a fantastic thing you've done!

In reply to by Noah F San (not verified)

Sorry I wasn't more clear about how the v.2.7 changes are meant to work. Though I haven't tested with v.3.x, the same PySimpleGUI code _should_ work under either rev. That's why the function returns an empty tuple when the version != 2.x, because the super() call doesn't need any params under v.3.x.

In reply to by PySimpleGUI

How can I add a background image that covers the entire window of the app. I don't see the functionality anywhere. Only changing the colour.

Theme doesn't work also.

sg.ChangeLookAndFeel('BluePurple')
nothing happens. Tried changing colour variable also.

If you are on a Mac, you will not see any change. You will see this message printed out:
*** Changing look and feel is not supported on Mac platform ***'

Make sure you make the call to ChangeLookAndFeel PRIOR to your layout definition. The layout needs to know the colors.

You can also call SetOptions with the individual color choices that you want. It is not blocked from being called by Macs. The reason for blocking the Look and Feel call is that button colors do not work on a Mac.

Feel free to log an issue on the github if it continues.

In reply to by Mike Kell (not verified)

Is there any way to keep the multi entry box from blowing out to the OS
if the user hits enter?
Raspbian Raspberry Pi

Since you don't mention any crashes, sounds like your Read is returning normally and you're simply exiting the program. What may be happening is that you're using a Submit() or OK() button. By default those buttons have a parameter named bind_return_key set to true. If you're using a built-in button then try adding the parameter ... bind_return_key=False... to the call. Or you can switch to making your own buttons by using a call like Button("Submit"). Plain buttons like this don't have the enter key bound to them like the built-in ones do. If you have further problems, come log an issue on the github site (www.PySimpleGUI.com)

In reply to by Curt Wuollet (not verified)

Creative Commons LicenseThis work is licensed under a Creative Commons Attribution-Share Alike 4.0 International License.