I remember the very first time I encountered Vim. I was a university student, and the computers in the computer science department's lab were installed with Ubuntu Linux. While I had been exposed to different Linux variations (like RHEL) even before my college years (Red Hat sold its CDs at Best Buy!), this was the first time I needed to use the Linux operating system regularly, because my classes required me to do so. Once I started using Linux, like many others before and after me, I began to feel like a "real programmer."

Real Programmers, by xkcd
Students could use a graphical text editor like Kate, which was installed on the lab computers by default. For students who could use the shell but weren't used to the console-based editor, the popular choice was Nano, which provided good interactive menus and an experience similar to Windows' graphical text editor.
I used Nano sometimes, but I heard awesome things about Vi/Vim and Emacs and really wanted to give them a try (mainly because they looked cool, and I was also curious to see what was so great about them). Using Vim for the first time scared me—I did not want to mess anything up! But once I got the hang of it, things became much easier and I could appreciate the editor's powerful capabilities. As for Emacs, well, I sort of gave up, but I'm happy I stuck with Vim.
In this article, I will walk through Vim (based on my personal experience) just enough so you can get by with it as an editor on a Linux system. This will neither make you an expert nor even scratch the surface of many of Vim's powerful capabilities. But the starting point always matters, and I want to make the beginning experience as easy as possible, and you can explore the rest on your own.
Step 0: Open a console window
Before jumping into Vim, you need to do a little preparation. Open a console terminal from your Linux operating system. (Since Vim is also available on MacOS, Mac users can use these instructions, also.)
Once a terminal window is up, type the ls command to list the current directory. Then, type mkdir Tutorial to create a new directory called Tutorial. Go inside the directory by typing cd Tutorial.
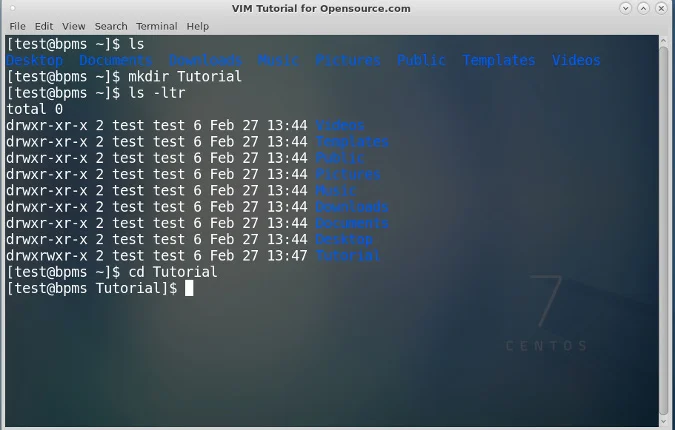
That's it for preparation. Now it's time to move on to the fun part—starting to use Vim.
Step 1: Create and close a Vim file without saving
Remember when I said I was scared to use Vim at first? Well, the scary part was thinking, "what if I change an existing file and mess things up?" After all, several computer science assignments required me to work on existing files by modifying them. I wanted to know: How can I open and close a file without saving my changes?
The good news is you can use the same command to create or open a file in Vim: vim <FILE_NAME>, where <FILE_NAME> represents the target file name you want to create or modify. Let's create a file named HelloWorld.java by typing vim HelloWorld.java.
Hello, Vim! Now, here is a very important concept in Vim, possibly the most important to remember: Vim has multiple modes. Here are three you need to know to do Vim basics:
| Mode | Description |
|---|---|
| Normal | Default; for navigation and simple editing |
| Insert | For explicitly inserting and modifying text |
| Command Line | For operations like saving, exiting, etc. |
Vim has other modes, like Visual, Select, and Ex-Mode, but Normal, Insert, and Command Line modes are good enough for us.
You are now in Normal mode. If you have text, you can move around with your arrow keys or other navigation keystrokes (which you will see later). To make sure you are in Normal mode, simply hit the Esc (Escape) key.
Tip: Esc switches to Normal mode. Even though you are already in Normal mode, hit Esc just for practice's sake.
Now, this will be interesting. Press : (the colon key) followed by q! (i.e., :q!). Your screen will look like this:
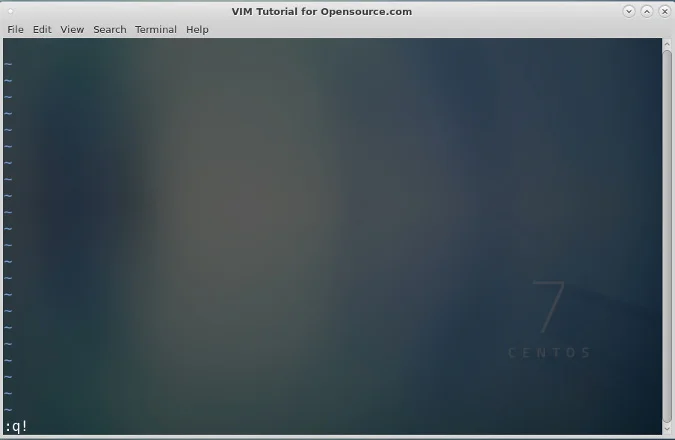
Pressing the colon in Normal mode switches Vim to Command Line mode, and the :q! command quits the Vim editor without saving. In other words, you are abandoning all changes. You can also use ZQ; choose whichever option is more convenient.
Once you hit Enter, you should no longer be in Vim. Repeat the exercise a few times, just to get the hang of it. Once you've done that, move on to the next section to learn how to make a change to this file.
Step 2: Make and save modifications in Vim
Reopen the file by typing vim HelloWorld.java and pressing the Enter key. Insert mode is where you can make changes to a file. First, hit Esc to make sure you are in Normal mode, then press i to go into Insert mode. (Yes, that is the letter i.)
In the lower-left, you should see -- INSERT --. This means you are in Insert mode.
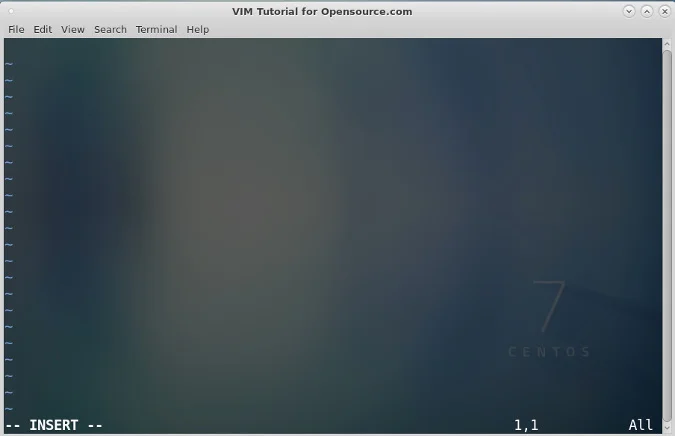
Type some Java code. You can type anything you want, but here is an example for you to follow. Your screen will look like this:
public class HelloWorld {
    public static void main(String[] args) {
    }
}
Very pretty! Notice how the text is highlighted in Java syntax highlight colors. Because you started the file in Java, Vim will detect the syntax color.
Save the file. Hit Esc to leave Insert mode and enter Command Line mode. Type : and follow that with x! (i.e., a colon followed by x and !). Hit Enter to save the file. You can also type wq to perform the same operation.
Now you know how to enter text using Insert mode and save the file using :x! or :wq.
Step 3: Basic navigation in Vim
While you can always use your friendly Up, Down, Left, and Right arrow buttons to move around a file, that would be very difficult in a large file with almost countless lines. It's also helpful to be able to be able to jump around within a line. Although Vim has a ton of awesome navigation features, the first one I want to show you is how to go to a specific line.
Press the Esc key to make sure you are in Normal mode, then type :set number and hit Enter .
Voila! You see line numbers on the left side of each line.
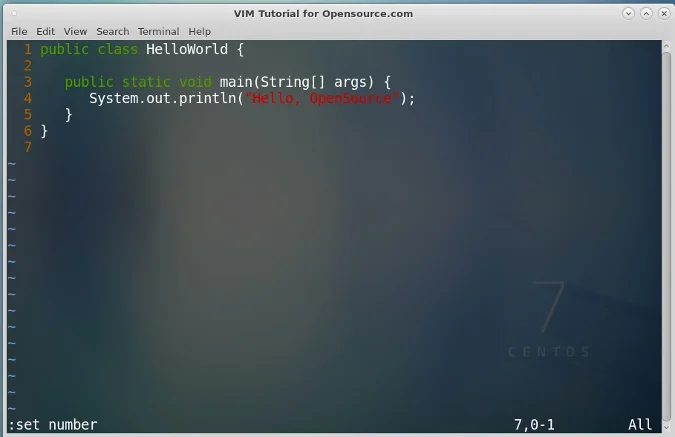
OK, you may say, "that's cool, but how do I jump to a line?" Again, make sure you are in Normal mode, then press :<LINE_NUMBER>, where <LINE_NUMBER> is the number of the line you want to go to, and press Enter. Try moving to line 2.
:2Now move to line 3.
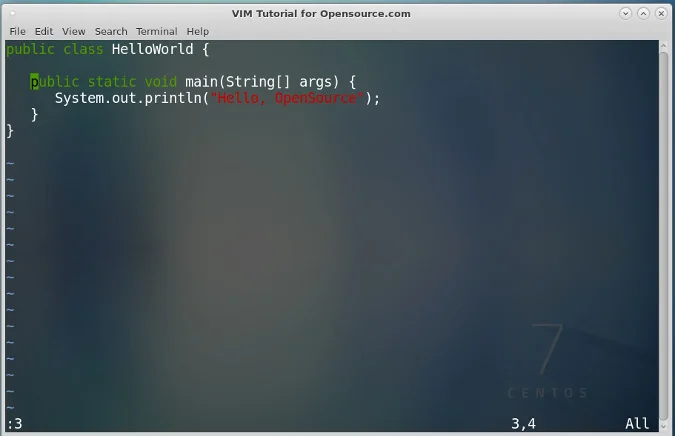
But imagine a scenario where you are dealing with a file that is 1,000 lines long and you want to go to the end of the file. How do you get there? Make sure you are in Normal mode, then type :$ and press Enter.
You will be on the last line!
Now that you know how to jump among the lines, as a bonus, let's learn how to move to the end of a line. Make sure you are on a line with some text, like line 3, and type $.
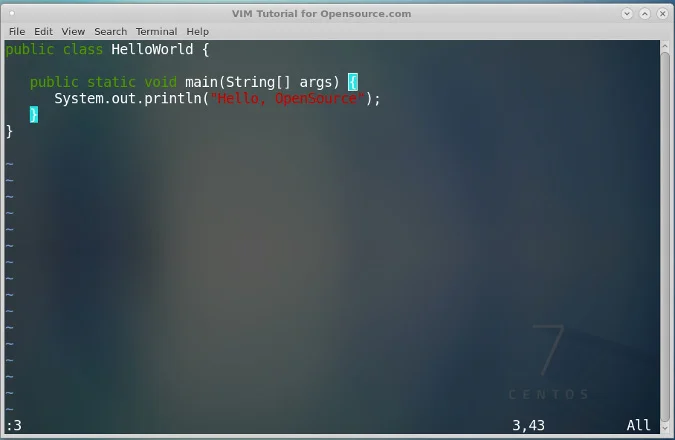
You're now at the last character on the line. In this example, the open curly brace is highlighted to show where your cursor moved to, and the closing curly brace is highlighted because it is the opening curly brace's matching character.
That's it for basic navigation in Vim. Wait, don't exit the file, though. Let's move to basic editing in Vim. Feel free to grab a cup of coffee or tea, though.
Step 4: Basic editing in Vim
Now that you know how to navigate around a file by hopping onto the line you want, you can use that skill to do some basic editing in Vim. Switch to Insert mode. (Remember how to do that, by hitting the i key?) Sure, you can edit by using the keyboard to delete or insert characters, but Vim offers much quicker ways to edit files.
Move to line 3, where it shows public static void main(String[] args) {. Quickly hit the d key twice in succession. Yes, that is dd. If you did it successfully, you will see a screen like this, where line 3 is gone, and every following line moved up by one (i.e., line 4 became line 3).
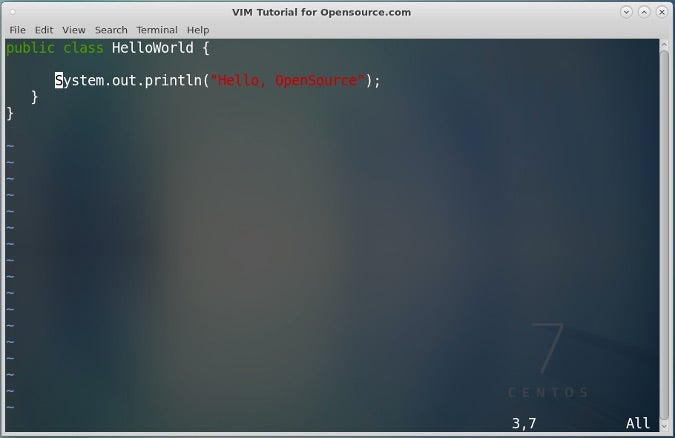
That's the delete command. Don't fear! Hit u and you will see the deleted line recovered. Whew. This is the undo command.
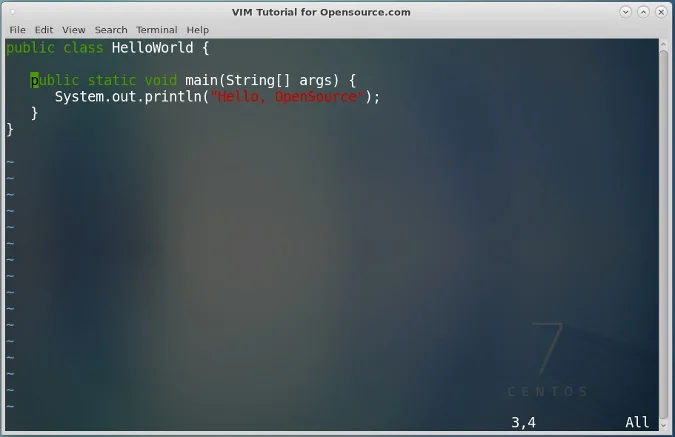
The next lesson is learning how to copy and paste text, but first, you need to learn how to highlight text in Vim. Press v and move your Left and Right arrow buttons to select and deselect text. This feature is also very useful when you are showing code to others and want to identify the code you want them to see.
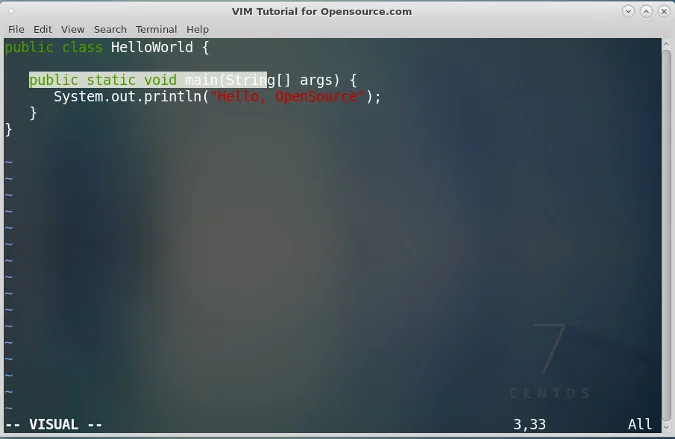
Move to line 4, where it says System.out.println("Hello, Opensource");. Highlight all of line 4. Done? OK, while line 4 is still highlighted, press y. This is called yank mode, and it will copy the text to the clipboard. Next, create a new line underneath by entering o. Note that this will put you into Insert mode. Get out of Insert mode by pressing Esc, then hit p, which stands for paste. This will paste the copied text from line 3 to line 4.
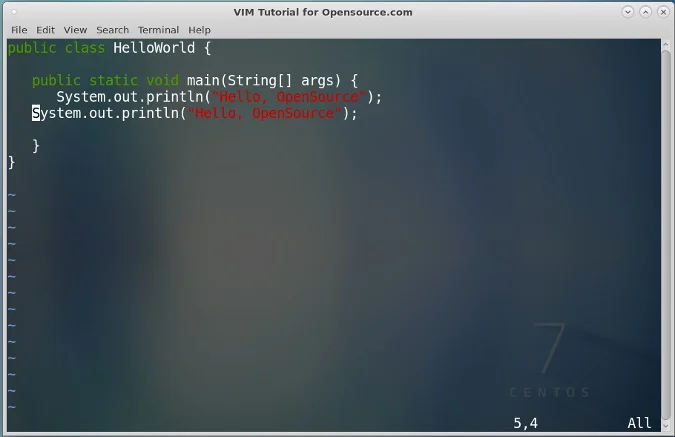
As an exercise, repeat these steps but also modify the text on your newly created lines. Also, make sure the lines are aligned well.
Hint: You need to switch back and forth between Insert mode and Command Line mode to accomplish this task.
Once you are finished, save the file with the x! command. That's all for basic editing in Vim.
Step 5: Basic searching in Vim
Imagine your team lead wants you to change a text string in a project. How can you do that quickly? You might want to search for the line using a certain keyword.
Vim's search functionality can be very useful. Go into the Command Line mode by (1) pressing Esc key, then (2) pressing colon : key. We can search a keyword by entering :/<SEARCH_KEYWORD>, where <SEARCH_KEYWORD> is the text string you want to find. Here we are searching for the keyword string "Hello." In the image below, the colon is missing but required.
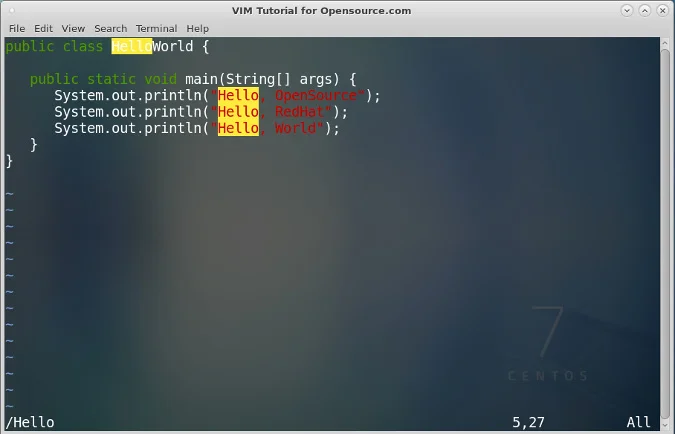
However, a keyword can appear more than once, and this may not be the one you want. So, how do you navigate around to find the next match? You simply press the n key, which stands for next. Make sure that you aren't in Insert mode when you do this!
Bonus step: Use split mode in Vim
That pretty much covers all the Vim basics. But, as a bonus, I want to show you a cool Vim feature called split mode.
Get out of HelloWorld.java and create a new file. In a terminal window, type vim GoodBye.java and hit Enter to create a new file named GoodBye.java.
Enter any text you want; I decided to type "Goodbye." Save the file. (Remember you can use :x! or :wq in Command Line mode.)
In Command Line mode, type :split HelloWorld.java, and see what happens.
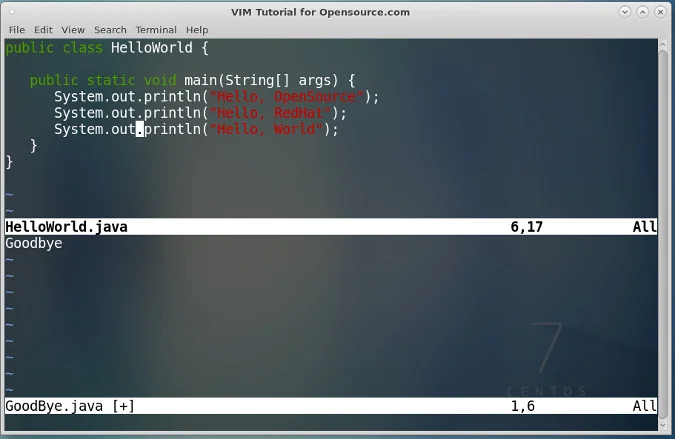
Wow! Look at that! The split command created horizontally divided windows with HelloWorld.java above and GoodBye.java below. How can you switch between the windows? Hold Control (on a Mac) or CTRL (on a PC) then hit ww (i.e., w twice in succession).
As a final exercise, try to edit GoodBye.java to match the screen below by copying and pasting from HelloWorld.java.
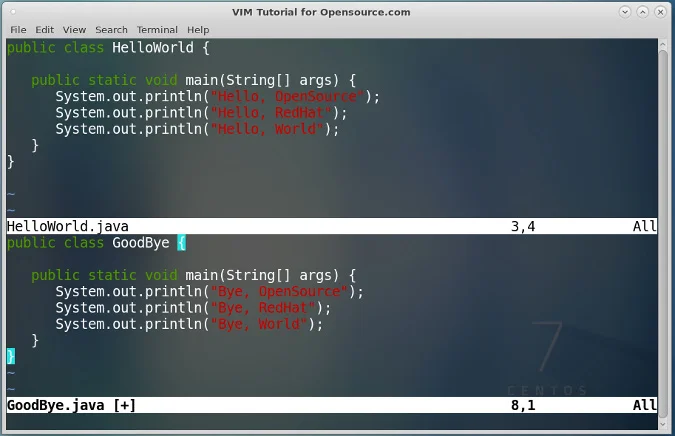
Save both files, and you are done!
TIP 1: If you want to arrange the files vertically, use the command :vsplit <FILE_NAME> (instead of :split <FILE_NAME>, where <FILE_NAME> is the name of the file you want to open in Split mode.
TIP 2: You can open more than two files by calling as many additional split or vsplit commands as you want. Try it and see how it looks.
Vim cheat sheet
In this article, you learned how to use Vim just enough to get by for work or a project. But this is just the beginning of your journey to unlock Vim's powerful capabilities. Be sure to check out other great tutorials and tips on Opensource.com.
To make things a little easier, I've summarized everything you've learned into a handy cheat sheet.


6 Comments