In 2021, there are more reasons why people love Linux than ever before. In this series, I'll share 21 different reasons to use Linux. Here's how I use Linux to edit videos.
Back in 2018, I wrote an article about the state of Linux video editing, in which I chose an application called Openshot as my pick for the top hobbyist video editing software. Years later, and my choices haven't changed. Openshot remains a great little video editing application for Linux, and it's managed to make creating videos on Linux boring in the best of ways.
Well, video editing may never become boring in the sense that no platform will ever get it perfect because part of the art of moviemaking is the constant improvement of image quality and visual trickery. Software and cameras will forever be pushing each other forward and forever catching up to one another. I've been editing video on Linux since 2008 at the very least, but back then, editing video was still generally mystifying to most people. Computer users have become familiar with what used to be advanced concepts since then, so video editing is taken for granted. And video editing on Linux, at the very least, is at the stage of getting an obvious shrug. Yes, of course, you can edit your videos on Linux.
Installing Openshot
On Linux, you can install Openshot from your distribution's software repository.
On Fedora and similar:
$ sudo dnf install openshotOn Debian, Linux Mint, Elementary, and similar:
$ sudo apt install openshotImporting video
Without the politics of "not invented here" syndrome and corporate identity, Linux has the best codec support in the tech industry. With the right libraries, you can play nearly any video format on Linux. It's a liberating feeling for even a casual content creator, especially to anyone who's spent an entire day downloading plugins and converter applications in a desperate attempt to get a video format into their proprietary video editing software. Barring [un]expected leaps and bounds in camera technology, you generally don't have to do that on Linux. Openshot uses ffmpeg to import videos, so you can edit whatever format you need to edit.
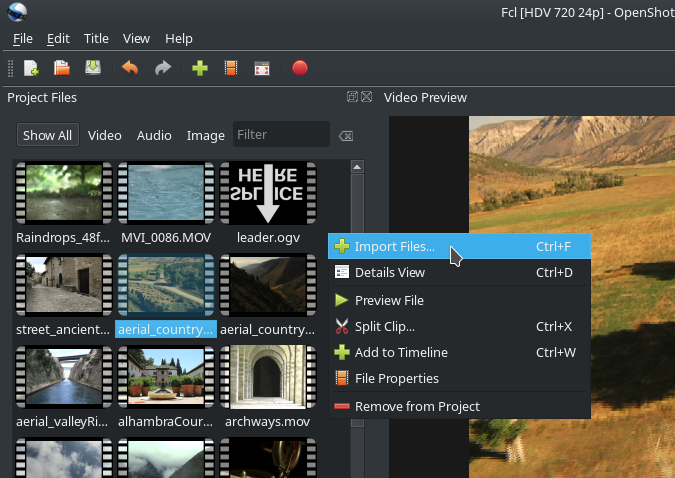
Import into Openshot
Note: When importing video, I prefer to standardize on the formats I use. It's fine to mix formats a little, but for consistency in behavior and to eliminate variables when troubleshooting, I convert any outliers in my source material to whatever the majority of my project uses. I prefer my source to be only lightly compressed when that's an option, so I can edit at a high quality and save compression for the final render.
Auditioning footage
Once you've imported your video clips, you can preview each clip right in Openshot. To play a clip, right-click the clip and select Preview file. This option opens a playback window so you can watch your footage. This is a common task for a production with several takes of the same material.
When rummaging through a lot of footage, you can tag clips in Openshot to help you keep track of which ones are good and which ones you don't think you'll use, or what clip belongs to which scene, or any other meta-information you need to track. To tag a clip, right-click on it and select File properties. Add your tags to the Tag field.
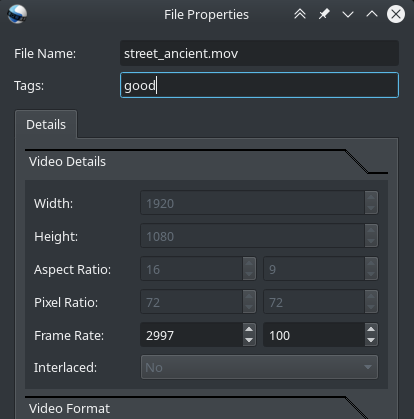
Tagging files in Openshot
Add video to the timeline
Whether you have a script you're following, or you're just sorting through footage and finding a story, you eventually get a sense of how you think your video ought to happen. There are always myriad possibilities at this stage, and that's a good thing. It's why video editing is one of the single most influential stages of moviemaking. Will you start with a cold open in media res? Or maybe you want to start at the end and unravel your narrative to lead back up to that? Or are you a traditional story-teller, proudly beginning at the beginning? Whatever you decide now, you can always change later, so the most important thing is just to get started.
Getting started means putting video footage in your timeline. Whatever's in the timeline at the end of your edit is what makes your movie, so start adding clips from your project files to the timeline at the bottom of the Openshot window.
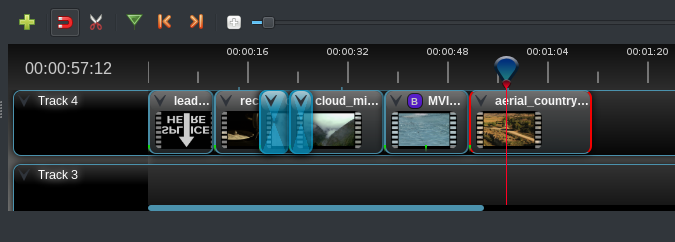
Adding clips to the timeline
The rough assembly, as the initial edit is commonly called, is a sublimely simple and quick process in Openshot. You can throw clips into the timeline hastily, either straight from the Project files panel (right-click and select Add to timeline or just press Ctrl+W), or by dragging and dropping.
Once you have a bunch of clips in the timeline, in more or less the correct order, you can take another pass to refine how much of each clip plays with each cut. You can cut video clips in the timeline short with the scissors (or Razor tool in Openshot's terminology, but the icon is a scissor), or you can move the order of clips, intercut from shot to shot, and so on. For quick cross dissolves, just overlay the beginning of a clip over the end of another. Openshot takes care of the transition.
Should you find that some clips have stray background sound that you don't need, you can separate the audio from the video. To extract audio from a clip in the timeline, right-click on it and select Separate audio. The clip's audio appears as a new clip on the track below its parent.
Exporting video from Openshot
Fast-forward several hours, days, or months, and you're done with your video edit. You're ready to release it to the world, or your family or friends, or to whomever your audience may be. It's time to export.
To export a video, click the File menu and select Export video. This selection brings up an Export Video window, with a Simple and Advanced tab.
The Simple tab provides a few formats for you to choose from: Bluray, DVD, Device, and Web. These are common targets for videos, and general presets are assigned by default to each.
The Advanced tab offers profiles based on output video size and quality, with overrides available for both video and audio. You can manually enter the video format, codec, and bitrate you want to use for the export. I prefer to export to an uncompressed format and then use ffmpeg manually, so that I can do multipass renders and also target several different formats as a batch process. However, this is entirely optional, but this attention to the needs of many different use cases is part of what makes Openshot great.
Editing video on Linux with Openshot
This short article hardly does Openshot justice. It has many more features and conveniences, but you'll discover those as you use it.
If you're a content creator with a deadline, you'll appreciate the speed of Openshot's workflow. If you're a moviemaker with no budget, you'll appreciate Openshot's low, low price of $0. If you're a proud parent struggling to extract just the parts of the school play featuring your very own rising star, you'll appreciate how easy it is to use Openshot. Cutting to the chase: Editing videos on the Linux desktop is easy, fun, and fast.



4 Comments