The Audacity sound editor is one of those open source applications that filled a niche that seemingly nobody else realized existed. Initially developed at Carnegie Mellon University at a time when many people still thought computers were just for office and schoolwork, and you required special DSP peripherals for serious multimedia work. Audacity recognized that, occasionally, the average computer user needed to edit audio. The Audacity team has consistently provided an open source application for recording and cleaning up sound in the two decades since.
I use Audacity a lot, and being an editor by training, I'm used to significant and usually single-key keyboard shortcuts in my applications. By building shortcuts around single letters, you can have one hand on the mouse and one on the keyboard, so the delay between choosing a tool or an important function and clicking the mouse is mere milliseconds. Throughout this article, I'll highlight the keyboard shortcut I use in Audacity if you want to optimize your own settings.
Install Audacity on Linux
Audacity is available on most Linux distributions from your package manager. On Fedora, Mageia, and similar distributions:
$ sudo dnf install audacityOn Elementary, Mint, and other Debian-based distributions:
$ sudo apt install audacity
However, I use Audacity as a Flatpak.
On Windows or macOS, download an Audacity installer from the Audacity website.
A recent fork, called Tenacity, aims to continue the Audacity tradition with a different team of developers. At the time of writing, the two are essentially the same application, so this article applies equally to both. Whether the two diverge in features later remains to be seen.
Once installed, launch the application from your Application or Activities menu.
Setting inputs in Audacity
First, you must set your audio input so that Audacity receives the signal from the microphone or audio interface you want to use. What you choose depends on your setup and what audio peripherals you own. USB microphones usually get listed as Microphone, but a microphone with a 1/8" input jack likely gets labeled as Line in. Your different options:
Pulse Audio
Linux uses Advanced Linux Sound Architecture (ALSA) as its backend for sound, while macOS and Windows use their own closed frameworks. On Linux, you can set Pulse Audio as your input source to direct Audacity to one virtual interface (Pulse), so you can route sound input from your System Settings. This is my preferred method because it centralizes all control in one convenient control panel. Gone are the days of selecting a microphone in one application only to discover that the microphone got muted elsewhere.
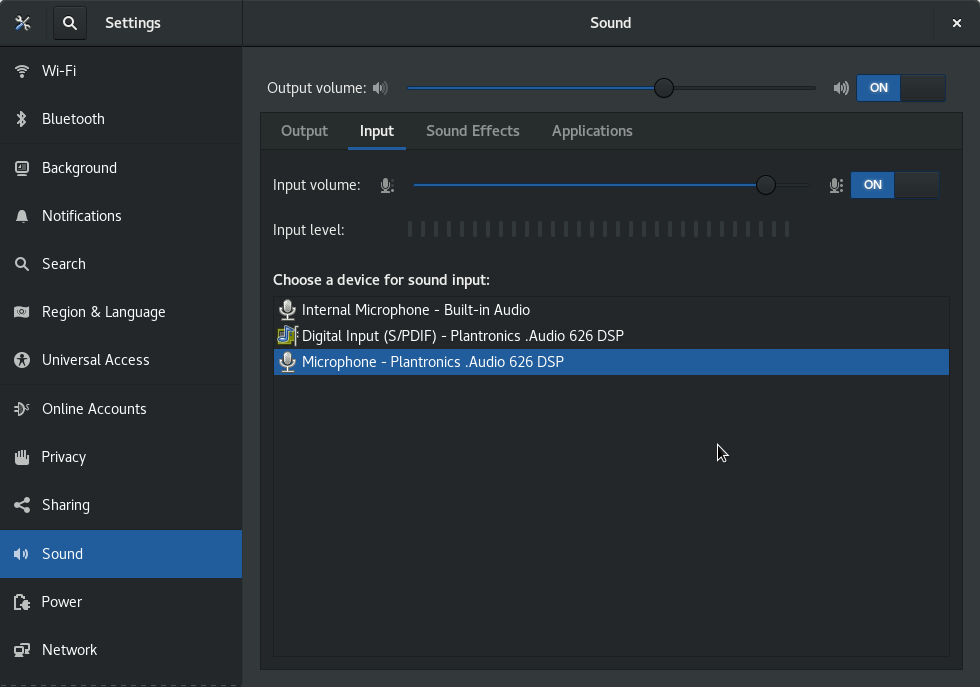
(Seth Kenlon, CC BY-SA 4.0)
Device access
If your distribution or OS doesn't use Pulse Audio, or if for some reason you prefer to access sound devices directly, you can alternatively select a device from the drop-down menu. This requires some knowledge of how your system lists sound devices, which isn't always obvious. A desktop might have several inputs, some in the rear of the tower and some in a front panel. Laptops usually have fewer input options, but you probably have a microphone near your webcam and possibly an external one if you're using one.
Recording audio with Audacity
Once your input is selected, press the Record button (the button with a red dot).
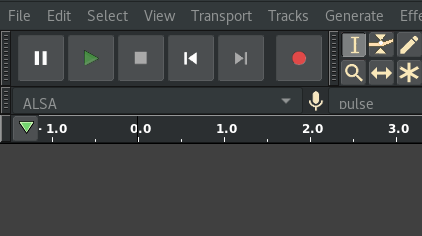
(Seth Kenlon, CC BY-SA 4.0)
If you're recording into a microphone, all you have to do is start talking. If you're recording input from, say, a vinyl record player, then you must start it. Whatever it is, as long as Audacity is in Record mode, any signal sent to your selected input is written to Audacity and rendered as a waveform on your screen.
My shortcut: I use the R key to start recording. By default, Space stops a recording (and also plays a recording back).
Editing audio
Recording rarely goes exactly as planned. Maybe you start recording too soon and have to sit through seconds of vinyl silence (it's like silence, but scratchier), or you discover that you fill all of your spoken silence with "uh" and "um" and other vocables, or you just have a false start. Audacity is first and foremost a waveform editor, meaning you can cut out the sounds you don't want in the final recording with the same ease that you make edits to the words you type into a word processor.
Editing sound at zero crossings
The main editing tool in Audacity is the Selection Tool. It's the familiar "I-beam" cursor you see in word processors, and its function is the same here. You can click and drag this cursor across a region of sound, and then you can copy or paste or cut or delete or just play the region.
My shortcut: I use the I key to activate the selection tool because the cursor looks like the letter "I."
However, in a word processor, you can see the end and start of each letter very clearly. There's no chance of you accidentally selecting and deleting only half of a letter.
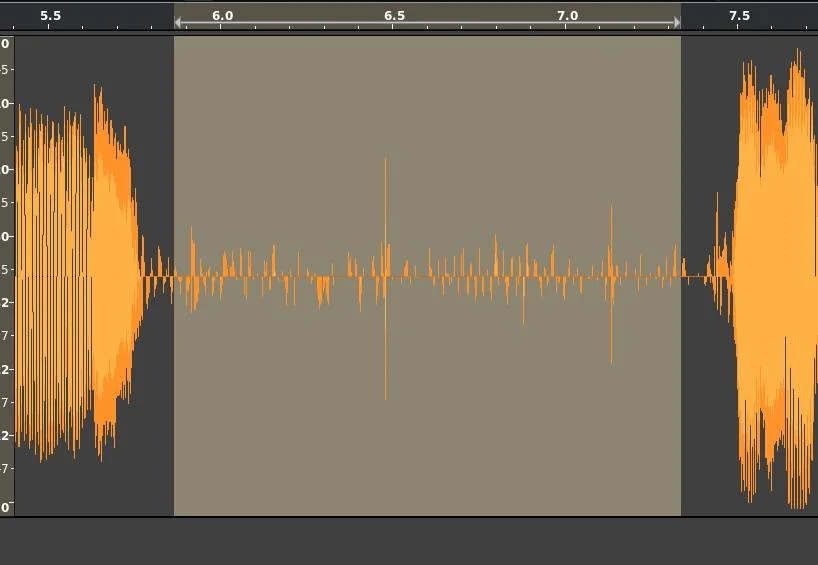
However, the "resolution" (called the sample rate) of sound in modern applications is very good, so it's difficult for the human eye to locate a clean break in an audio wave. Audacity can adjust your work so that your selected region lands on what's called a zero crossing, which avoids subtle but noticeable glitches where you made cuts.
(Seth Kenlon, CC BY-SA 4.0)
After you make a selection, go to the Select menu and choose At Zero Crossings.
My shortcut: I use the Z key to adjust a selection to zero crossings and the X key to delete a region (it saves me from having to move my hand all the way up to Del or Backspace.)
Making room for more
The beauty of editing is that your final product doesn't have to be true to what you recorded. I've recorded lectures and even scripted readings that end up getting sidetracked for one reason or another, or that omit a section of important information, only to then rearrange or add brand new audio before publishing.
Moving a selection of audio is similar to deleting, except instead of removing audio, you copy and paste the selection the same way you do in a word processor—copy or cut using standard keyboard shortcuts, reposition your cursor, and paste. Making room for insert edits, though, requires empty space on your audio timeline so you can record additional audio to fill the gap you've created. For this, you use the Selection Tool and the Time Shift Tool.
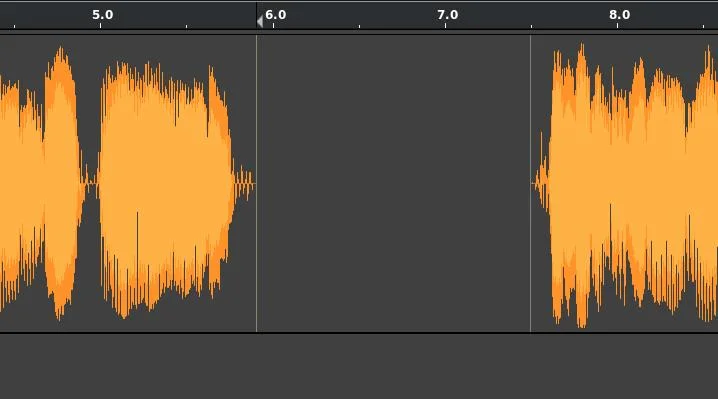
To create a gap in your audio, position your Selection Tool cursor at the point where you want to add empty space. Navigate to the Edit menu, select the Clip Boundaries submenu, and then choose Split. This splits your audio at the point of your Selection tool.
Activate the Time Shift Tool in the top toolbar (the icon is two joined arrows pointing left and right.) Click and drag the right half of your split audio to create a gap.
(Seth Kenlon, CC BY-SA 4.0)
My shortcut: I use K to split (or "kut," as a mnemonic) and T to activate the Time Shift Tool.
Exporting audio
When you're happy with your audio, you can export it so you can share it with others. Audacity has a good selection of formats it can export to, and it's able to pipe its output to tools like ffmpeg for more formats than you'll probably ever need.
My preference is to export audio in the FLAC format, an audio format that's a little like a WAV, except it's losslessly compressed. It takes up a fraction of the space without any loss in quality. To try it out, go to File, select the Export submenu, and then choose Export Audio. With a FLAC file as your golden image, you can use SoundConverter to convert your file into whatever format is best for any number of delivery targets—Ogg Vorbis or Opus or Webm for browsers, M4A files for Apple devices, and maybe an MP3 for a legacy system.
If you just want a quick and simple export from Audacity, the easy option is Ogg Vorbis. This is an open source file format that plays in most web browsers (Firefox, Chromium, Chrome, Android, and Edge) and media players like VLC, mpv, and many others.
Explore Audacity
Audacity is a classic power tool of the open source software world. Basic recording and editing are only the beginning. You can add effects, filter out (some) noise, adjust speed, change pitch, and much more. Whether you're recording lectures at school, mixing up drum loops, splicing together sounds for a video game, or just exploring the world of audio, go launch Audacity and get creative!






Comments are closed.