When you work with containers on Kubernetes, you often group applications together in a pod. When you launch a container or a pod into production, it's called a deployment. If you're using Kubernetes daily or even just weekly, you've probably done it hundreds of times, but have you thought about what exactly happens when you create a pod or a deployment?
I find it helpful to have an understanding of the chain of events on a high level. You don't have to understand it, of course. It still works even when you don't know why. I don't intend to list each and every little thing that happens, but I aim to cover all of the important ones.
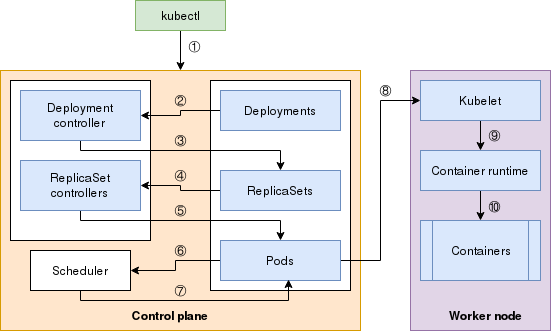
Here's a visual map of how the different components of Kubernetes interact:

(Nived Velayudhan and Seth Kenlon, CC BY-SA 4.0)
You may notice in the diagram above that I haven't included etcd. The API server is the only component that can directly talk to etcd, and only it can make changes to it. So you can assume that etcd exists (hidden) behind the API server in this diagram.
Also, I'm talking about only two main controllers (Deployment and ReplicaSet) here. Others would also work similarly.
The steps below describe what happens when you execute the kubectl create command:
Step 1: When you use the kubectl create command, an HTTP POST request gets sent to the API server, which contains the deployment manifest. The API server stores this in the etcd data store and returns a response to the kubectl.
Steps 2 and 3: The API server has a watch mechanism and all the clients watching this get notified. A client watches for changes by opening an HTTP connection to the API server, which streams notifications. One of those clients is the Deployment controller. The Deployment controller detects a Deployment object, and it creates a ReplicaSet with the current specification of the Deployment. This resource gets sent back to the API server, which stores it in the etcd datastore.
Steps 4 and 5: Similar to the previous step, all watchers get notified about the change made in the API server—this time the ReplicaSet Controller picks up the change. The controller understands the desired replica counts and the pod selectors defined in the object specification, creates the pod resources, and sends this information back to the API server, storing it in the etcd datastore.
Steps 6 and 7: Kubernetes now has all the information it needs to run the pod, but which node should the pods run on? The scheduler watches for pods that don't have a node assigned to them yet, and starts its process of filtering and ranking all nodes to choose the best node to run the pod on. Once the node is selected, that information gets added to the pod specification. And it gets sent back to the API server and stored in the etcd datastore.
Steps 8, 9, and 10: All the steps until now occur in the control plane itself. The worker node has yet to do any work. The pod's creation isn't handled by the control plane, though. Instead, the kubelet service running on all the nodes watches for the pod specification in the API server to determine whether it needs to create any pods. The kubelet service running on the node selected by the scheduler gets the pod specification and instructs the container runtime in the worker node to create the container. This is when a container image gets downloaded (if it's not already present) and the container actually starts running.
Understanding Kubernetes deployments
Gaining an understanding of this general flow can help you understand many events in Kubernetes. Consider a DemonSet or StatefulSet in Kubernetes. Apart from using different controllers, the pod creation process remains the same.
Ask yourself this: If the deployment gets modified to have three replicas of an app, what would the chain of events that lead to the creation of the pods look like? You can refer to the diagram or the listed steps, but you definitely have the knowledge you need to figure it out. Knowledge is power, and you now have an important component for understanding Kubernetes.


1 Comment