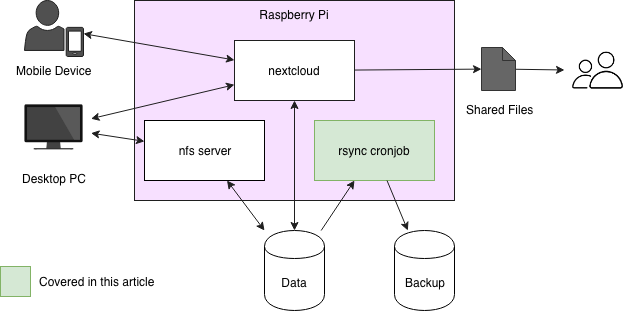
In the first part of this three-part series using a Raspberry Pi for network-attached storage (NAS), we covered the fundamentals of the NAS setup, attached two 1TB hard drives (one for data and one for backups), and mounted the data drive on a remote device via the network filesystem (NFS). In part two, we will look at automating backups. Automated backups allow you to continually secure your data and recover from a hardware defect or accidental file removal.

Backup strategy
Let's get started by coming up with with a backup strategy for our small NAS. I recommend creating daily backups of your data and scheduling them for a time they won't interfere with other NAS activities, including when you need to access or store your files. For example, you could trigger the backup activities each day at 2am.
You also need to decide how long you'll keep each backup, since you would quickly run out of storage if you kept each daily backup indefinitely. Keeping your daily backups for one week allows you to travel back into your recent history if you realize something went wrong over the previous seven days. But what if you need something from further in the past? Keeping each Monday backup for a month and one monthly backup for a longer period of time should be sufficient. Let's keep the monthly backups for a year and one backup every year for long-distance time travels, e.g., for the last five years.
This results in a bunch of backups on your backup drive over a five-year period:
- 7 daily backups
- 4 (approx.) weekly backups
- 12 monthly backups
- 5 annual backups
You may recall that your backup drive and your data drive are of equal size (1TB each). How will more than 10 backups of 1TB from your data drive fit onto a 1TB backup disk? If you create full backups, they won't. Instead, you will create incremental backups, reusing the data from the last backup if it didn't change and creating replicas of new or changed files. That way, the backup doesn't double every night, but only grows a little bit depending on the changes that happen to your data over a day.
Here is my situation: My NAS has been running since August 2016, and 20 backups are on the backup drive. Currently, I store 406GB of files on the data drive. The backups take up 726GB on my backup drive. Of course, this depends heavily on your data's change frequency, but as you can see, the incremental backups don't consume as much space as 20 full backups would. Nevertheless, over time the 1TB disk will probably become insufficient for your backups. Once your data grows close to the 1TB limit (or whatever your backup drive capacity), you should choose a bigger backup drive and move your data there.
Creating backups with rsync
To create a full backup, you can use the rsync command line tool. Here is an example command to create the initial full backup.
pi@raspberrypi:~ $ rsync -a /nas/data/ /nas/backup/2018-08-01This command creates a full replica of all data stored on the data drive, mounted on /nas/data, on the backup drive. There, it will create the folder 2018-08-01 and create the backup inside it. The -a flag starts rsync in archive-mode, which means it preserves all kinds of metadata, like modification dates, permissions, and owners, and copies soft links as soft links.
Now that you have created your full, initial backup as of August 1, on August 2, you will create your first daily incremental backup.
pi@raspberrypi:~ $ rsync -a --link-dest /nas/backup/2018-08-01/ /nas/data/ /nas/backup/2018-08-02This command tells rsync to again create a backup of /nas/data. The target directory this time is /nas/backup/2018-08-02. The script also specified the --link-dest option and passed the location of the last backup as an argument. With this option specified, rsync looks at the folder /nas/backup/2018-08-01 and checks what data files changed compared to that folder's content. Unchanged files will not be copied, rather they will be hard-linked to their counterparts in yesterday's backup folder.
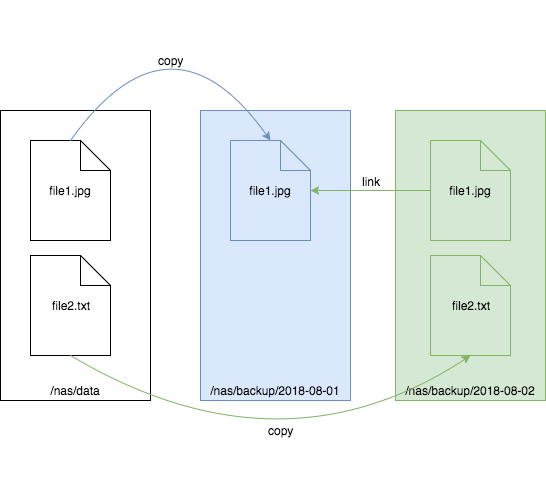
When using a hard-linked file from a backup, you won't notice any difference between the initial copy and the link. They behave exactly the same, and if you delete either the link or the initial file, the other will still exist. You can imagine them as two equal entry points to the same file. Here is an example:

The left box reflects the state shortly after the second backup. The box in the middle is yesterday's replica. The file2.txt didn't exist yesterday, but the image file1.jpg did and was copied to the backup drive. The box on the right reflects today's incremental backup. The incremental backup command created file2.txt, which didn't exist yesterday. Since file1.jpg didn't change since yesterday, today a hard link is created so it doesn't take much additional space on the disk.
Automate your backups
You probably don't want to execute your daily backup command by hand at 2am each day. Instead, you can automate your backup by using a script like the following, which you may want to start with a cron job.
#!/bin/bash

TODAY=$(date +%Y-%m-%d)
DATADIR=/nas/data/
BACKUPDIR=/nas/backup/
SCRIPTDIR=/nas/data/backup_scripts
LASTDAYPATH=${BACKUPDIR}/$(ls ${BACKUPDIR} | tail -n 1)
TODAYPATH=${BACKUPDIR}/${TODAY}
if [[ ! -e ${TODAYPATH} ]]; then
	mkdir -p ${TODAYPATH}
fi

rsync -a --link-dest ${LASTDAYPATH} ${DATADIR} ${TODAYPATH} $@

${SCRIPTDIR}/deleteOldBackups.sh
The first block calculates the last backup's folder name to use for links and the name of today's backup folder. The second block has the rsync command (as described above). The last block executes a deleteOldBackups.sh script. It will clean up the old, unnecessary backups based on the backup strategy outlined above. You could also execute the cleanup script independently from the backup script if you want it to run less frequently.
The following script is an example implementation of the backup strategy in this how-to article.
#!/bin/bash
BACKUPDIR=/nas/backup/

function listYearlyBackups() {
	for i in 0 1 2 3 4 5
		do ls ${BACKUPDIR} | egrep "$(date +%Y -d "${i} year ago")-[0-9]{2}-[0-9]{2}" | sort -u | head -n 1
	done
}

function listMonthlyBackups() {
	for i in 0 1 2 3 4 5 6 7 8 9 10 11 12
		do ls ${BACKUPDIR} | egrep "$(date +%Y-%m -d "${i} month ago")-[0-9]{2}" | sort -u | head -n 1
	done
}

function listWeeklyBackups() {
	for i in 0 1 2 3 4
		do ls ${BACKUPDIR} | grep "$(date +%Y-%m-%d -d "last monday -${i} weeks")"
	done
}

function listDailyBackups() {
	for i in 0 1 2 3 4 5 6
		do ls ${BACKUPDIR} | grep "$(date +%Y-%m-%d -d "-${i} day")"
	done
}

function getAllBackups() {
	listYearlyBackups
	listMonthlyBackups
	listWeeklyBackups
	listDailyBackups
}

function listUniqueBackups() {
	getAllBackups | sort -u
}

function listBackupsToDelete() {
	ls ${BACKUPDIR} | grep -v -e "$(echo -n $(listUniqueBackups) |sed "s/ /\\\|/g")"
}

cd ${BACKUPDIR}
listBackupsToDelete | while read file_to_delete; do
	rm -rf ${file_to_delete}
done
This script will first list all the backups to keep (according to our backup strategy), then it will delete all the backup folders that are not necessary anymore.
To execute the scripts every night to create daily backups, schedule the backup script by running crontab -e as the root user. (You need to be in root to make sure it has permission to read all the files on the data drive, no matter who created them.) Add a line like the following, which starts the script every night at 2am.
0 2 * * * /nas/data/backup_scripts/daily.shFor more information, read about scheduling tasks with cron.
There are additional things you can do to fortify your backups against accidental removal or damage, including the following:
- Unmount your backup drive or mount it as read-only when no backups are running
- Attach the backup drive to a remote server and sync the files over the internet
This example backup strategy enables you to back up your valuable data to make sure it won't get lost. You can also easily adjust this technique for your personal needs and preferences.
In part three of this series, we will talk about Nextcloud, a convenient way to store and access data on your NAS system that also provides offline access as it synchronizes your data to the client devices.


10 Comments