This article is excerpted from my book, Linux in Action, and a second Manning project that’s yet to be released.
The firewall
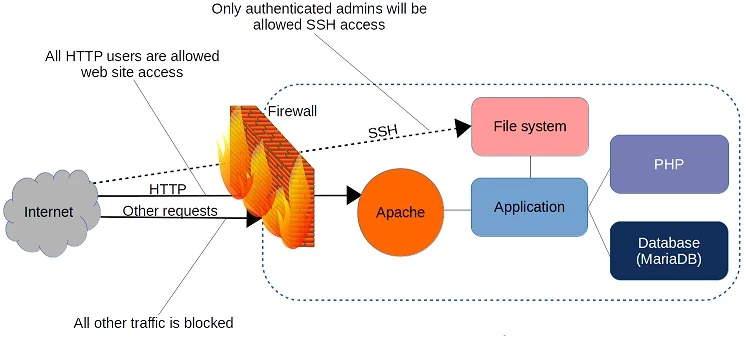
A firewall is a set of rules. When a data packet moves into or out of a protected network space, its contents (in particular, information about its origin, target, and the protocol it plans to use) are tested against the firewall rules to see if it should be allowed through. Here’s a simple example:

A firewall can filter requests based on protocol or target-based rules.
On the one hand, iptables is a tool for managing firewall rules on a Linux machine.
On the other hand, firewalld is also a tool for managing firewall rules on a Linux machine.
You got a problem with that? And would it spoil your day if I told you that there was another tool out there, called nftables?
OK, I’ll admit that the whole thing does smell a bit funny, so let me explain. It all starts with Netfilter, which controls access to and from the network stack at the Linux kernel module level. For decades, the primary command-line tool for managing Netfilter hooks was the iptables ruleset.
Because the syntax needed to invoke those rules could come across as a bit arcane, various user-friendly implementations like ufw and firewalld were introduced as higher-level Netfilter interpreters. Ufw and firewalld are, however, primarily designed to solve the kinds of problems faced by stand-alone computers. Building full-sized network solutions will often require the extra muscle of iptables or, since 2014, its replacement, nftables (through the nft command line tool).
iptables hasn’t gone anywhere and is still widely used. In fact, you should expect to run into iptables-protected networks in your work as an admin for many years to come. But nftables, by adding on to the classic Netfilter toolset, has brought some important new functionality.
From here on, I’ll show by example how firewalld and iptables solve simple connectivity problems.
Configure HTTP access using firewalld
As you might have guessed from its name, firewalld is part of the systemd family. Firewalld can be installed on Debian/Ubuntu machines, but it’s there by default on Red Hat and CentOS. If you’ve got a web server like Apache running on your machine, you can confirm that the firewall is working by browsing to your server’s web root. If the site is unreachable, then firewalld is doing its job.
You’ll use the firewall-cmd tool to manage firewalld settings from the command line. Adding the –state argument returns the current firewall status:
# firewall-cmd --state
running
By default, firewalld will be active and will reject all incoming traffic with a couple of exceptions, like SSH. That means your website won’t be getting too many visitors, which will certainly save you a lot of data transfer costs. As that’s probably not what you had in mind for your web server, though, you’ll want to open the HTTP and HTTPS ports that by convention are designated as 80 and 443, respectively. firewalld offers two ways to do that. One is through the –add-port argument that references the port number directly along with the network protocol it’ll use (TCP in this case). The –permanent argument tells firewalld to load this rule each time the server boots:
# firewall-cmd --permanent --add-port=80/tcp
# firewall-cmd --permanent --add-port=443/tcp
The –reload argument will apply those rules to the current session:
# firewall-cmd --reloadCurious as to the current settings on your firewall? Run –list-services:
# firewall-cmd --list-services
dhcpv6-client http https ssh
Assuming you’ve added browser access as described earlier, the HTTP, HTTPS, and SSH ports should now all be open—along with dhcpv6-client, which allows Linux to request an IPv6 IP address from a local DHCP server.
Configure a locked-down customer kiosk using iptables
I’m sure you’ve seen kiosks—they’re the tablets, touchscreens, and ATM-like PCs in a box that airports, libraries, and business leave lying around, inviting customers and passersby to browse content. The thing about most kiosks is that you don’t usually want users to make themselves at home and treat them like their own devices. They’re not generally meant for browsing, viewing YouTube videos, or launching denial-of-service attacks against the Pentagon. So to make sure they’re not misused, you need to lock them down.
One way is to apply some kind of kiosk mode, whether it’s through clever use of a Linux display manager or at the browser level. But to make sure you’ve got all the holes plugged, you’ll probably also want to add some hard network controls through a firewall. In the following section, I'll describe how I would do it using iptables.
There are two important things to remember about using iptables: The order you give your rules is critical, and by themselves, iptables rules won’t survive a reboot. I’ll address those here one at a time.
The kiosk project
To illustrate all this, let’s imagine we work for a store that’s part of a larger chain called BigMart. They’ve been around for decades; in fact, our imaginary grandparents probably grew up shopping there. But these days, the guys at BigMart corporate headquarters are probably just counting the hours before Amazon drives them under for good.
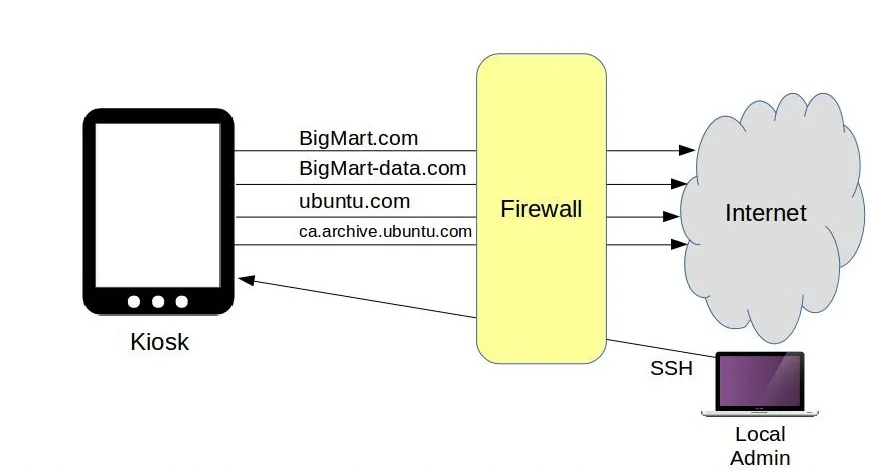
Nevertheless, BigMart’s IT department is doing its best, and they’ve just sent you some WiFi-ready kiosk devices that you’re expected to install at strategic locations throughout your store. The idea is that they’ll display a web browser logged into the BigMart.com products pages, allowing them to look up merchandise features, aisle location, and stock levels. The kiosks will also need access to bigmart-data.com, where many of the images and video media are stored.
Besides those, you’ll want to permit updates and, whenever necessary, package downloads. Finally, you’ll want to permit inbound SSH access only from your local workstation, and block everyone else. The figure below illustrates how it will all work:

The kiosk traffic flow being controlled by iptables.
The script
Here’s how that will all fit into a Bash script:
#!/bin/bash
iptables -A OUTPUT -p tcp -d bigmart.com -j ACCEPT
iptables -A OUTPUT -p tcp -d bigmart-data.com -j ACCEPT
iptables -A OUTPUT -p tcp -d ubuntu.com -j ACCEPT
iptables -A OUTPUT -p tcp -d ca.archive.ubuntu.com -j ACCEPT
iptables -A OUTPUT -p tcp --dport 80 -j DROP
iptables -A OUTPUT -p tcp --dport 443 -j DROP
iptables -A INPUT -p tcp -s 10.0.3.1 --dport 22 -j ACCEPT
iptables -A INPUT -p tcp -s 0.0.0.0/0 --dport 22 -j DROP
The basic anatomy of our rules starts with -A, telling iptables that we want to add the following rule. OUTPUT means that this rule should become part of the OUTPUT chain. -p indicates that this rule will apply only to packets using the TCP protocol, where, as -d tells us, the destination is bigmart.com. The -j flag points to ACCEPT as the action to take when a packet matches the rule. In this first rule, that action is to permit, or accept, the request. But further down, you can see requests that will be dropped, or denied.
Remember that order matters. And that’s because iptables will run a request past each of its rules, but only until it gets a match. So an outgoing browser request for, say, youtube.com will pass the first four rules, but when it gets to either the –dport 80 or –dport 443 rule—depending on whether it’s an HTTP or HTTPS request—it’ll be dropped. iptables won’t bother checking any further because that was a match.
On the other hand, a system request to ubuntu.com for a software upgrade will get through when it hits its appropriate rule. What we’re doing here, obviously, is permitting outgoing HTTP or HTTPS requests to only our BigMart or Ubuntu destinations and no others.
The final two rules will deal with incoming SSH requests. They won’t already have been denied by the two previous drop rules since they don’t use ports 80 or 443, but 22. In this case, login requests from my workstation will be accepted but requests for anywhere else will be dropped. This is important: Make sure the IP address you use for your port 22 rule matches the address of the machine you’re using to log in—if you don’t do that, you’ll be instantly locked out. It's no big deal, of course, because the way it’s currently configured, you could simply reboot the server and the iptables rules will all be dropped. If you’re using an LXC container as your server and logging on from your LXC host, then use the IP address your host uses to connect to the container, not its public address.
You’ll need to remember to update this rule if my machine’s IP ever changes; otherwise, you’ll be locked out.
Playing along at home (hopefully on a throwaway VM of some sort)? Great. Create your own script. Now I can save the script, use chmod to make it executable, and run it as sudo. Don’t worry about that bigmart-data.com not found error—of course it’s not found; it doesn’t exist.
chmod +X scriptname.sh
sudo ./scriptname.sh
You can test your firewall from the command line using cURL. Requesting ubuntu.com works, but manning.com fails.
curl ubuntu.com
curl manning.com
Configuring iptables to load on system boot
Now, how do I get these rules to automatically load each time the kiosk boots? The first step is to save the current rules to a .rules file using the iptables-save tool. That’ll create a file in the root directory containing a list of the rules. The pipe, followed by the tee command, is necessary to apply my sudo authority to the second part of the string: the actual saving of a file to the otherwise restricted root directory.
I can then tell the system to run a related tool called iptables-restore every time it boots. A regular cron job of the kind we saw in the previous module won’t help because they’re run at set times, but we have no idea when our computer might decide to crash and reboot.
There are lots of ways to handle this problem. Here’s one:
On my Linux machine, I’ll install a program called anacron that will give us a file in the /etc/ directory called anacrontab. I’ll edit the file and add this iptables-restore command, telling it to load the current values of that .rules file into iptables each day (when necessary) one minute after a boot. I’ll give the job an identifier (iptables-restore) and then add the command itself. Since you’re playing along with me at home, you should test all this out by rebooting your system.
sudo iptables-save | sudo tee /root/my.active.firewall.rules
sudo apt install anacron
sudo nano /etc/anacrontab
1 1 iptables-restore iptables-restore < /root/my.active.firewall.rules
I hope these practical examples have illustrated how to use iptables and firewalld for managing connectivity issues on Linux-based firewalls.


10 Comments