Traditionally, the film editing process was regimented and compartmentalized. The assistant editors helped organize footage, the editor cut the picture, a sound engineer mixed the sound tracks, and a music composer provided the score. In today's quickly evolving landscape of film production, these roles are becoming less clearly defined and many of these tasks are falling upon the editor alone. And in the independent world it's been this way for a very long time.
Read the other parts in this series: Part 1: Introduction to Kdenlive
Part 2: Advanced editing technique
Part 3: Effects and transitions
Part 4: Coior correction
Part 6: Workflow and conclusion
The results are that the video editor is responsible more and more for building the final film from its disparate pieces, and consolidating the tasks in this way tends to quicken the post-production process, and of course bring down costs. Unfortunately, since video editors have mostly been trained on video editing applications, they tend to try to perform all of those different tasks -- clip organization, dialogue editing, audio cleaning, and soundtrack mixing -- in the one application that they are familiar with: their video editor.
On GNU Linux, we have the principle of modularity, and the well-known idea that a tool should "do one thing and do it well." Kdenlive hardly does just one thing, but even if we broaden the idea of what "one thing" can mean, it would still be a difficult argument to make that you were ever meant to edit audio in a video editing application (open source or otherwise). In this article, we'll discuss the different sources of audio, how to prepare it for editing, how to export it, optimize it, and finally re-import it.
Audio Recording and Synchronization
Most cameras that you'll use will have some ability to capture sound, but very rarely are the microphones embedded in the camera of very good quality or at a reasonable distance from the actors to capture good sound. There are three scenarios that have become prominent in how to deal with this:
1. Ignore the on-board mic and set up an external recording system.
2. Ignore the on-board mic and use an external mic recording into the camera.
3. Use the on-board mic.
In the first case, you'll end up with separate audio files that you'll import from the external recording device, such as a Zoom H4, or similar. In the second case, you'll end up with audio "embedded" into the video file that you import from the camera.

And in the third case, you'll still have "embedded" sound in the video file, and you'll either use it as your only sound or you'll use it as reference sound while you sync your external audio file to your video. If you did record to an external device, then you'll need to synchronizing sound in your video editor. This is easier if you did get the reference sound via the on-board camera mic, and it is even easier if you actually bothered to slate each shot.
Slating is one of those often-overlooked parts of production that is probably the single most helpful thing you can do on set to aid in post production. A slate can be simple; I find that a legal notepad (like a tablet computer, but made of trees, believe it or not) and a Sharpie pen is perfect for the non-audible indication of what scene, shot, and take the clip is about to contain. To give something to sync sound to easily, make sure that both the camera and the sound recording are rolling, and then firmly clap your hands in clear view of the camera. This is a low-budget version of a clapboard and frankly it has the exact same results.
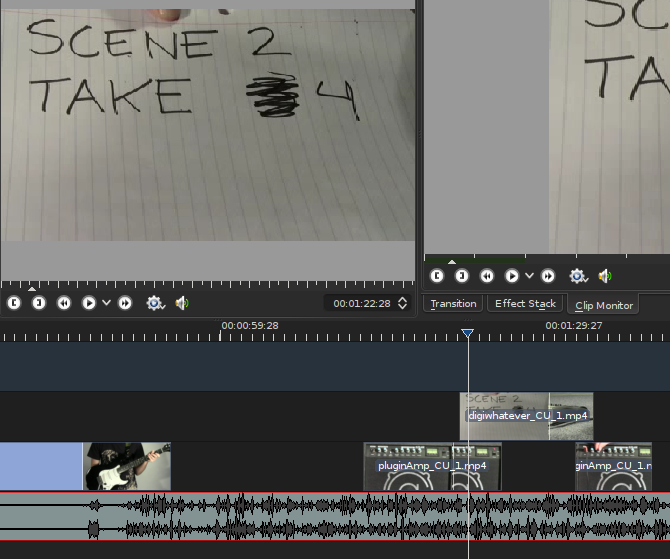
The only reason to not slate is because the shot is complex and there is literally no way to fit a slate in at the beginning of the shot. In this event, do a "tail slate," that is, the same thing only at the end of the shot.
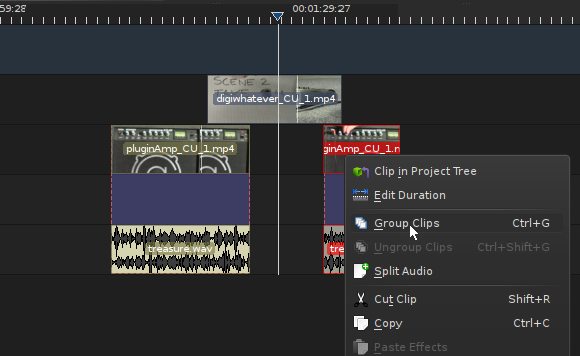
It's customary to hold the notepad (or clapboard, or whatever) upside down just as a visual cue for the assistant editor or editor that this slate isn't indicating that a shot is just beginning, but that it's just ending. If you slate each shot, then synchronizing sound in your video editor is as simple as making sure that your audio files and video files have sane names (more on naming conventions in the final article of this series), dragging them both into the timeline, and lining up the loud sound of a clap in the audio track with the visual of that clap in the video track. Once it's synchronized, group the video and audio tracks together by selecting them both with your select tool (s), right-clicking on one track, and choosing Group Clips.
If your sound is starting out synchronized but is then falling out of sync (or just won't sync at all), then check the sample rate. If your Kdenlive project setting is 44.1khz or 48khz but your sound files were recorded at 32khz or 22050hz or worse, then you might find that the audio simply isn't playing at the correct speed. It will gradually fall out of sync, consistently, regardless of how you move it or slice it.
To fix this, a simple sox command will suffice:
$ sox inputfile.wav -r 44100 outputfile_44100.wav
Of course you can do this to an entire folder of audio files with a simple "for" loop:
for i in *.wav; do sox $i -r 44100 $(basename $i .wav)_44100.wav; done
Best Practices for a Basic Mix
Even though you will be taking your audio out to an external application to for the final mix, the first draft of an audio mix happens within the video editor. The best way to make this happen is to stay organized with what tracks receive what kind of sound file.
You should plan on having at least two audio tracks for dialogue; the first will be your default landing track for audio, and the second you can use for overlapping dialogue, which sometimes happens in your typical over-the-shoulder (OTS) conversation scene. In addition to these, you'll probably realistically want a track or two for sound effects. While I don't want to do much mixing in my video editor, I have to admit that sometimes when editing a cafe scene, it just helps to have a bed of cafe background noise to provide a little environment. https://www.freesound.org is an excellent resource for these kinds of effects, so I often download a few tracks and sound effects and drop them in on my effects and foley tracks. Even if I end up not using those particular sound effects, at least they serve as good reference during the actual audio mix as to when the "real" versions of those effects should come in and when they should end; think of it as a Click Track 2.0.
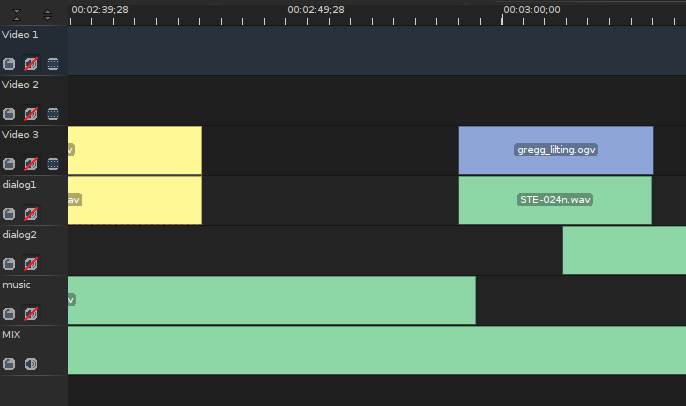
And finally you might want to designate a track for music or musical elements. Again, strictly speaking this isn't something you should really be doing in the video editor but then again we're not editing for Cecil B DeMille, either. Modern editors frequently edit to music, and if nothing else, as with the effects, it will serve as a good indication of when the real music is supposed to come in and when it should swell and when it should be soft, and so on.
Be sure not to mix different types of sound into the same tracks; dialogue must stay in dialogue tracks, effects in effect tracks, and music in music tracks. If you need to add a track and designate it as a third or fourth dialogue track, then do so. They're free, I promise.
At some point during your edit, you should separate the audio from the video tracks if you are using any of the embedded sound streams that belong to a video track. By doing so, you ensure that all of your audio is consolidated into the correct tracks, and it enables you to safely and securely mute all sound off of the video tracks, which you'll want to do if you are ignoring most of the embedded audio streams.
Exporting
The audio tracks for your project will not be exported for the final audio mix until you have declared "picture lock", meaning that you've resolved that no changes to the sequence of images will be made, or that if they are made then those changes will in no way require shortening the audio tracks (ie, you are swapping out one establishing shot for another, for the same duration, and will not require any change to audio). Once you are secure that your picture is locked, then you can do a simple export via the Render menu in Kdenlive. Access this via the big red button in the main toolbar, or via the Project menu > Render. The project menu For Destination, choose Audio Only. Select the format and sample rate you wish to export to; it's best to stay with your current sample rate. make sure your Output File is going to a logical directory and has a sensible name; I usually place my audio tracks into a directory call "mix".
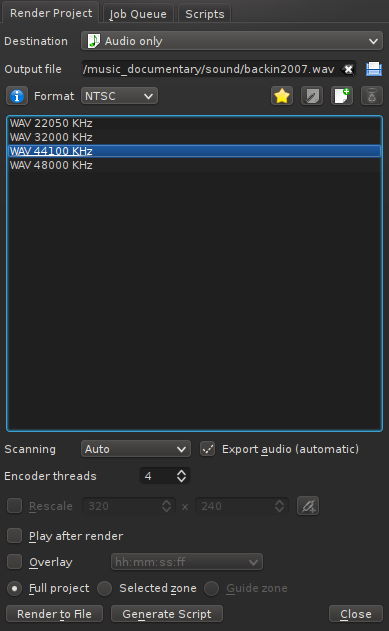
You want to export each track as an individual file; so, in your timeline, mute all tracks but the first dialogue track. And then add it to the render queue by clicking the Render To File button on the lower left of the Render dialogue box. This starts processing in the background, so next you can mute the dialogue track and unmute your next track. Name the output file and add it to the render queue. Then mute that track and unmute the next one, and so on.
In the end you'll have 6 audio tracks (assuming two dialogues, two effects, and two music) that are each the full length of your project file. There will probably be a lot of dead space in each, since you make only have a sound effect every few minutes or so, or only one instance of music, and so on. The important thing is that each track is self-contained, independent of the others, and all of them are exactly the same length as one another and as the video project itself. You, or your sound mixer, can then import the audio files into an audio mixing application; I've used Audacity, Ardour, and Qtractor for the job, mostly depending on what the system I'm using happens to have installed or what the complexity of the project demands.

There's a little bit of an expectation now that an audio mixing application will have the ability to import a video track so that audio can be mixed exactly along with the video. This certainly does help with sound cues or subtle sonic touches like noticing a passing airplane outside a window and dropping in a faint airplane sound effect, and so on.
The de facto audio mixers for Linux do not yet feature this ability out-of-the-box. One solution is a click track. This is the time-honoured convention of having a spare audio track with either literal clicks or, in my personal version of the click track, temporary sound effects that indicate where an when some significant event is supposed to occur. This, combined with a lo-res temporary render of the movie that I can have open in Dragon or Mplayer, allows me to easily maneuver my audio mix and cross-reference the video as needed. So far I've not missed an audio cue yet, and I feel that the absence of a constant video track helps me immerse myself in the sound design.
The application Xjadeo allows you to bind a video file to the JACK transport, which is sort of a meta playhead that synchronizes various sound sources on a system. JACK is usually used by musicians so that, for instance, the drum machine playing in Hydrogen will come in at the right moment in a sequence being designed in Ardour or Qtractor. Xjadeo uses ffmpeg to play back a video in time (and, accordingly, stop or scrub) with your audio in any JACK-aware audio mixer. Re-importing the Mix Once your sound is mixed to your liking, you should export the sound as one complete mixdown. Obviously you will keep the audio project itself in the event that you need to re-mix or change the language or the dialogue (ie, for a dub track), but I see no reason to allow Kdenlive to do any of the mixing by keeping tracks separate.
Before importing the final mix into my project, I generally save a copy of the project as, for instance, project-name_mixed.kdenlive. This, I open in Kdenlive, and eliminate the unneeded audio tracks, mostly just to avoid silly mistakes but sometimes also to save system resources. Importing the final mix is as easy as adding a clip to the Project Tree, and then dragging the final mix to a new audio track in the timeline, starting at 00:00:00:00. You've now successfully made the round-trip with your audio mix.



Comments are closed.