Back in the old days of computer-based film editing, computers were, famously, less powerful than the mobile phone in your pocket, and yet people were able to edit higher-than-HD-resolution film for international film releases. How was this possible?
Before answering that, a brief and simplified technical lesson:
Most films today are either all or mostly digital, both in the way they are shot and edited. Before digital cameras took over, though, and in some pockets of the film-making community today, celluloid film was used. The celluloid film that you put into your camera and shoot is called your negative—it is your original, master copy. Should anything happen to your film negative, then entire days or weeks of filmmaking would be lost (and, depending on what you filmed, the footage might literally be irreplaceable), which generally means that a lot of money is lost, too. For those reasons, the negatives of a movie are protected at any cost.
To ensure a negative's safety, it's promptly developed after being shot, and then immediately copied to another reel of film. This copy is called a work print (actually, there are several stages of copies, here, but I'm keeping it simple to better illustrate a point). The negative is taken to a vault and stored safely away, and the movie editor receives a work print.
For months, the movie editor re-creates the story told by the script with the working-copy of the footage. If the work print gets too scratched or is cut up too much to be useful, another copy can be made from the original. The point is that the editor works on a work print and never touches the negative.
The problem is, once the edit is done, it's been handled and spliced up and taped together; it's nowhere near theatrical quality. So what do you do? You do a matchback—you take the edge numbers of the work print and record the order in which you have spliced them together, and then print yet a new copy of the movie in the proper order, from the original, un-touched and pristine, negative.
Digital proxies
I explain this arcane (and yet not so arcane) technology to you because it directly relates to the concept of offline editing in the digital (and Digital Intermediate) world. Computer vendors don't really advertise what their products are not capable of doing, so it's pretty common for us to hear ads for the latest and greatest computers promising us that we can "edit HD video in real time". There's some truth to this; modern technology can edit video a lot better than ever before, but you don't have to be an industry analyst to know that video cameras are constantly dumping more information into the frame every year, too. It's like a personal Cold War trying to keep a computer powerful enough to process your video.
You might think that movie studios solve this problem by throwing money at it. Although that's partly true, even movie studios don't relish throwing money away, so the way that professional editors actually deal with the issue is with offline editing. It's a technique that's been around since the beginning of computer-based editing, and it's a technique that, in spite of the advertisements claiming otherwise, is still useful in today's world.
Offline editing builds upon the idea of work prints in the celluloid legacy model. Consider the footage that you shoot, at a high resolution, your digital negative. You import it into your computer as normal, you back it up as usual (because you back up your production drive at least nightly, yes?), and bring it into Kdenlive. But you don't edit it.
Kdenlive creates proxy clips (or "offline media", as it is commonly called in the industry). You can choose the resolution of your proxy media; I frequently work at 640x480 scaled down from full 1920x1080 HD, but if you need less drastic differential, then you might try working at 720p or similar. Working at this lower resolution permits your computer to do far fewer calculations to move media around within your project, when applying and playing back effects and transitions, and test renders. In fact, you will quite probably find that your computer now runs all processes in what will feel like real time. Once your edit is finished, you render your final product and Kdenlive magically knows not to render out the proxy media, but to use the full resolution source clips instead.
Kdenlive takes care of most of this for you, but you do have to ask it to create the proxy media for you. Understand that most video editing applications offline or proxy media, although most of them don't involve the user in the process, instead doing it as necessary to maintain the illusion that the software can just magically handle heavyweight media without compromising in work quality. Don't be fooled by the fact that you have to tell Kdenlive to use its proxy system; it's not you, it's not your computer, it's not your software. It's just honest and pragmatic computing.
Proxy walkthrough
To prove that the proxy process is a lot less scary than it sounds, here's a quick walkthrough of the process, from project creation to final render.
Setup
The first step is the usual project creation sequence I have recommended since my very first Kdenlive article: open Kdenlive, start and save a fresh, empty project, and then import your footage. In that order.
I am a proponent of creating a new project, and then saving that project, as your first step so that you establish a project directory where all files (like auto-generated proxy files, which are particularly relevant to this article) will be saved. So don't just start working, and don't just save the default project; go to the File menu > New.
If you want to use proxies for an existing project, you can set this all up from the Project menu > Project Settings.

In the top section of the Project Settings window, designate a Project folder. This is important, because it is where your proxy clips will be stored and referenced by Kdenlive. Personally, I prefer to create a unique project directory for every project.
For the video profile, do not use the video profile of your master footage. Instead, use the video profile of the proxy clips you want to generate. This is important! If you use the same resolution as your source footage, then using proxies is not beneficial; you're up-res'ing footage to the same high quality video you are trying to avoid. So use your proxy resolution, not your source resolution.
To be clear: If you shot at 1080p and you want to end up with 720p and 1080p distributable videos, but you want to work at a simple SD (640x480, for example) resolution, then your project setting should be VGA NTSC. When you render, you will be rendering out full quality clips. I promise.
Next, place a tick in the Proxy clips section to activate offline editing. You can set the threshold required for Kdenlive to generate proxy clips and click the OK button.
Your project has now been saved, and the proxy system is active.
Import footage
Next, import your source material. You should probably save your source material in your active Kdenlive project directory to keep your work consolidated and easily archived, but it depends on your infrastructure and work flow.
If a clip is larger than the threshold you set in Project Settings, a proxy clip will be generated for you. You can always tell when a proxy clip has been generated by the P icon in the upper left of the thumbnail.

Edit
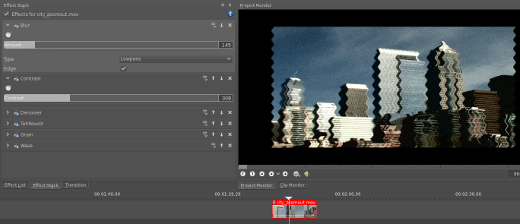
At this point, you have simply to edit your project as usual. You will find a remarkable boost in performance; all clips should play pretty smoothly even with stacks and stacks of effects.

You should not do color correction on proxy clips, because offlined media is necessarily compressed, so any color correction would be done on an incomplete image. I also refrain from elaborate keyframing or titling during the offline edit stage, for fear of subtle alignment shifts when returning to full quality.
Render
In an offline edit, there are two paths you might take when rendering. You can render out the low-res proxies, if you are just looking to get a feel for how edits play or you just need a reference video to use during the audio mix. Or you might do a full quality render, tossing the proxy clips aside.
To start a render, click the Render button in the Kdenlive toolbar or select Project menu > Render.
If you are doing a test render, then set the target video profile to whatever codec you prefer, and tick the Render using proxy clips option.

If you want a full quality render, then set the target video profile to whatever codec you prefer, and leave the Render using proxy clips unticked. You can do variations of this by setting a new target size if you want to render out a smaller version of your project (such as a 720p version of the 1080p source). The point is that all originating data, whether raw or through filters and effects, come from the full resolution source footage and not from the proxy clips.

Offline editing in the real world
Offline editing is a reality of digital editing, just as work prints were a reality of celluloid. Whether you are required to switch it on manually or whether it's done behind a magic curtain, offline editing is something you should not just get familiar with, and not just get comfortable with, but learn to enjoy. Offline editing is a great way to free up resources on your workstation, to make your editing experience smoother, and in the professional realm where ultra-high resolutions are common, it's an absolute necessity. But best of all, offline editing gets you editing faster and more efficiently so you can concentrate on being creative.


2 Comments