Post-production is a long and involved process. As these articles have demonstrated, Kdenlive is capable of handling every step with efficiency and flexibility. In this final article, we will discuss the final export of the full project from Kdenlive, as well as examine the over-all free software workflow of post-production.
Read the other parts in this series: Part 1: Introduction to Kdenlive
Part 2: Advanced editing technique
Part 3: Effects and transitions
Part 4: Coior correction
Part 5: All about audio
At this point in the Kdenlive project, all editing has been completed, the picture lock has been declared, colour correction has finished, compositing has been perfected and titles inserted, and the audio mix has been finalized. The only step left is to export the movie from Kdenlive as a self-contained movie file.
The first export of your movie should be a full-quality, bit-for-bit copy of exactly what you see in Kdenlive. This serves a few different purposes:
1. Ensures that you have a full-quality backup "Gold Master" of your movie.
2. Ensures that everything you think you see in the small-ish windows and relatively chaotic interface of your video editor is actually true. Regardless of how good an editor you are, there is just something different about sitting back and watching a movie without the ability to stop it and make a quick adjustment or a quick edit. This isn't something you should reserve for the very end of your project, either; this is a step you'll want to do periodically throughout the edit. They're called "sanity" checks in the industry.
The Gold Master
To get a Gold Master from Kdenlive, click the Render button in the main toolbar, or access it via Project menu > Render.
As your Destination, choose Lossless/HQ. Name your output file as your gold master, or rc1 if it's merely a release candidate, or whatever notation you want to use.
The render menu and the gold master
Kdenlive, using ffmpeg as its render backend, offers FFV1 and HuffYUV as its full quality master formats. Choose one of these (both are good; HuffYUV will have a larger file size as it uses PCM for audio while the FFV1 preset uses FLAC), and click the Render To File button on the bottom left of the dialogue box. I tend to use HuffYUV as I have had good experiences with it.
Now that you have a full quality version of the movie, you can either use it as your transcoding source, if you wish to encode for distribution manually, or you can use Kdenlive's interface. I use ffmpeg directly, mostly out of habit but the Kdenlive frontend is, to date, the most sensible ffmpeg frontend I've used.
Encoding
Encoding video for distribution is subject to artistic preference and per-project requirements. There is not a single "best way" to encode your project; you must consider your desired format, your intended delivery method, and so on.
Kdenlive takes into account most of the usual delivery methods, offering presets for DVDs, mobile devices, web sites like Youtube and Vimeo, and much more.
From the user perspective, video codecs are mostly all created equal (a gross over-simplification that probably has ffmpeg and Kdenlive developers cringing). They take video and somehow compress it and ideally play it back on the desired device. So it's useless for a content creator to debate over which codec would be best for their film. Fact is, any codec will do. The deciding factor will be subtleties like bitrate, keyframing and GOP size, and frame size.
The bitrate of a video determines how much information each frame contains. This effects not just the visual quality of the video, but also the ability of the video to be streamed over a network or even a device (since the graphic chips of any device will have its limitation). A very high bitrate, like 35000 kbps (and higher, up to about 54000 kbps, or 54 Mbps) is common on a medium like Blu Ray. DVDs had a bitrate of about 8000kbps. Internet video, obviously, varies greatly, depending on just how much confidence the content provider has in the network connection of their audience.
Variable bitrates help lower the overall file size by throttling the bitrate during shots that don't actually require much information. A relatively still shot of a building, for example, is a lot less demanding on video playback than a high-speed car chase.
The best way to optimize this is to use the 2-pass option. This takes twice as long to encode, but the results are invariably better in both quality and file size. During the first pass, ffmpeg reviews the footage and plans out the optimal method of encoding. On the second pass, ffmpeg does the actual encode.
If you're using the Kdenlive Render dialogue box, the bitrate and number of passes are really all you can control, aside from choosing your video format and frame size. The free video formats, Xvid, MP4, Theora, and Webm are all excellent codecs, most of which are gaining widespread adoption. I would argue that 9 times out of 10 these codecs alone are sufficient for most distribution channels. That said, there are those devices that require special options, and for this you simply have no choice but to encode into a format that you don't really own or control.
Frame size has a very direct result on file size, so if you're targeting a specific file size then the bitrate and frame size are the attributes you can target to help you achieve your goal. The lower the bitrate, the smaller your file will be, and if you reduce your frame size by 50% you'll often see nearly a 50% drop in file size. Of course, the trade-off in both cases is quality.
If you want to try some custom ffmpeg commands to run against your uncompressed Gold Master, then you can choose all the options you want and then, rather than clicking the Render to File button, click the Generate Script instead. This dumps the ffmpeg command that Kdenlive has generated to a file on your harddrive. You can customize this script using your favourite text editor and then run from the Kdenlive Render Dialogue box via the Scripts tab.
Workflow
The bigger picture of post-production warrants some consideration since Kdenlive is only one piece of the puzzle in a diverse industry that is filled with developing technologies. These six articles have shown that Kdenlive is poised to easily be a drop-in solution for video editing, being able to ingest a variety of formats, combine all manner of visual effects, and be the final mix of all the different elements that go into a video production. The bigger question, then, is whether GNU Linux is ready to be a multimedia production solution.
The post production workflow
The general flow of post production revolves around the video editor, but requires a number of additional, specialized applications. Before the media even gets ingested by the video editing application, it must be organized and sorted in some useful way. Prorietary editing applications mostly encourage the editors to do this within their application. This often is very helpful as long as you're only accessing the media from within the application, which is rarely ever the case even when the proprietary application claims to be a turn-key solution.
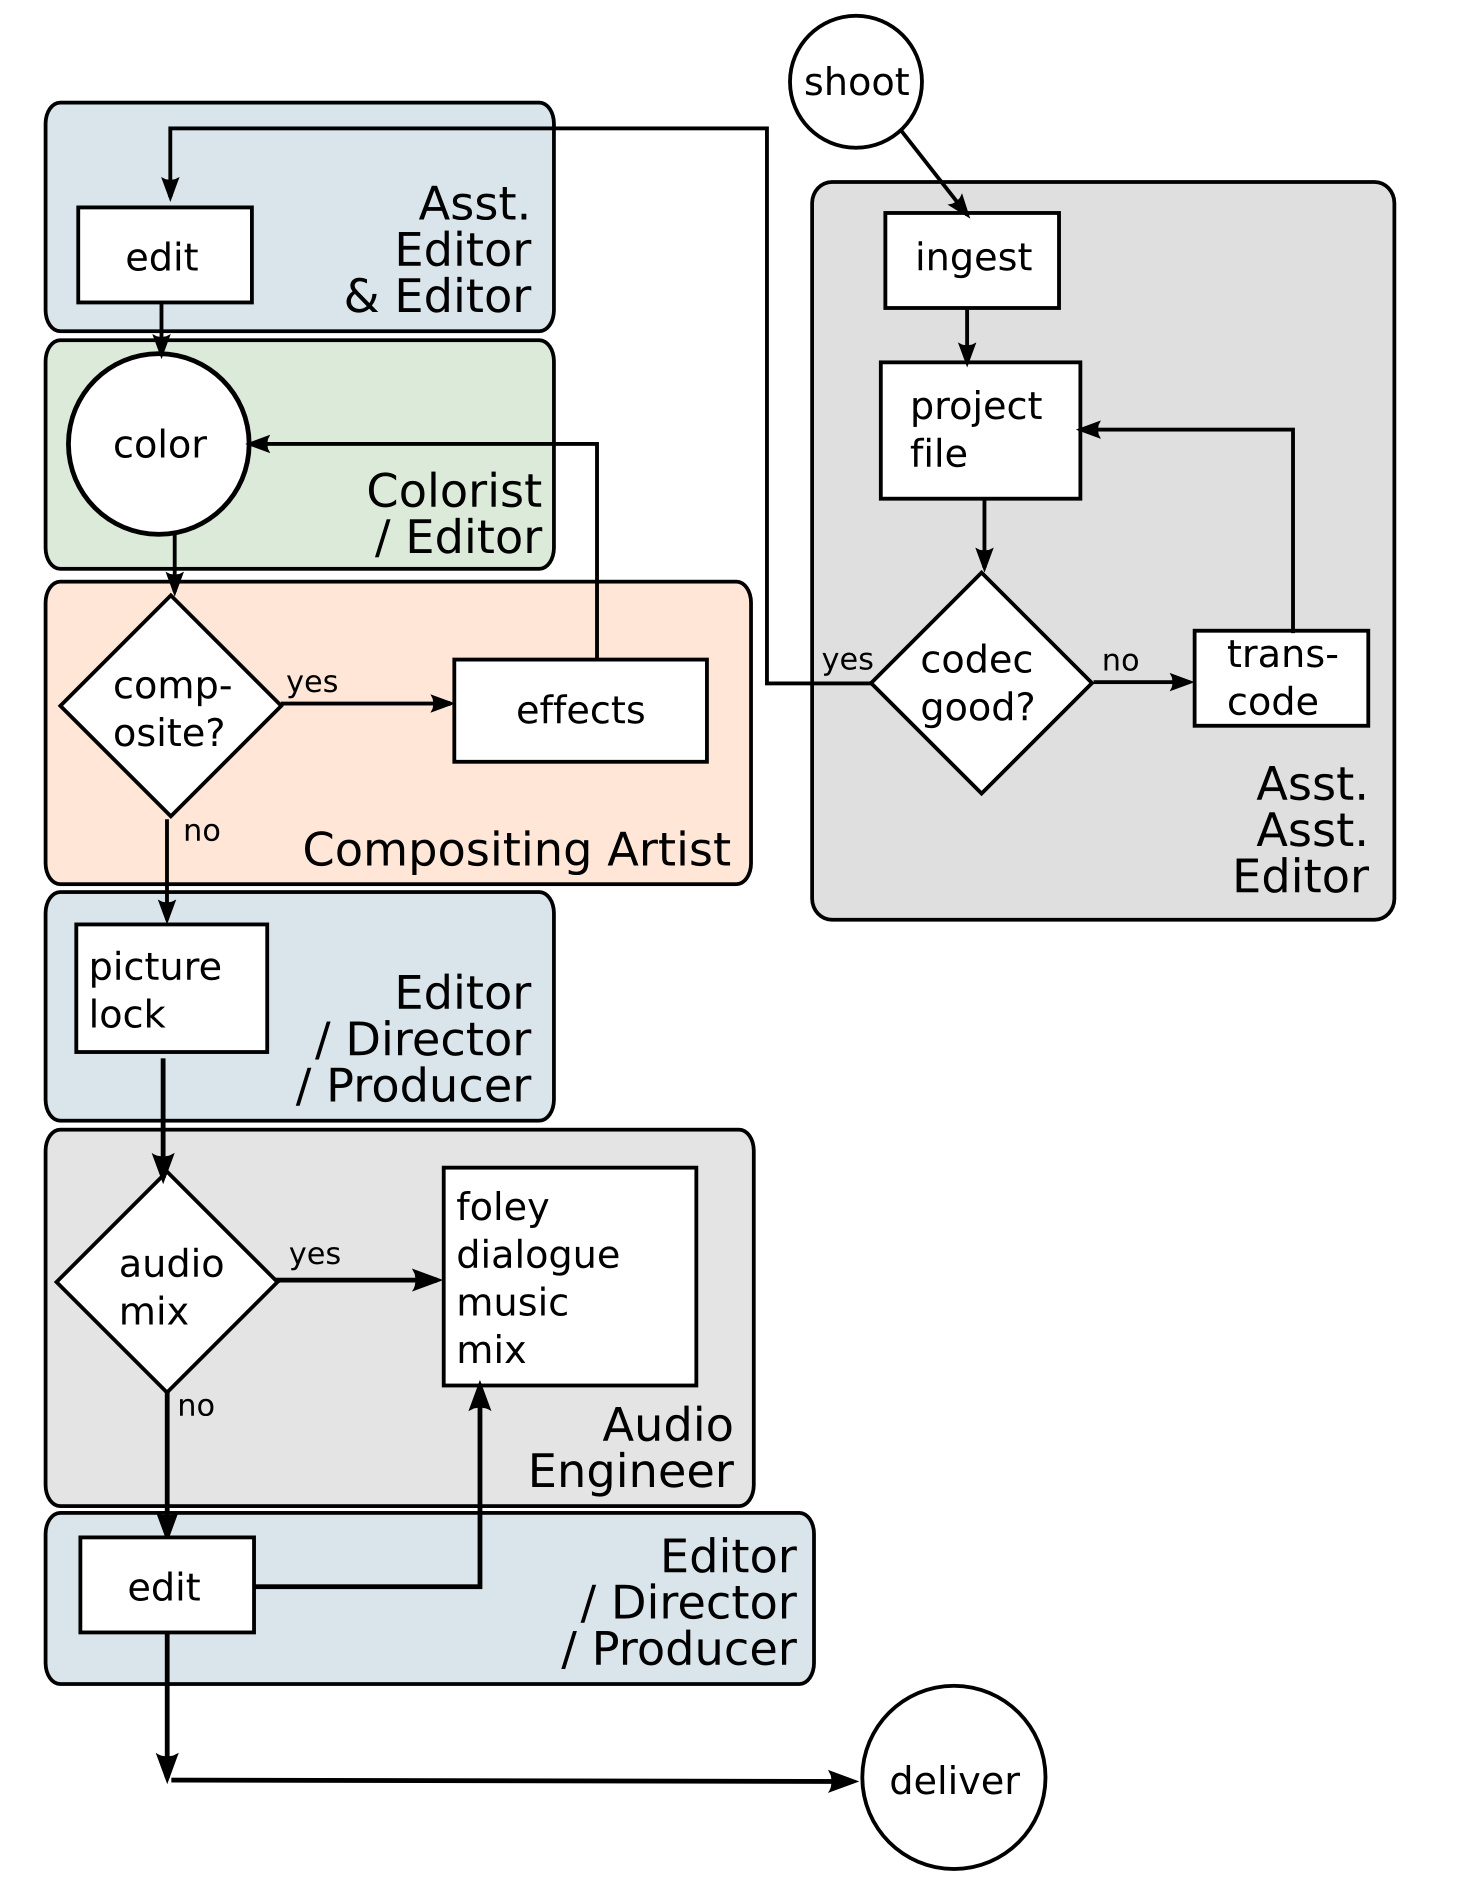
Proper media management should be done in a file manager, such as Dolphin or Nautilus or the terminal of your choice. Here are some good principles that any good Assistant Assistant Editor knows:
1. Stay organized. Don't scatter your footage all over your computer and expect your project to retain its integrity for years to come. If your project is a quick one-off video that you're going to post to the internet or render out to a harddrive and then delete the source files from your computer, then you might not need to bother with proper organization. For a serious video project that is going to take more than an afternoon to edit, however, keep your files in one directory tree, keep them organized on your drive, and back them up.
2. Name your files so that they are useful. MVI00087.AVI and DCS_000101.MOV are not appropriate file names for video clips upon which your project relies. In a perfect world, we'd all be assigned an Assistant Assistant Editor to watch all of our footage and carefully summarize what's in the take, what take number it is, and then to name the clip accordingly. Until this happens, the responsibility falls upon you. So, watch your clips, give them logical names, such as
klaatuDrinksCoffee_21_MCU_2.mts
Where "klaatuDrinksCoffee" is the scripted action, 21 is the scene number, MCU is the type of shot (in this case, Medium Close-Up), and 2 is the take number. Stay with that convention and you'll never fail to know exactly what is in each shot and where in your project it should be used.
3. Don't edit off of a USB 2.0 drive. There are exceptions to this rule, but USB 2.0 really is too slow for serious high def editing and even, I find, for standard def editing once the project becomes very complex. Get an extra SATA controller if you have to, or a SATA external drive, or upgrade to USB 3.0, but try to avoid USB 2.0 for editing if possible.
Two exciting projects have been developing lately, both geared toward media management on a larger scale. dmedia, associated with the up-and-coming Novacut video editor, promises distributed workflows, and mis from Nido Media provides editors with comprehensive details about shared media in a central media library.
Once the media has been properly organized, it's safe to import it into the video editing application. Kdenlive allows you to create folders within the project tree; use this to manage your scenes. Also remember to make copies of each major cut of your work. Versioning is important!
Transcoding, if it needs to be done, is an area in which GNU Linux excels. Between Ffmpeg and Mencoder, you will usually have no trouble getting video into a format that is easily edited. In fact, at the production facility where I work, it's a Linux box, built at a fraction of the price of the computers around it and yet three times as powerful, that is the main conversion station when video comes in that nothing else will edit. (Eventually, of course, it will be Linux that is used to edit everything in the first place!)
After the project has been created in your editing application and the media is ready to be cut, the next step is, obviously, editing the film. As this article has shown, Kdenlive handles this with ease. A few things to keep in mind in any editing application, Kdenlive not excepted:
1. Whatever is in the timeline is in your RAM. In Emacs terms, the Timeline is your Buffer. If you are editing standard definition footage and have 4gb of RAM then you'll surely be able to edit about a half an hour of footage with numerous cuts and clips without noticing any burden on your system. High Def footage on 4gb RAM is quite another story. Keep this in mind. If you must, edit your project in two or three scene chunks, as convenient, and then marry it all together in the end.
2. I've edited on both my laptop and my main workstation. The laptop is, technically, able to edit, which is convenient when not in studio, but it's far more pleasant to edit on the workstation. Marketing ads showing professional editors cutting their film on a small laptop are doing just that: marketing. If you are about to embark on a serious video project, buy or build a computer appropriate to the job, with multiple CPU cores, plenty of RAM, and a healthy video card.
3. Unfortunately, my tests with the free video card drivers available for ATI and Nvidia have not yet proven to be capable of the same performance as the proprietary drivers. Intel cards are nice in this way, being both open source and, depending on the chip, capable, but if you are doing serious compositing you will most likely require Nvidia or ATI. Hopefully the free drivers will be able to develop quickly so that they can be used for heavy lifting, or Nvidia or ATI will come to their senses and open source their drivers.
Once the picture is locked, or nearly locked, effects, composites, and titles can be worked on. While Kdenlive could do basic versions of all of these things, there are better tools in the GNU Linux world for the job. In fact, we have two excellent tools that, again, equal or rival the tools available in the proprietary world: Blender and Synfig Studio.
In the FX world, it is typical to work with image sequences rather than video. To export just a scene from your movie to deliver to the composite artist, you can utilize in and out points in the timeline just as you would in the clip monitor. It is common to deliver the scene to the FX artist with "handles", that is, a second or so of the shot leading into the FX shot and a few seconds of the shot following.
In the Render dialogue box, choose Lossless/HQ as your Destination, de-select the Export Audio option, and save the clip to some location. Then in a terminal convert that shot to a series of images with ffmpeg:
$ ffmpeg -i short_for_compositing.avi ./scene21_fx/sc21_%03d.tif
Note that the output target %03d.tif will provide three digit numeration for each image; ie, sc21_000.tif, sc21_001.tif, and so on. If you are for some reason exporting a shot longer than 40 seconds or so that requires compositing, then you'll want to make sure you have enough digits in your numbering scheme to preserve correct order of images.
Both Synfig and Blender will import such an image sequence, and export an image sequence that you can then re-import into Kdenlive.
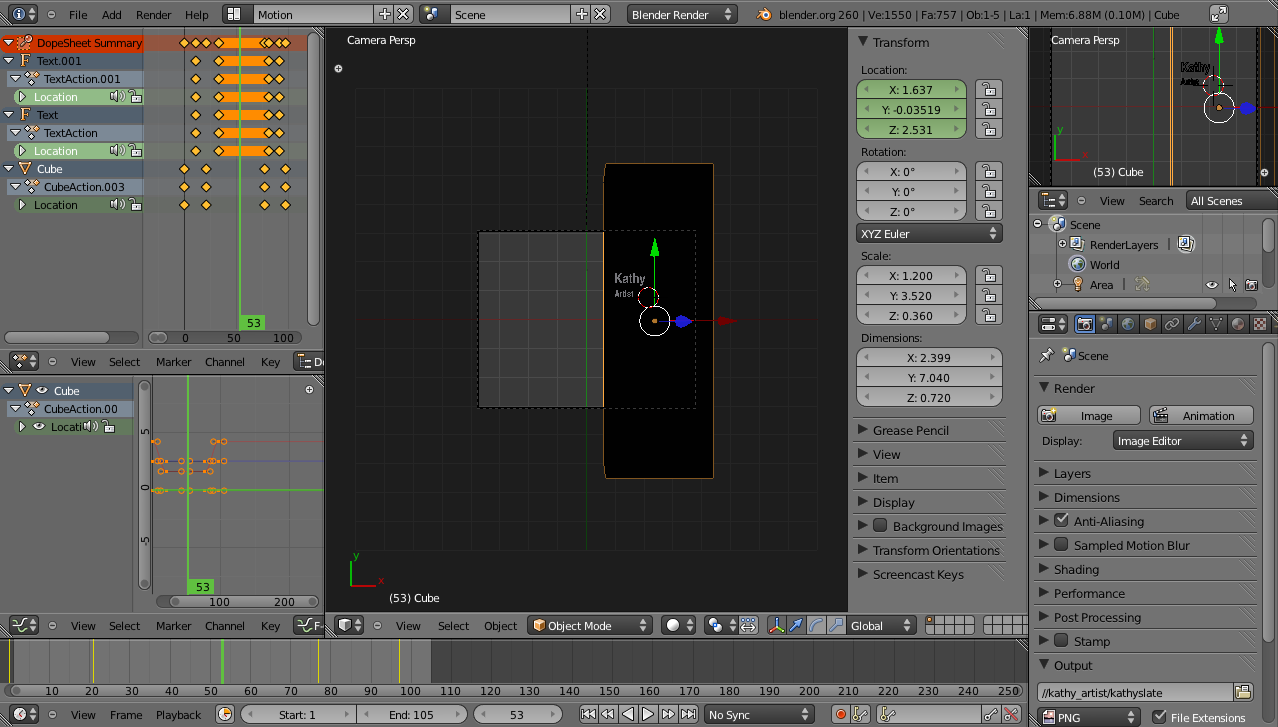
Titling can be done a few different ways; for animated title sequences, Blender or Synfig will probably be the best choice. If you are simply going to use static title cards then you can also design your titles in GIMP and import a single PNG or TIF image to your project. You might have to adjust for pixel aspect ratio (ie, design your titles in GIMP at 720x534 or so, such that when they import into 720x480 projects they will appear properly proportioned) but aside from that, it's straight-forward.
While compositing is under way, it is common for audio work to begin, since both processes rely on a locked picture. In the previous article, preparing for the audio mix was discussed in detail. Free software offers a number of excellent options for achieving a professional sound mix, whether you know just enough to use Audacity or prefer a full-featured digital audio workstation like Ardour or Qtractor. With over 100 plugins available from the LADSPA and Calf projects and a few others, you'll have everything you need and quite possibly a lot more than you'd normally have if you'd had to pay for all of those features
separately.
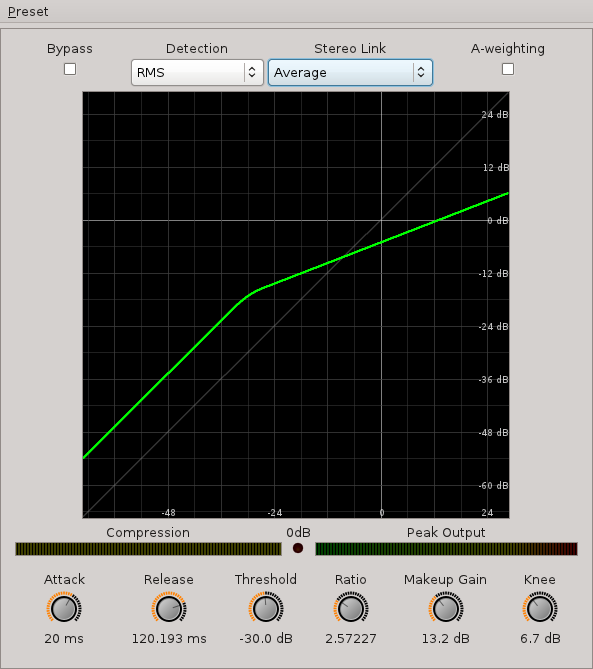
When the audio and composites are ready, they are re-imported into Kdenlive and integrated with the project. More than likely, a few last-minute revisions will be made by a picky director or the all-knowing producer (they are always all-knowing), but more or less the project is finished. Export it as a lossless Gold Master and compress for your targeted distribution.
Conclusion
GNU Linux has refined its multimedia capabilities to being both user-friendly, flexible, efficient, and stable. It is a realistic platform for post production and content delivery. It is also flexible enough to integrate into an existing non-Linux environment, with many tools such as Blender and Audacity and ffmpeg being completely cross-platform. Start converting your post production process today, and discover true independent filmmaking!




2 Comments