Editing in Kdenlive is done both in the monitors and in the timeline. Your initial cuts are made while reviewing your footage and placing clips into the timeline in the order that you want your movie to be seen. Once the initial cut is done, though, most of your time will be spent in the timeline.
It doesn't take long to get comfortable working in the timeline, but it does take a little bit of work to get efficient.
A note about keyboard shortcuts
First of all, the keyboard shortcuts in Kdenlive leave something to be desired. One of the best things you can do for yourself early on is go through the Settings > Configure Shortcuts... panel and come up with some shortcuts that don't require you to have an extra two fingers.
Typically in "pro" apps, the most common keyboard presses are single-key presses (since, presumably, they get used often and your other hand is busy with the mouse). Less common keyboard presses are two-key combinations, and very rare keyboard presses are more complex and less convenient. So choose some keyboard combinations that make sense for your workflow, and that make sense for when they will be used (for instance, don't require Shift-R to make a splice in an application designed to splice footage, nor Alt+Shift+= to add a clip to a selection).
If you are at a loss for ideas, my keyboard configuration is available for download from slackermedia.info/downloads/configs.tbz. It may be a good starting point for you.
Navigating the timeline
Most actions on the timeline apply to individual tracks. Only one track can be active at a time. You activate a track by either clicking on the empty space under the track title on the left, or by pressing the Up or Down arrow.
Once a track is active, that track takes priority for any operational (not navigational, though) key presses.
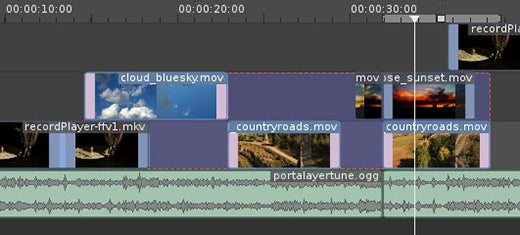
Moving horizontally along the timeline is accomplished with the Left and Right arrow keys:
- Single presses move left or right by one frame.
- Shift-Left and Shift-Right move left or right by one second.
- Alt-Left and Alt-Right takes the playhead to the next splice point on any track.
- Home and End move the playhead to the front or the end of the active clip.
Selecting clips
By default, pressing Alt++ (that's Alt+Shift+Plus) adds whatever clip is on the active track under the playhead to a selection (or starts a selection if one does not yet exist).
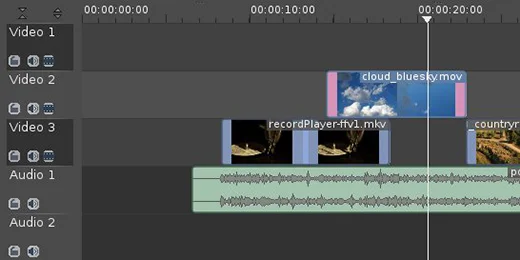
To add another clip to the selection, move your playhead to another clip and press Alt++. The clip must be on the active track, so you might have to move up or down a track with the arrow keys first. Due to the way that Kdenlive represents selections, it might appear to you that all clips between the selected clips have become part of the selection, but they have not; the only selected clips are those that you add.
This method of selection can be quick and efficient if you like keyboard navigation, as many editors do. You can do the same thing with the mouse and keyboard by clicking the first clip to select it and then Control-clicking the second clip.
As with most selections in any application, any action you perform to one also happens to the other. This means that with multiple clips selected you can move them, copy and paste them, delete them, and so on.
Playhead control
The playhead of your timeline, being you eyes and ears for your edit, is a very useful tool when making precision splices or edits.
You can yank the playhead to whatever your current mouse cursor position is by pressing P. It's a useful trick that can remarkably speed up navigation.
One unique characteristic about the Qt toolkit (the graphical programming framework that Kdenlive, Krita, Qtractor, and many other great applications are built upon) is that, by default, KDE windows allow you to grab onto them from any place within the window. This can be marvelously efficient with many—if not most—applications, but with multimedia applications that regularly require random clicks and drags it can be maddening to accidentally move your entire application window when all you meant to do is move your playhead.
Do yourself a favor now and turn this behavior off in System Settings > Application Appearance. In the Style category on the left, activate the Applications tab. Click the Configure button.
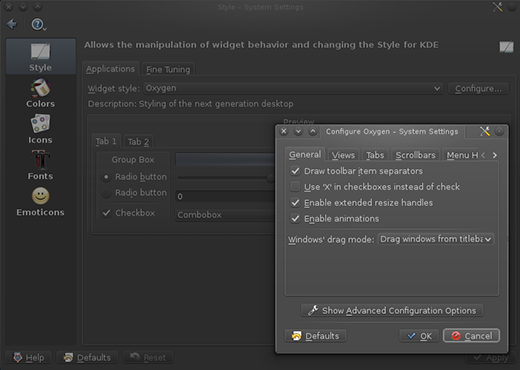
In the Configure window, activate the General tab and click the Show Advanced Configuration Options button.
Set Windows drag mode to Drag windows from titlebar only and click the OK button to apply.
Quick splicing
Now that your entire window won't move along with your playhead, you can start using the playhead as an editing cursor. For instance, if you position the playhead over a clip that you want to splice, and press P to bring your playhead to your current position, and then press Shift-R for "cut clip" (the Kdenlive developers mean "splice," not "cut to clipboard"), then the clip is spliced at the position of the playhead.
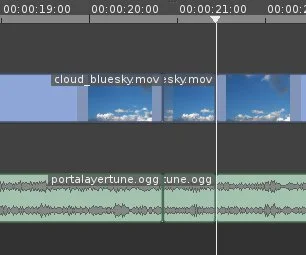
As usual with non-navigational actions, the splice (or "cut") affects the active clip. You can make a clip active by clicking on it, but if you prefer to stay on the keyboard, you can just arrow Up or Down to the appropriate track and make the clip active with Alt++ (or whatever, perhaps, more convenient key you decide in your own keyboard shortcut settings) and then splice.
Similar to the arbitrary quick splice are the quick edit shortcuts to adjust the in and out point of a clip. This is one of the greatest features of Kdenlive; it's one of those innovative shortcuts that makes editing in the timeline sublimely simple and no other NLE that I've used seems to have the exact same feature:
- Make a clip active with either the mouse or keyboard
- Place the playhead at the position in the timeline where you want the new edit point to be
- Press the 1 key on your keyboard to move the in point of the clip to the playhead, or the 2 key to move the out point to your playhead.
Preview renders
One of the most glaring weaknesses of Kdenlive is the inability to view video effects in real time, no matter what. To see the problem, select any clip in the timeline and apply a few effects; a blur, some colour correction, some distortion, and anything else you feel will make your computer work harder than it wants to. Then try to play your project.
What will happen is that all of your footage will play smoothly until the playhead reaches the effected clip.
As it currently stands, Kdenlive provides two options to deal with effects that your computer is unable to instantly render for you: either the playhead dwells on each frame as Kdenlive attempts to render the effect in the project monitor (turning each frame into seconds, rather than the expected action of playing 25 frames or so per second), or frames are dropped so that the playhead can keep moving (but then you don't get to see the effect, because it's skipped).
Neither of these options are sufficient for everyday use. You may as well have no effects if it means you can't edit. And indeed, that's one very pragmatic option: wait until the end of your edit to apply your effects. That's not as cheeky as it sounds; it's typical in an editing workflow not to apply effects until the cuts have been finalized, partly because you shouldn't be thinking about fancy effects until your story is solid, and partly because effects do take processing power no matter what.
The other option is temporary or preview render files. Some NLEs handle this invisibly for you, and while that sometimes works, it also, frankly, leads to file corruption more often than anyone would like to admit. Kdenlive doesn't bother handling temporary render previews, but you can do it manually. It's not so bad to do this because, as with any manual process, it heightens awareness of what exactly is happening and, being managed by you, becomes less prone to error and easier to debug should an error occur.
To implement preview renders for yourself, you need a standardized system. I'll give you mine; you're welcome to use it, or you can develop your own.
First, create a temporary render folder in your project tree.
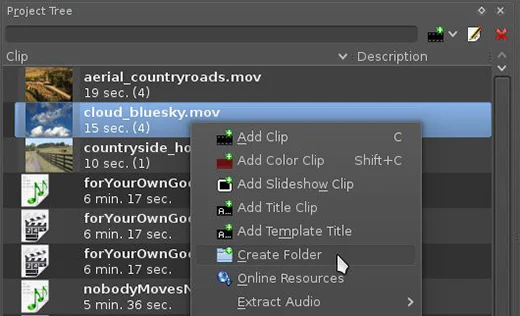
You'll also need a new video track. You should name it something that makes sense (like "rendertmp" or "rtmp"). To do this, use the Project menu > Tracks > Insert Track. Insert one video track before the topmost track in your timeline.
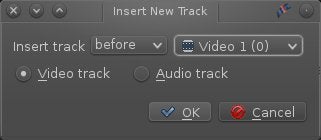
You only need to do those two steps once per project; once the folder and the track exists, you're ready to go.
When you find that a clip is not playing smoothly, but you need to see it play smoothly, mark its in and out points with the timeline selector (or "guides").
Your selection doesn't have to be exact; you can overshoot it if you want. It's pretty easy to be exact, though:
- Select the clip.
- Press the Home key to move your playhead to the beginning of the clip.
- Press i to mark in.
- Press o to mark out.
With your clip marked, press Ctrl + Return or click the Render button in the top toolbar. Click on the Selected Zone option at the bottom of the Render window, set your preferred codec (I use FFV1 as a good balance between native playback and file size), and then render the clip.
Of course you do not need to render the audio, and you can use multi-threading to speed the render along. I place the render file in the default project location of ~/kdenlive (which otherwise never gets directly used, as I maintain my own project files separately).
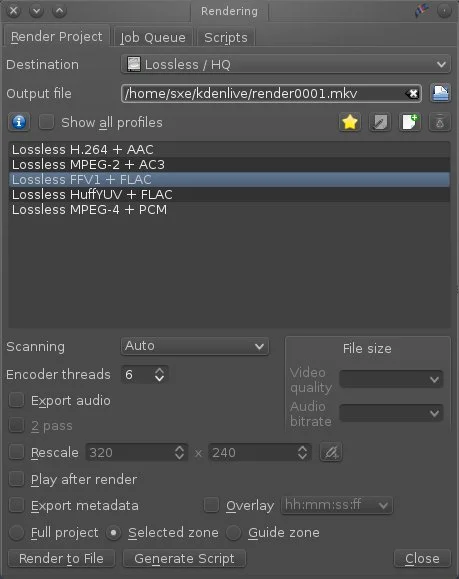
You can continue working while the file renders, so there's no need to get up and take a coffee break just yet (sorry!).
When the file has rendered, import the rendered clip into your rendertmp folder and drag it onto your rendertmp video track.
Now when you play through your project, the topmost track (your temporary render track) takes priority, and you get to see the effect(s) applied to your clips, smoothly and seamlessly. Should you need to adjust the effects, just hide the track and make your adjustments to the original clip.

After you make your adjustments, mark the clip again and render it back out, over-writing your previous temp render. Kdenlive will offer to remove the clip (which is being overwritten); you'll be tempted to refuse, and just hope that the render file reloads, but don't do it. For the same reason it's bad idea in other NLEs, it's a bad idea here; remove the clip, reimport it, and replace it on the timeline. Unhide the track, and you have your (new) preview back.
Kdenlive timeline editing
There are a few more tricks that you can do in the timeline, such as marking points in the timeline and marking and commenting on the clips themselves, inserting space, and removing space, but I'll leave that to your own exploration. There are also several functions that appear to be planned but not implemented, so if something you stumble across does not appear to work as you would expect, look it up online and make sure it's an actual feature that has been switched on.
Timeline editing in Kdenlive is easy and flexible, and it can be a powerful workflow once you're comfortable with it. Get some practice in while you can, and the next time you have a big and important project to splice together, you'll find yourself dancing across the keyboard and making edits like a pro.
Makers
This article is part of Seth Kenlon's Multimedia Makers column, where he shares tutorials and tips on creating multimedia with Linux and its vast creative toolkit. In partnership with slackermedia.info and gnuworldorder.info.





Comments are closed.